In this article
Everybody wants to know how to climb the 5.13a. The Boulder Problem gets the headlines, the Free Solo footage, the plywood replicas bolted to gym walls. But ask the climbers who actually got shut down on the Freerider what stopped them, and almost none of them say the 5.13a.
The number on the topo is rarely the thing that ends an attempt, and that gap between the legend and the reality is where this whole guide lives. Below is what the Freerider actually is, why its grade is a bit of a trick, the cruxes in the order you meet them, the rack you carry, the days you spend up there, the history, and an honest read on whether you’re ready for it.
What the Freerider Actually Is

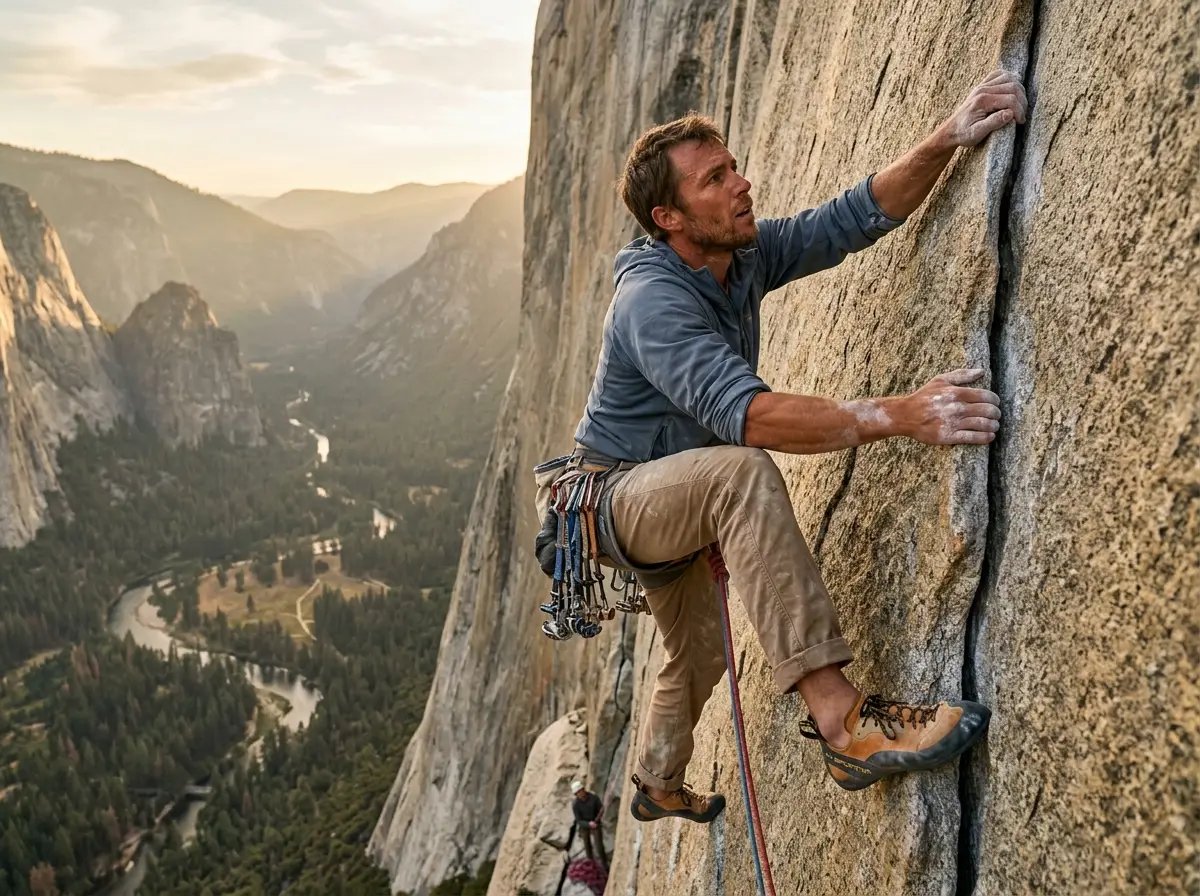
Before anyone tells you it’s hard, you should know what the line even is. The Freerider isn’t its own wall. It follows the Salathé Wall, the great 1961 aid line up the southwest face of El Capitan, then peels off onto free variations that dodge the original’s harder 5.13 pitches. Alexander Huber pieced the line together in the mid-1990s, and it has since become the most-traveled free route up the center of the biggest, most famous chunk of granite in the world, one of the most demanding lines on the most famous wall in the world.
The line, top to bottom
You’re looking at roughly 3,000 feet of climbing over about 30 to 33 pitches, depending on how you count and link them. It starts on the low-angle Freeblast slabs, works through a string of named features (the Hollow Flake, the Monster Offwidth, the headwall), and tops out on the summit slabs of El Cap. It traverses. It downclimbs. It is not a straight plumb line, and that matters for how you rope-manage and where you bivy.
The numbers that get quoted
The grade is VI 5.13a on the Yosemite Decimal System, or 5.12d if you take the Teflon Corner variation instead of the Boulder Problem. That Grade VI is a commitment grade, not a difficulty number: it means a long, serious route that takes most parties multiple days. People fixate on the 5.13a and ignore the VI, which is backwards. The hard moves are short. The commitment is the whole route.
What “easiest free route up El Cap” really means
You’ll see the Freerider called the easiest way to free climb El Capitan, and that phrase has talked more than a few people into trouble. Easiest here is relative to a set that includes some of the hardest big-wall free climbs anywhere. It is the most achievable, not the achievable one. The Freerider sits in a different universe from El Cap’s other classic, The Nose, which most parties climb with aid; freeing the center of this wall is a multi-year goal for strong climbers, not a fast-track tick.
Why the Grade Lies — Boulder Problem vs Teflon Corner
Here’s the part nobody explains clearly. The Freerider doesn’t have one crux you have to climb. It has two cruxes, and you pick which one you face. That’s the whole reason the grade reads “5.13a or 5.12d,” and it’s why the lower number is not the easier climb for everyone.
The Boulder Problem (5.13a)
The Boulder Problem is a short, crimpy face sequence capped by a committing sideways lunge off small holds, roughly V7 in boulder terms. Alexander Huber actually built this variation back in 1995 specifically to avoid the corner next door. Then a key hold broke off years later, and the sequence jumped from 5.12d to 5.13a. So the most famous move on the route, the one in the film, exists only because Huber wanted to dodge a different crux, and it’s harder now than when he first did it.
The Teflon Corner (5.12d)
The Teflon Corner is the alternative, and it’s exactly what it sounds like. Sustained, insecure stemming up a glassy, polished dihedral with no real holds, just opposing pressure and faith in your feet. The grade is lower on paper. It is not lower for a climber whose feet skate the second the rock gets slick. Power climbers loathe it. Slab and friction specialists float it.
Which one is “easier” for you
This is the call that should shape your whole season of preparation, and it comes down to style, not the number. If you’re a crimper who can pull hard for three moves, the Boulder Problem is your line. If you’re a quiet-feet smearing climber who trusts friction, the Teflon Corner will feel more secure even at the “harder” effort. Knowing roughly how 5.13a stacks up against the UIAA and French scales helps you calibrate, but the grade chart won’t tell you which crux suits you. Only honest self-assessment does.
| Crux | Grade | What it is | Who picks it |
|---|---|---|---|
| Boulder Problem | 5.13a | Short crimpy face into a sideways lunge (~V7) | Power and crimp climbers |
| Teflon Corner | 5.12d | Sustained, insecure stemming on glassy rock | Slab and friction climbers |
Decide your crux at home, not at the base of the headwall on day three. Train the Boulder Problem if you’re a crimper, train glassy stemming if you’re a smearer, and commit to that plan before your legs are wrecked and your judgment is shot.
Pitch by Pitch — Every Crux in Order
The names matter because you’ll hear them all over the topo and the trip reports, and from below they’re just mystery words. Here’s the route in the order you actually meet it, so the beta stops being a foreign language.
The Freeblast and the lower wall
You start on the Freeblast slabs, a long stretch of low-angle friction climbing that feels easy in the sun and turns treacherous when it’s cold or wet. This is the first place parties bail, often because the slab humbled them before the wall even got steep. The protection thins out here too, so a runout above your last piece is part of the deal. Slab climbing rewards patience and quiet feet, and it punishes anyone trying to muscle it.
The Hollow Flake, the downclimb, and the Monster’s door
Higher up you reach the Hollow Flake, which involves a committing downclimb to get into. Then comes the part the topo undersells: the move into the Monster Offwidth is guarded by a 5.11d downclimb that’s actually harder than the Hollow Flake downclimb. People train the up-moves and forget you have to climb down into some of this, and downclimbing at your limit feels far more sketch than climbing up. Solid all-around movement, including the liebacking and jamming that are the crack climbing skills you can’t fake here, is what keeps the lower wall from eating your day.
The headwall stack and the Round Table
Up top, the route saves its teeth. The Boulder Problem or the Teflon Corner comes first, then the Enduro Corner, a long dihedral where your forearms get pumped and stay that way, living up to its name. Past that you hit the Round Table traverse and, near the very top, the Scotty Burke offwidth, a short, awkward pitch with almost no published beta. You figure “Scotty B” out on lead, on the last day, when you’re more tired than you’ve ever been on a route. That’s not an accident of the topo; it’s the defining feature of how this climb is built.
The Real Filter Isn’t the 5.13a — It’s the Monster
If you remember one thing from this guide, make it this. The 5.13a is the hardest move. The Monster Offwidth is the pitch that sends the most aspirants home, and the two facts are not the same thing. This is where the legend and the reality split hardest.
200 feet of grovel nobody trains
The Monster is a roughly 200-foot wide crack, graded 5.11a/d, climbed left-side-in with your arms, knees, and hips jammed and thrashing. That 5.11 grade is the most honest-looking lie on the route. A 5.11 face pitch is a warm-up for a Freerider aspirant. Two hundred feet of offwidth is a different animal entirely, because almost nobody trains offwidth, and the technique is so specific that raw fitness doesn’t transfer.
It eats the biggest cam most people own and keeps widening near the top. Higher in the slot you’ll want a Black Diamond Camalot C4 #6, which is the piece the beta names again and again as the crack widens toward a #7. The lip pull near the top is the actual technical crux, but it’s short and, oddly, more secure than the grind below it.
The downclimb door and the Bermuda Dunes escape
Getting into the Monster means that 5.11d downclimb, which is its own small adventure. There’s a known workaround: the Bermuda Dunes traverse lets you cross over from below the Ear on a few 5.10 moves and a short 5.10 crack to reach the Monster’s true start, skipping the worst of the downclimb. It’s not cheating; it’s route knowledge, and on a multi-day push, saving your head and shoulders for the actual offwidth is smart.
Go find a 60-foot offwidth at your local crag and get thoroughly embarrassed before you ever book a flight. The Monster is the most common reason strong gym climbers don’t finish the Freerider, and there is no shortcut for time spent thrashing in a wide crack.
Why top-heavy difficulty wrecks strong climbers
Now stack the other half of the problem on top. The Freerider’s difficulty is top-heavy: the crux pitches sit past pitch 20. You don’t warm up into the hard climbing; you arrive at it already three days deep, dehydrated, with raw hands and a tired head. Fresh-legs redpoint logic, the way you’d send a single-pitch project, simply doesn’t apply. The strategic consequence is real: pace conservatively, choose your bivies so you reach the headwall as rested as the wall allows, and respect that the head game of grinding up something that won’t let you rest is half the battle this high. One climber dislocated a shoulder in the offwidth above El Cap Spire; the stories of people physically and mentally unraveling on the wide stuff are not rare.
The video below shows the scale and the grovel-and-thrash reality better than any topo can. Watch how much wall there is, and watch what the offwidth actually demands.
The Rack — What to Actually Carry
A Freerider trad rack is heavy, wide, and specific. The good news is the small-to-mid stuff is the same gear you already own for any trad climbing day. The part that catches people out is the wide end, the pieces most climbers have never bought.
Doubles to #3, then the wide stuff
The standard frame is doubles, sometimes triples, of cams from finger size up through hands, roughly the #0.3 to #3 range. Then you add the big pieces for the wide cracks and the offwidth approach. A Black Diamond Camalot C4 #4 is the widest “standard” cam most parties already double, and it covers the wide hands and fists below the truly big stuff. For the first genuinely large fissures, including the entry to the offwidth zone, the Black Diamond Camalot C4 #5 is the workhorse. Think of the rack as “doubles to #3, plus a #4, #5, and #6 for the wide sections,” not as buying every single size.
Filling the gaps with cams and nuts
The granite up here is full of pin scars and thin seams where a wide-range cam won’t sit right. A set of Metolius Master Cams earns its place with narrow heads that slot into placements a chunkier cam skates out of, and the Range Finder dots help a newer trad leader place with confidence. For the truly thin stuff where no cam fits, a set of brass micronuts like the DMM I.M.P. Brass Micronut Set is cheap, light insurance on the slabby seams where you won’t get bomber protection any other way. None of this is glamorous gear. All of it keeps you protected where the cams quit.
Shoes, slings, and managing the weight
Bring a stiff, comfortable shoe you can stand in all day on slab and edge in the corners, not your tightest sport slipper; the right crack shoe that won’t wreck your feet over a multi-day push matters more here than peak performance for ten minutes. A heavy, wide rack is also its own skill to carry, and learning to rack a big rack so you never fumble a lead saves you fumbling for the right cam mid-pitch when your forearms are cooked.
Rent or borrow the #5 and #6. Most parties don’t own the big pieces and have no reason to buy them for a single route. The Yosemite shops rent them, and a borrowed #6 climbs exactly as well as one you paid full price for.
Days on the Wall — Bivies, Water, and Hauling
Climbing the Freerider isn’t climbing a route so much as moving a small camp up a cliff for several days. The logistics are not an afterthought to the climbing; they are the climbing, as much as any single pitch.
The 3 to 5 day push and where you sleep
Most parties plan a 3 to 5 day ascent with bivies on ledges like Heart Ledge, El Cap Spire, and the Mammoth Terraces. You eat, sleep, and live up there, watching the valley shrink below you. How you ration those days ties straight back to the top-heavy problem: bivy ledge placement is a strategy decision, because where you sleep determines how fresh you are when you finally reach the headwall cruxes.
Hauling and fixing, the work of living up there
You’re not carrying all that water and food on your back. You haul it in a bag, and hauling, along with fixing lines on the lower pitches before the push, is real labor with its own gear and technique. A progress-capture pulley like the Petzl Pro Traxion is the standard tool for the job; it grabs the line so the bag doesn’t slide back down while you reset, and on a multi-day haul that efficiency adds up to hours and shoulders. Water is weight and weight is everything, so every liter you haul is a tradeoff against speed.
When to go, and the falcon closure
Spring and fall are prime, but the timing has a catch most newcomers don’t know about. Yosemite closes designated nesting cliffs, including parts of El Capitan, from March 1 to July 15 to protect peregrine falcons, so you should always check the current Yosemite raptor-nesting closures before you rack up. The reason the closures exist is a genuine conservation win worth knowing: climbers helped bring peregrine falcons back to El Capitan after they nearly vanished, and breeding pairs have rebounded since. You’ll also want a harness you can hang in comfortably for days, because a thin sport harness that’s fine for an hour becomes a real problem on a portaledge.
The History That Made It Famous
You can’t understand why the Freerider draws people without the story behind it, and the story has one distinction that matters more than all the rest for anyone planning to climb it.
The Huber brothers and the 1998 first free ascent
Alexander Huber found and worked the line in 1995, and in 1998 he and his brother Thomas Huber made the first free ascent, or FFA, redpointing the route in 15 hours and 25 minutes. The defining crux of the modern route, the Boulder Problem, was Alexander’s invention, built to sidestep the glassy Teflon Corner. For the full account, the American Alpine Club’s record of the Freerider’s first free ascent lays out how the line came together.
Honnold’s free solo, and why it’s not your climb
On June 3, 2017, Alex Honnold free-soloed the Freerider in 3 hours and 56 minutes, the first ropeless ascent of El Capitan, topping out onto a ledge he later described as about the size of a child’s bedroom. It became the film Free Solo, and it is the reason most people have heard of this route at all. But Honnold’s free solo was the opposite of reckless, the payoff of years of methodical rehearsal.
Here’s the distinction that matters: what Honnold did is not what you will do. He climbed ropeless, alone, after years of rehearsal, in under four hours. A normal strong party climbs roped, over 3 to 5 days, hauling bags, sleeping on ledges, running two-person systems. Conflating the two is the single most common mistake newcomers make about this route.
The wider legacy
The Freerider has been a proving ground for decades. Steph Davis became the first woman to free climb it in 2004, Pete Whittaker notched the first rope-soloed-in-a-day ascent, and climbers like Sasha DiGiulian have added their own ascents to the list. The wall’s free-climbing lineage runs deep, from Lynn Hill’s historic free ascent of The Nose to Tommy Caldwell and Kevin Jorgeson’s Dawn Wall to the steady stream of aspirants who show up every season to try the center of El Cap.
Are You Actually Ready for It?
Time for the honest part, the one the highlight reels skip. The Freerider is not a bucket-list tick for a strong gym climber. It’s a multi-year project for a competent trad and big-wall climber, and pretending otherwise is how people get hurt.
The prerequisite ladder
Before this route is realistic, you should be comfortable leading solid 5.12 trad, not just following it or hangdogging it. You need real multi-day big-wall experience, the kind where you’ve hauled, slept on a ledge, and managed systems with a partner for days. And you need refined technique across the board: slab friction, crack and jamming, chimney, and yes, offwidth. Each of those is a separate skill, and the Freerider tests all of them. And nobody onsights this route; it’s a redpoint you rehearse, fall on, and come back to.
Why your gym grade means nothing here
A gym 5.13 builds power and pulling endurance on positive holds. It builds almost none of what the Freerider demands. It doesn’t teach offwidth, slab friction, downclimbing, or the deep endurance to perform when you’re wrecked on day three. This is the clearest case of why your gym grade means nothing on real rock, and the Monster Offwidth is where that lesson gets delivered, usually at high volume.
Building up to it
The path to the Freerider runs through smaller objectives first. Stack committing multi-pitch and alpine-rock routes where you can build the systems, the head, and the wide-crack technique with lower stakes. A committing multi-pitch objective like the Owen-Spalding on the Grand Teton is the kind of stepping stone that earns you the experience the Freerider assumes you already have. And whatever you climb, keep the non-negotiables front and center: a real bail and contingency plan, awareness of loose rock, the Leave No Trace habits and Yosemite climber’s credo that keep the Valley open, and that falcon-closure check before you commit to a date.
Conclusion
Three things to carry away from all this. First, the grade is a choose-your-crux, not a difficulty ranking, so pick the Boulder Problem or the Teflon Corner by your style, not by the lower number. Second, the famous 5.13a is the hardest move, but the 5.11 Monster Offwidth and the top-heavy stacking of cruxes are what actually filter people out. Third, this is a long-term project for a well-rounded trad and big-wall climber, not a strength tick for a gym crusher.
So before you ever rack up for El Cap, go get humbled by a wide crack at your local crag, lead a committing multi-pitch on a route you can bail off cleanly, and build the boring skills the highlight reels never show. That’s the honest first step toward the Freerider.
Frequently Asked Questions
01How hard is the Freerider on El Capitan really?
It’s graded VI 5.13a, or 5.12d if you take the Teflon Corner instead of the Boulder Problem. But the single hardest move isn’t what stops most people. The 200-foot Monster Offwidth and the cruxes stacked past pitch 20 are the real filters.
02How many days does it take to climb the Freerider?
Most parties plan a 3 to 5 day push with bivies on ledges like Heart and El Cap Spire. Fast, experienced teams move quicker, and Alex Honnold free-soloed it in under four hours, but that’s not the roped reality for a normal party.
03What is the hardest pitch on the Freerider?
The single hardest move is the Boulder Problem at 5.13a. But the pitch that shuts down the most aspirants is the Monster Offwidth, a roughly 200-foot 5.11 that demands offwidth technique almost nobody trains, plus the sustained Enduro Corner higher up.
04What’s the difference between the Freerider and the Salathé Wall?
The Freerider follows the Salathé Wall but uses free variations, like the Boulder Problem and Teflon Corner, to avoid the harder 5.13 pitches of the original free Salathé. It’s considered the most achievable free line up the center of El Cap.
05Do you need a #6 cam for the Freerider?
Effectively yes. The Monster Offwidth takes a #6 Camalot and keeps widening toward #7 near the top. Most parties don’t own one, so renting or borrowing the big pieces is normal and expected, not a shortcut.
Safety Notice: Rock climbing and mountaineering are inherently high-risk
activities that can involve physical trauma or fatal incidents. The information on Rock Climbing Realms is for
educational and informational purposes only. Techniques and advice presented here are not a substitute
for professional, hands-on instruction. Conditions and risks vary by location. Always seek guidance
from a qualified instructor before attempting new techniques. By using this website, you agree that you
are solely responsible for your own safety. Any reliance you place on this information is strictly
at your own risk, and you assume all liability for your actions. Rock Climbing Realms and its authors
will not be held liable for any harm, damage, or loss sustained in connection with the use of this information.
Affiliate Disclosure: We are a participant in the Amazon Services LLC Associates Program, an
affiliate advertising program designed to provide a means for us to earn advertising fees by advertising and linking
to Amazon.com. As an Amazon Associate, we earn from qualifying purchases. We are also an official affiliate partner
of Black Diamond Equipment via the AvantLink network. If you click on a Black Diamond affiliate link and make a
purchase, we may earn a commission at no additional cost to you. We also participate in other affiliate programs.
Additional terms are found in the terms of service.