


In this article
You’re standing at your first outdoor top-rope anchor with two spare snapgates in your hand, a partner waiting sixty feet below, and no idea whether “good enough” is actually good enough. The gym never made you decide this.
Here’s the thing every guide teaches on day one: the list of places a locking carabiner is mandatory is short, it’s memorizable, and it barely changes between disciplines. Everywhere else, a non-locking carabiner is not the cheap option, it’s the correct one. This is the scenario-by-scenario breakdown of where a locker is non-negotiable, where it’s dead weight on your harness, and how many of each actually belong on your rack.
What Actually Makes a Carabiner “Locking”
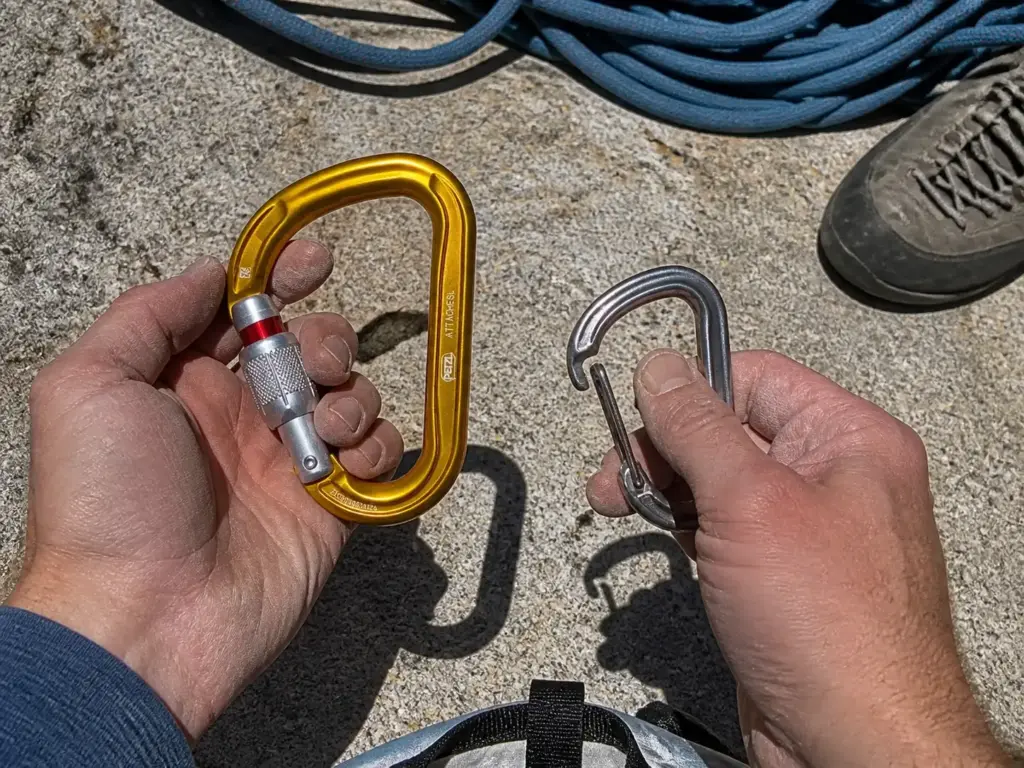
Every climber can point at a locker and a snapgate and tell you which is which. Far fewer can tell you what that sleeve is actually doing, which is exactly why so many people walk around trusting a screwgate that isn’t screwed. The distinction isn’t safe versus less safe. It’s how many deliberate motions stand between the gate and open.
A non-locking biner is one motion. Push, it opens, the spring closes it behind you. Straight gate, bent gate, wiregate, doesn’t matter, they all live in the same category because they all open with a single push. A locking biner adds a second mechanism you have to defeat separately: a threaded sleeve on a screwgate, or a spring-loaded sleeve that returns itself to locked on a twist-lock, tri-lock, ball-lock or magnetic gate.
What confuses people is the assumption that locking means stronger. It usually doesn’t. A quality snapgate and a quality locker are often rated identically on the axial load they’ll take along the major axis, and both have already cleared the same CE certification and UIAA certification floor.
Under the UIAA’s own connector safety standard (EN 12275), a certified connector has to hold at least 7 kN under open gate load, and self-closing gates need at least 5N of force to close a gap no wider than 3mm. The kilonewton figure stamped on the spine is the manufacturer beating that floor by a wide margin, not a marketing number. The locker’s advantage is narrower and more specific: it refuses to open when something rubs against it.
One more distinction worth making before we go further: a certified climbing connector is not the same object as the accessory carabiner clipped to your water bottle. A non-load-bearing carabiner carries no breaking strength rating at all and belongs nowhere in a climbing system. If there’s no kN figure stamped into the metal, it’s a keychain.
Two standards govern the real ones. EN 12275 covers carabiners for mountaineering, and EN 362 covers connectors used as personal protective equipment against falls. Most climbing biners are certified to the first, some rescue and work-at-height hardware to both.
So “locking” describes the gate mechanism. Nothing else. Not the shape, not the strength, not the job it’s built for.
Those are three separate decisions, and the rest of this article works through each of them. If you want the category from the ground up first, the full breakdown of carabiner shapes, gate types and kN ratings covers the hardware in detail.
The Seven Places a Locker Is Non-Negotiable
Here’s the list. Memorize these seven and you’ve solved most of what this article is about:
- Belay device attachment
- Rappel or abseil device
- Your own tie-in to the anchor, whether that’s a clove hitch or a personal anchor system
- The top-rope master point
- Any bail carabiner you leave behind
- HMS/Munter hitch belaying
- Glacier rope travel
Cross-competitor consensus, cross-discipline consensus, and it doesn’t drift much between guide services either. But a list you memorize without understanding is a list you’ll misapply the first time reality hands you something slightly different. So look at what these seven have in common: every one is a position where a single point is carrying you, or where you won’t be standing there watching it.
Belay and rappel deserve their own paragraph because the mechanism is so specific. The rope runs continuously across that carabiner, hour after hour, and that exact motion is what works an unlocked gate open. It isn’t a theoretical concern. It’s the most common rope-on-metal contact in all of climbing.
The device and the biner function as one unit, whether you’re running a tubular belay device or an assisted braking device like a GriGri, which is why how the belay device and the biner work as one system matters more than picking either piece in isolation. The same logic covers your personal tether, whether you tether in with a PAS or a daisy chain at the belay.
Bail biners get their own line for a different reason. You’re leaving it behind, nobody is checking it again, and the next party to come along runs their life through it with no idea who put it there. Climbers over-gear out of fear and under-gear out of laziness, and bail biners are the one place where the laziness costs somebody else.
Glacier travel is the outlier most people skip, and the reason it belongs isn’t that a crevasse fall is worse than a lead fall. It’s duration and repetition. You’re roped up for hours, clipping and unclipping through transitions, in cold that makes your hands stupid. That’s a lot of chances to leave something open.
A basic HMS screwgate covers most of this list on its own. The Black Diamond RockLock Screwgate Carabiner is the standard answer here, a hot-forged pear with a keylock nose and 24 kN on the major axis, big enough that a Munter and a belay device both have room to work.
Where Non-Locking Carabiners Are the Right Call
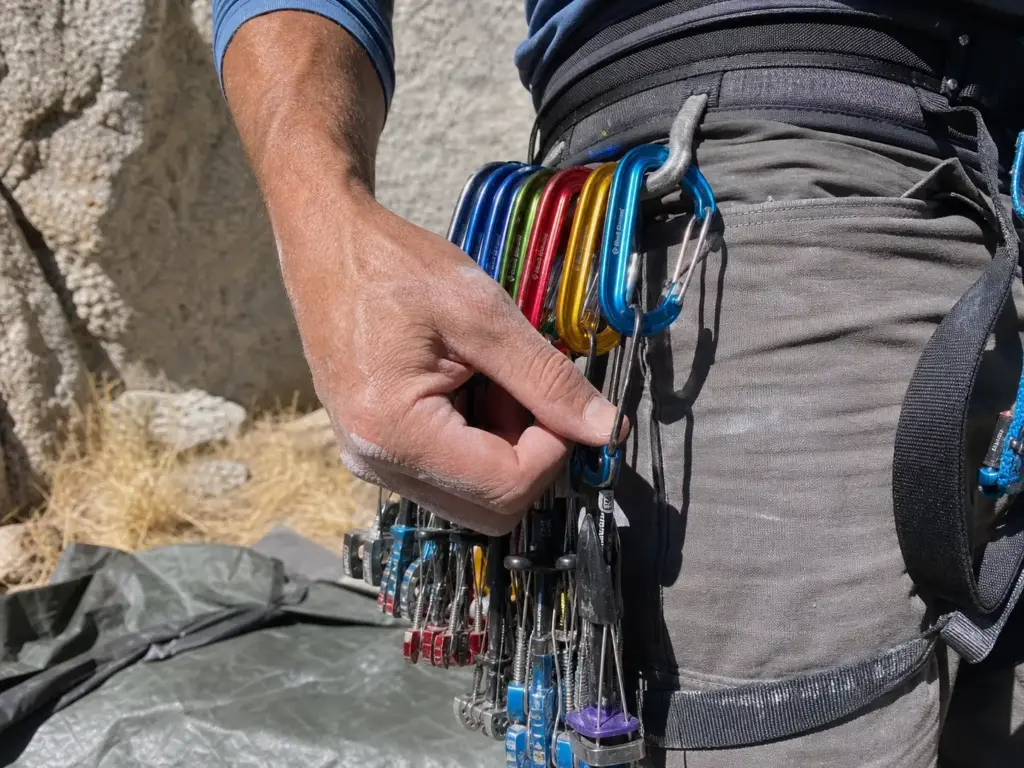
New climbers who take safety seriously tend to over-lock everything, and it makes them slower and heavier on exactly the routes where slow and heavy hurt most. Non-lockers aren’t the budget compromise. They’re the correct tool for a specific set of jobs, and using a locker there is a downgrade.
Quickdraws are the clearest case. Clipping speed under pump is a genuine safety factor, not a convenience one. A gate you have to thread while your forearms are shutting down is a worse system than one you can slap the rope into with two fingers and a prayer.
That’s the whole argument, and it holds all the way up the grades. If you’re at the stage of picking your first set of quickdraws, this is the spec that matters more than the color.
Then there’s weight. Twelve to sixteen draws’ worth of locking gates is real mass, and every gram of it sits on your harness for the entire pitch.
Racking gear is the same story from a different angle: when a biner is holding a cam or a nut on your gear loop, it’s a hanger, not a life-support connection. The placement is what’s holding you. The biner is just transportation.
Alpine draws follow quickdraw logic with a bonus, because the extension is doing the real work of solving rope drag. This is also where a specific mistake shows up: clipping the rope straight into a cam’s wiregate without an extension lets rope movement torque the biner sideways against the rock, which invites gate lash and cross-loading in the same motion. Extending placements with alpine draws fixes both problems with one piece of gear.
Inside the non-locking category, the wire gate carabiner versus the solid gate carabiner is worth understanding rather than guessing at. Wiregates resist ice and frost buildup, and they cut gate lash, the momentary whip-open of a gate during a hard fast fall, because a lighter gate has less mass to keep moving.
In cold conditions that’s a safety spec, not a weight gimmick, and it’s why ice climbing racks lean so heavily on them. A multi-pack is the sane way to buy them, and the Black Diamond MiniWire Rackpack (6-Pack) is about as plain and useful as this category gets.
If you find yourself putting a locker somewhere the seven-scenario list doesn’t name, stop and ask what failure you’re actually defending against. Half the time the honest answer is “none, it just felt safer,” and that instinct is what turns a clean rack into eight pounds of metal you’re dragging up a pitch.
Screwgate, Twist-Lock, Tri-Lock: What You’re Actually Buying
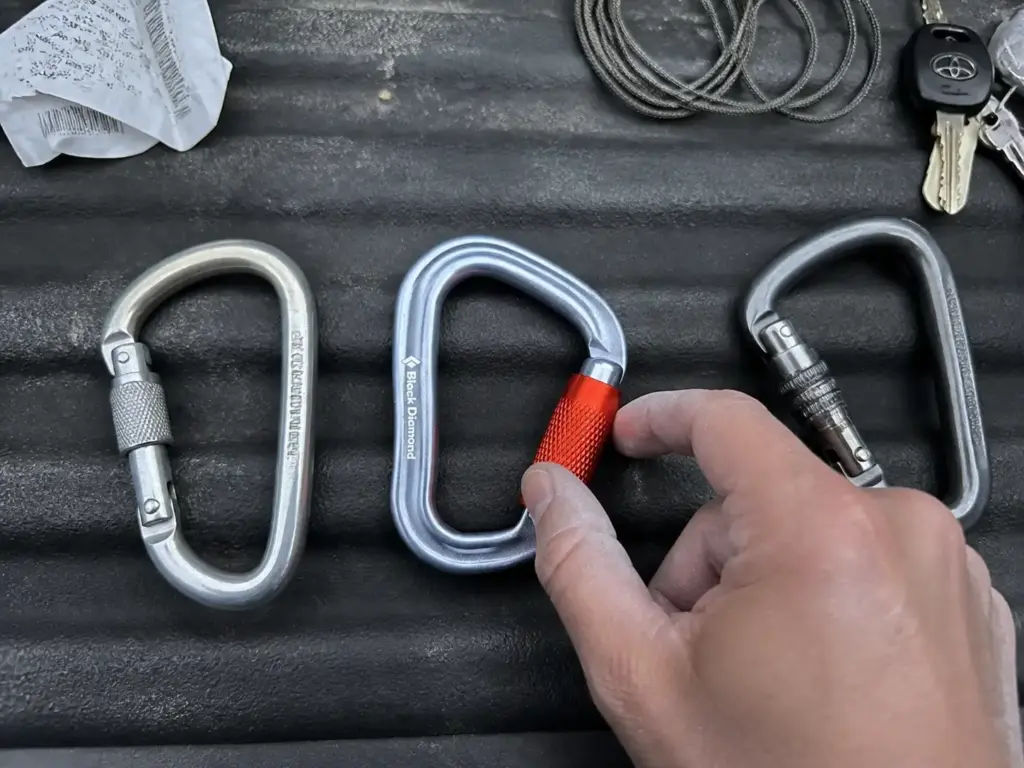
Gear shops present these as a ladder from basic to premium, which is a useful way to sell the expensive one and a bad way to understand them. They aren’t tiers of safety. They’re tiers of how much you don’t trust yourself to remember. Once you see it that way the decision gets a lot simpler.
Screwgate, Light and Simple and Entirely Dependent on You
A manual threaded sleeve, the fewest moving parts of any locking mechanism, the lightest, the cheapest, and by a good margin the easiest to work one-handed with gloves on or with hands too cold to feel much. There’s a reason it’s been the default for decades.
The tradeoff is absolute, though, and worth saying plainly: it does nothing at all unless you remember to thread it. It’s also the only mechanism vulnerable to the vibration creep covered further down, which is the failure mode most climbers have never had explained to them.
Twist-Lock and Tri-Lock, Where the Mechanism Remembers for You
Here a spring returns the sleeve to locked on its own the instant you let go. A twist lock carabiner takes two motions to open, tri-lock and ball-lock take three. You cannot leave one of these unlocked by forgetting, which is the entire point. Edelrid’s own breakdown of why auto-locking mechanisms exist is blunt about the design intent: these were built specifically to remove the human-memory failure mode from the equation.
You pay for that in weight, in more moving parts that gum up with grit and ice, and in genuine awkwardness one-handed until you’ve drilled it enough that your thumb knows the sequence.
Tri-lock and ball-lock are the most secure and the most annoying to operate. That’s not a flaw in the design. That’s the trade, stated honestly.
If you want one and you want it light, the Black Diamond VaporLock Twistlock HMS Carabiner is the full-function pear-shaped auto-locker that gives up the least mass for the mechanism.
Which one belongs on your harness
Repetitive, vibration-heavy, transition-heavy days are where auto-locking earns its weight. Glacier travel, long lowering sessions, a day of guiding where you’re clipping and unclipping forty times. Not because the mechanism is stronger, but because you physically cannot forget to re-lock it, and on hour six of that kind of day forgetting is a real possibility.
Everything else is a basic screwgate plus the orientation habit two sections down. Specialty lockers buy convenience and redundancy against your own attention. They don’t buy a categorically higher safety ceiling, and any shop employee who tells you otherwise is describing a price tag, not a physics problem.
Shape Decides the Job More Than the Lock Does
Climbers will spend two weeks agonizing over screwgate versus twist-lock and then buy entirely the wrong shape. A pear-shaped locker and a D-shaped locker do genuinely different work, and getting it backwards shows up immediately as a knot that won’t seat or a Munter that binds against the spine every time you feed. Matching shape and gate type to each specific climbing job is the decision people skip and then quietly regret at the anchor.
The HMS or pear-shaped carabiner has a wide top end, and that width is the whole feature. Knots and hitches need room to roll and reseat as they load, and a narrow biner strangles them. This is the belay, rappel and Munter shape, which is why climbers use “HMS” as shorthand for the profile itself. The name comes from Halbmastwurfsicherung, the German for the Munter belay, which tells you exactly what it was designed around.
The D-shaped carabiner and the asymmetric D carabiner work on different geometry. The shape pushes the load onto the spine, which is the strongest part of the biner, so you get more strength per gram than any other profile. That makes it the anchor building, quickdraw and PAS shape. The Petzl Am’D Screw-Lock Carabiner is the textbook version of this: asymmetric D, screw-lock, and it disappears into an anchor setup without complaint.
The oval carabiner is the specialist. Symmetrical through the bend at both ends, lower rated strength than a D, but it racks gear neatly and won’t shift or wander in a pulley or an aid climbing setup where you need things to stay exactly where you put them.
Where shape and lock intersect is the practical takeaway: an HMS screwgate is the single most useful locker on a beginner rack, because one biner covers belay, rappel and Munter duty instead of three.
And while you’re comparing, look at the nose. A hooked nose can snag a sling, a bolt hanger or a gear loop during a clip or a fall, where a keylock nose is smooth and simply won’t. Beginners never check this spec. Veterans never skip it.
Why a Screwgate You Locked Can Be Open an Hour Later
This is the section that changes behavior. Everybody has been told to lock their screwgate. Almost nobody has been told that a screwgate can work itself open while you’re using it exactly the way you were taught.
And the genuinely unsettling part isn’t the failure. It’s what the failure looks like: nothing. The biner still looks closed.
The creep, not the event
A rope running over or near the sleeve during belaying or a long lowering transmits a constant low-grade vibration into the metal. The sleeve backs off a little at a time. There’s no moment where it fails, no snap, no click. It’s a slow creep spread across a pitch, which is precisely why nobody catches it in the act.
Mammut’s technical guide to carabiner mechanisms documents the same gradual backing-off, and it’s the mechanism behind one of the most common stories in climbing: the long multi-pitch day where a screwgate that was definitely locked at the start of the pitch turns up half-unscrewed at the belay.
Why it goes unnoticed is worth sitting with. A sleeve that’s 80% unthreaded is visually identical to a locked one from arm’s length. Same silhouette, same color, same everything. There’s no click when it crosses the line from locked to not-locked, no indicator window, nothing your eye is going to snag on while you’re thinking about the next pitch.
Screw Down, the Orientation Habit
The fix costs nothing. Rack and clip your screwgates so gravity pulls the sleeve toward locked rather than away from it. That’s it, that’s the whole technique, and it cuts the risk substantially, which is why guides teach the phrase “screw down” to every client who’ll listen. Gravity works the full length of the pitch whether or not you’re paying attention.
Pair it with a glance-check and you’ve covered the rest. You’re already looking at the system at specific moments: the partner check, every transition, the second before you weight something. Add the sleeve to what your eyes pass over, since it takes no extra time when you’re already there.
And if the sleeve feels gritty rather than turning smooth, that’s its own signal. A sleeve that’s grinding instead of turning smoothly is both a symptom of neglect and a cause of the next problem, because a sticky sleeve is one you’ll under-thread without noticing. Proper gate closure depends on threads that actually turn.
When to let the mechanism handle it instead
Long glacier days, repeated lowers, guiding, anything with dozens of transitions stacked into one day. This is the precise case auto-locking mechanisms were built for, and it’s where the weight penalty is worth paying without argument. The failure mode you’re buying out of is your own attention on hour seven.
For a normal single-pitch day, though, a screwgate plus the screw-down habit is not a compromise and shouldn’t be sold to you as one. It’s the standard, it works, and it has worked for a very long time.
Don’t crank the sleeve down hard against the gate. A screwgate threaded with full force under a loaded biner can seize and become nearly impossible to open one-handed with cold fingers. Thread it until it stops, then back it off a quarter turn. Locked is locked; welded is a problem for later.
Cross-Loading, What It Looks Like and Why It Guts Your Margin
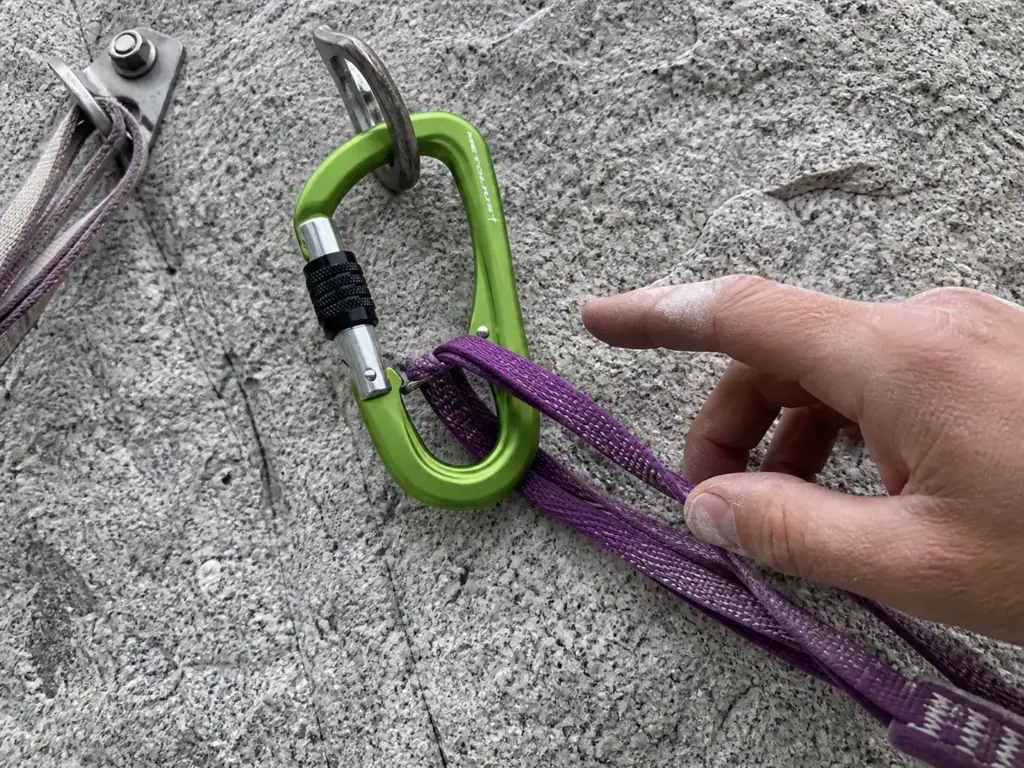
Cross-loading gets said like a word everyone already understands. Then you ask a climber to describe what it looks like at a master point and you get a feeling rather than a geometry. It’s a visible problem with a visible fix, and the numbers behind it are startling enough that they change how you look at an anchor.
The geometry
Normal loading runs along the major axis, spine to gate-end, which is the direction every carabiner on earth is designed and rated for. Cross loading turns the biner sideways so the load pulls gate-to-spine instead, across the short dimension. That sideways pull is what the rating charts call a transverse load, and it’s the one number nobody memorizes.
That’s the whole problem, and the reason the strength drop is so steep sits in one place: the gate hinge pin and the latch notch. Neither was ever engineered to carry tensile stress, because they exist to hold a gate shut, not to hold a climber.
So when the load comes across that axis, the failure point isn’t the thick spine of the aluminum carabiner you’re picturing. It’s a small pin and a notch doing a job they were never given.
The numbers that should worry you
A biner rated at 20 to 24 kN on the major axis drops to roughly 7 to 9 kN cross-loaded. Call it a third of what’s stamped on the spine. Off-axis loading tested against rated strength puts real numbers behind what most climbers treat as a vague warning.
Here’s the context that makes it land. Real climbing falls generate forces topping out somewhere around 9 kN. Not 24. Nine.
So the comfortable margin you assume you’re carrying, the one where the biner is rated at nearly three times the worst thing that can happen, is simply gone in the cross-loaded orientation. You’re operating at the ceiling instead of well under it. If the rating system itself is fuzzy to you, what those three kN numbers stamped on the spine actually mean is worth ten minutes before your next anchor.
How it happens, and the five-second check
The triggers are boring and common: a twisted anchor sling, a dogbone that’s rotated during the day, belaying from above without a dedicated anti-cross-load biner, or a master point that leaves enough slack for the carabiner to rotate into a tri-axial position while you’re not watching.
None of these are exotic scenarios. They’re Tuesday.
The check takes five seconds. Before you weight anything, eyeball the biner’s long axis against the direction of pull. If the spine-to-gate line isn’t roughly parallel to the load path, it’s mis-oriented, and you fix it right then.
The reason this matters is behavioral more than technical: climbers almost never glance at biner orientation after a fall, even though a twisted sling is completely obvious the moment somebody actually looks at it.
The hardware answer exists too, for the positions where you’d rather not rely on noticing. Captive-eye and anti-cross-load designs physically stop the rotation instead of asking your attention to catch it. The Metolius Gatekeeper Belay Carabiner is the straightforward version, a captive-eye HMS that keeps the belay loop where it belongs.
Worth reading alongside anchor setups that failed in ways nobody expected, because cross-loading is the textbook case of a system that looked completely fine right up until it wasn’t.
Two Non-Lockers Opposite and Opposed: The Real Rules
This is the technique that saves your day when you’re one locker short at an anchor. It’s also the technique people quietly get wrong by doing half of it and assuming that’s the whole thing. Two biners with both gates facing the same direction isn’t opposite and opposed. It’s two carabiners sharing one failure mode, stacked on top of each other, and the redundancy you think you bought is imaginary.
What “opposite and opposed” physically means
Two non-lockers clipped so the gates face opposite directions. One biner’s gate matched to the other’s spine, top matched to bottom. Say it out loud while you’re clipping if it helps, because the arrangement is easy to describe and surprisingly easy to botch when you’re tired.
The mechanics are what make it legitimate rather than a bodge. No single snag, rotation, or contact with rock can act on both gates at once, because anything with the geometry to push one gate open is simultaneously pushing the other one closed. That’s the entire principle, and it’s why the technique survives in guide curricula instead of being dismissed as a shortcut.
The half-error is the common one. Two biners, both gates facing out, clipped in thirty seconds because it looked redundant. A partner does this at an anchor, somebody notices, and it becomes a teaching moment rather than an incident. That’s the good version of finding out.
Where It’s Legitimate, and Where It Isn’t
Legitimate: top-rope master points and anchor backup positions. This is standard guide-industry instruction, taught deliberately, not a corner-cut that got grandfathered in. If you’re building the top-rope anchor this technique lives at, opposite and opposed belongs in your toolkit. It’s also been hashed out at length by climbers on Mountain Project who have flagged repeatedly about top-rope master points exactly where the boundary sits.
Not legitimate: your belay device, your rappel device, your personal tie-in. The technique plugs a gap at an anchor. It does not replace a locker on a life-support connection you’re actively operating with your hands.
The boundary exists for a mechanical reason, not a bureaucratic one. At an anchor the system is static and inspectable. You built it, you can see it, it isn’t moving. On a belay device the rope is running across the gates continuously, and continuous rope movement across a gate is exactly the load this technique doesn’t defend against.
Opposition protects against snags and rotation. It does nothing about a rope sawing at a gate for an hour. That distinction is what makes it a genuine redundant system at an anchor and a false one anywhere else. The same backup logic shows up in ice anchors and V-thread setups, where redundancy is built the same way for the same reasons.
How Many of Each You Actually Need
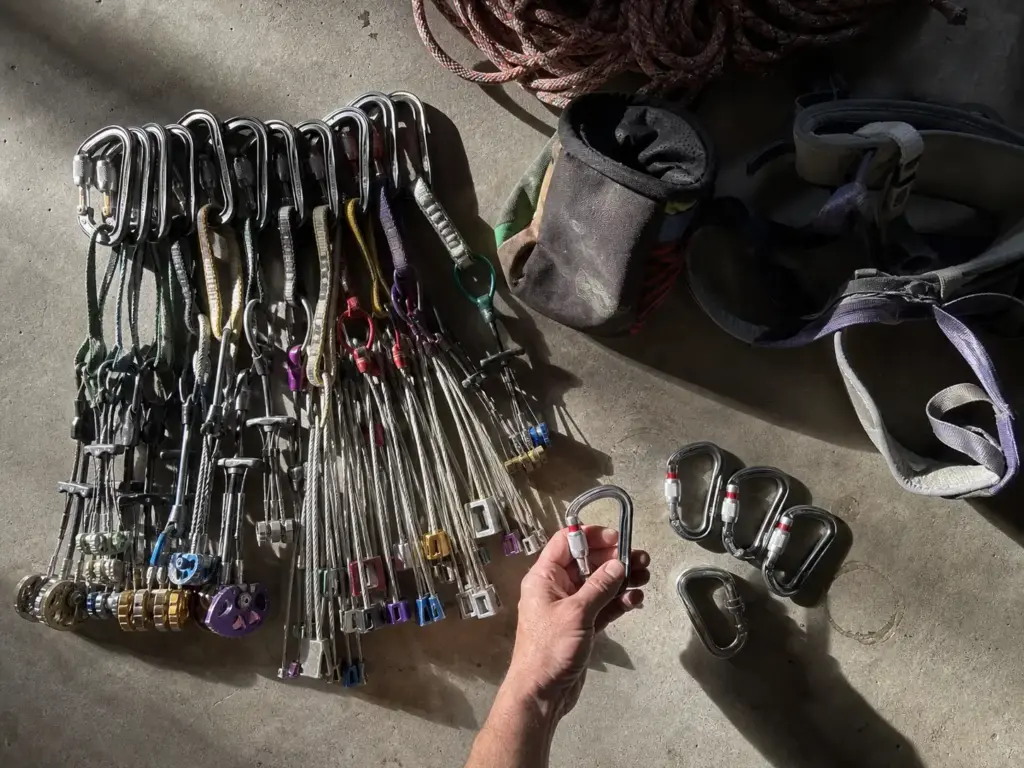
People walk into a gear shop having read six articles about locking mechanisms and still have no idea whether to buy three lockers or twelve. The answer isn’t a shopping list. It’s a ratio, and the ratio holds steady across almost every rack you’ll ever see hanging in a gear room.
The ratio that answers the question
A typical beginner trad rack runs roughly 15 to 20 non-locking carabiners against about 4 to 6 locking carabiners. Most of the non-lockers should be wiregates, for the weight savings across that many units and for cold-weather reliability.
Look at what those 4 to 6 lockers are actually doing: belay, rappel, personal tether, anchor master point, and one spare for whatever the day invents. That’s the complete list. The number stays small because the job list stays small, and it stays small even as the protection side of your rack grows into something expensive.
Sport-only setups need fewer of both, since a bolted route removes most of the gear you’d otherwise carry. Multi-pitch goes the other direction and adds lockers before it adds anything else.
A single well-chosen HMS screwgate like the Petzl Attache Screw-Lock Carabiner covers the belay slot, the rappel slot and the Munter backup slot without you buying three separate biners for three separate jobs.
What changes as you progress
Multi-pitch is the first real shift, and it’s a locker shift. Every belay transition is another locker scenario, so the count climbs, and shape starts mattering more than it did on the ground because you want an HMS up there for Munter backup when your device goes for a ride down the wall.
Ice and alpine pull the non-locking side hard toward wiregates, because frost in a solid gate is a real problem and a wire gate shrugs it off. Alpine also pushes you toward the auto-locking carabiner on the glacier-travel biner specifically, for the reasons the vibration section covered. If you’re heading that direction, glacier and snow anchor setups are the companion skill to the hardware. This is also where an ice screw clip starts appearing on the rack alongside everything else.
Aid and hauling add ovals and specialist shapes that never show up on a sport rack. That’s a real progression, but it’s also several seasons out for most climbers, and buying for it now is buying gear that sits in a bin. The same goes for the steel carabiner, which shows up in rigging and top-rope-anchor abrasion contexts but is far too heavy for anything you’re carrying up a route.
Buying it without buying twice
Buy your lockers as a small set of basic screwgates rather than acquiring one exotic mechanism at a time. A multi-pack of plain HMS screwgates hits the 4 to 6 count in a single purchase, at a per-unit cost that makes the specialty singles look silly. The Petzl William Screw-Lock Carabiner 3-Pack is the direct route: three large pear-shaped screwgates, one transaction, and you’re most of the way to a complete locker set.
Do the same on the non-locking side, where volume is the whole point and per-unit cost compounds fast across twenty biners. Build the first rack around the ratio, not around a list of models somebody recommended in a forum thread. Then work out organizing all of it on your gear loops so you’re not fumbling mid-lead, which is a skill of its own and the thing that actually makes a rack feel good to climb with.
Buy your lockers in one color and your racking biners in another, or at least keep the lockers visually distinct. When you’re reaching blind at a hanging belay with your face against the rock, “the red ones are the lockers” is a faster sort than reading shapes by feel.
The Specialty Lockers You Can Skip on Day One
Here’s the section nobody selling carabiners will write for you. Most of the buying guides ranking for this topic are published by gear brands, and none of them are going to tell you their specialty locker is optional. It usually is.
The blunt version: a basic HMS screwgate covers belay, rappel, Munter and anchor duty. That is very nearly everything a first rack asks a locker to do. Something like the Black Diamond HotForge Screwgate Carabiner is a hot-forged, keylock-nose, no-frills screwgate, and it does the job with no story attached to it.
What the upcharge buys is convenience and redundancy against human error. Not a higher safety ceiling. A tri-lock is not stronger than a screwgate, it’s harder to leave unlocked, which is a genuinely useful property and a completely different claim from “safer.” Once you internalize that distinction, gear-shop conversations get much shorter.
Two specialty pieces do earn their place, and both are situation-triggered rather than day-one purchases. Auto-locking makes sense for glacier travel and high-transition days, for the vibration reasons above. Anti-cross-load designs make sense if you regularly belay from above, for the geometry reasons above. Notice that both of those are answers to a specific problem you’ve encountered, not upgrades you buy in advance of maybe encountering it.
What can wait: the ball-lock carabiner, magnetic gates, and belay-master-style captive designs. These are all real products solving real problems. They’re just mostly not the problems a first-season climber has, and a rack full of them is a rack you assembled out of anxiety.
There’s a cost to over-specializing that nobody puts on the packaging, either. Every extra motion in a locking mechanism is a motion you have to perform correctly with cold hands, in the dark, or while a rope is loading.
The triple-lock carabiner is the clearest example. It’s the most secure mechanism you can buy and also the one beginners most often fumble, which means the biner spends a couple of seconds unlocked while somebody wrestles with it that a screwgate would have spent locked. Security on paper and security in practice diverge the moment a mechanism outruns the hands using it.
The same reasoning applies to spreading a small budget across too many models. Six different locking mechanisms on one rack means six different muscle memories, and under stress you’ll default to whichever one you’ve handled most. Four identical screwgates build one habit that works every time you reach for one. That consistency is a genuine safety property, and it’s the argument for buying a matched set that no gear brand has any reason to make.
If you want a rule for the shop, use this one: buy the mechanism that answers a problem you’ve already had.
Left something unlocked at a transition? That’s an auto-lock conversation. Watched a biner rotate sideways in a master point? That’s an anti-cross-load conversation.
Haven’t hit either yet? Then you’re buying insurance against a hypothetical, and that money buys more rack as plain screwgates and wiregates.
The honest counter-case deserves airtime, though. If you already know you’re forgetful under stress, if you’ve caught yourself walking away from a transition with something unlocked, then buying the mechanism that remembers for you is a completely legitimate call. Just make it deliberately, as an answer to a thing you know about yourself, rather than by default because it was the most expensive option on the wall. Whatever you end up with, checking gate play and wear before you trust any of it is the habit that keeps the whole rack honest.
Conclusion
Seven scenarios need a locker. Everything else on your rack doesn’t, and pretending otherwise makes you slower on exactly the terrain where speed is the safety factor.
The failure modes are the part nobody teaches. A screwgate creeping open under rope vibration while it still looks closed. A biner rotating into a cross-load that cuts its rated strength by two thirds. Both are visible if you look, and both take five seconds to check.
Build to the ratio, not to the catalog. Four to six basic screwgates, 15 to 20 non-lockers, and specialty mechanisms only when a specific situation walks up and asks for one.
Next time you’re at an anchor, before you weight it: check the sleeve is threaded and the biner’s long axis lines up with the pull. Two seconds, every single time, until your hands do it without being asked.
Frequently Asked Questions
01Are two non-locking carabiners as safe as one locking carabiner?
Two non-lockers set opposite and opposed are the accepted substitute at a top-rope master point, but only there. Both gates must face opposite directions, since same-facing gates share one failure mode. Never substitute them on a belay device, a rappel device, or your personal tie-in.
02Do you need locking carabiners for quickdraws?
No. Quickdraws use non-locking carabiners by design, because clipping speed under pump and weight across a full rack matter more than lock redundancy. The exception is a fixed draw at a permanent anchor, where a locker on the rope end is common.
03How often does a screwgate actually unscrew itself?
Often enough that guides teach an orientation habit for it. Rope movement across the sleeve transmits vibration that backs it off over a pitch, and a mostly-unscrewed sleeve looks identical to a locked one from a few feet away. Clip screwgates so gravity pulls the sleeve toward locked.
04What type of locking carabiner is best for belaying?
A pear-shaped HMS screwgate. The wide top end gives a belay device, a Munter hitch and the rope room to move without binding, and the screwgate mechanism is light and simple to operate one-handed. Anti-cross-load designs are worth considering if you regularly belay from above.
05How many locking carabiners do I need to start climbing?
Four to six for a first rack, against roughly 15 to 20 non-lockers. The lockers cover belay, rappel, personal tether, the anchor master point, and one spare. It is a short list, which is why the number stays small even as the rest of your rack grows.
Safety Notice: Rock climbing and mountaineering are inherently high-risk
activities that can involve physical trauma or fatal incidents. The information on Rock Climbing Realms is for
educational and informational purposes only. Techniques and advice presented here are not a substitute
for professional, hands-on instruction. Conditions and risks vary by location. Always seek guidance
from a qualified instructor before attempting new techniques. By using this website, you agree that you
are solely responsible for your own safety. Any reliance you place on this information is strictly
at your own risk, and you assume all liability for your actions. Rock Climbing Realms and its authors
will not be held liable for any harm, damage, or loss sustained in connection with the use of this information.
Affiliate Disclosure: We are a participant in the Amazon Services LLC Associates Program, an
affiliate advertising program designed to provide a means for us to earn advertising fees by advertising and linking
to Amazon.com. As an Amazon Associate, we earn from qualifying purchases. We are also an official affiliate partner
of Black Diamond Equipment via the AvantLink network. If you click on a Black Diamond affiliate link and make a
purchase, we may earn a commission at no additional cost to you. We also participate in other affiliate programs.
Additional terms are found in the terms of service.