

In this article
Welcome to the adventurous world of traditional (trad) climbing! This pursuit opens up a vast new realm of cliffs and experiences, but it also demands self-sufficiency, especially when it comes to placing your own protection. Assembling your first trad rack—the collection of gear you’ll rely on for safety—can feel like a monumental task, given the variety of equipment and the investment involved. This guide, a comprehensive trad climbing equipment guide of sorts, is designed to demystify the process, focusing on the essential trad gear and components you’ll need, how to prioritize your purchases strategically, and how to build a functional starter rack economically. We’ll explore the core gear, from passive protection like nuts to active cams, along with crucial connectors and personal equipment (like your harness, helmet, and shoes), ensuring you approach this fundamental aspect of trad-climbing with clarity and confidence. Understanding what to buy and when is key to a safe and efficient progression into this rewarding discipline. Let’s gear up for your trad climbing journey with these gear suggestions.
Understanding Trad Climbing Fundamentals and Your Rack’s Role
To effectively build your first trad rack: essential gear and what to prioritize, it’s helpful to first grasp what trad climbing entails and the critical function your gear serves. This section will define traditional climbing and explain why a well-chosen trad climbing rack is your primary safety system on routes lacking fixed bolts. We’ll also differentiate between the two main categories of protection: passive and active, which will set the stage for understanding each piece of gear you’ll select for your own rack.
What is Traditional Climbing?
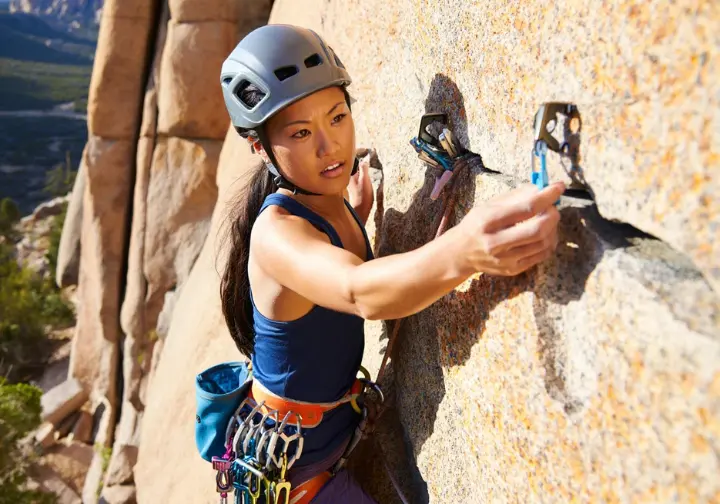
Traditional climbing is a discipline where the leader ascends rock faces by placing removable protection into natural rock features such as cracks, constrictions, or pockets. This gear, which forms the climber’s safety net, is then typically removed by the second climber (or follower). Unlike sport climbing, where bolts are pre-installed into the rock, trad climbing necessitates that the trad climber carries and skillfully places all protective equipment. This profound reliance on one’s own gear and judgment is a hallmark of the trad climbing experience, fostering a deep sense of self-sufficiency and adventure in trad climbing.
The “trad rack” itself is the specific assortment of equipment a climber carries to implement this protection. Its composition is not arbitrary; it’s a carefully considered selection vital for the safety and success of any trad climb. A well-chosen rack must be suitable for the anticipated rock type and features, be completely reliable, and be organized for efficient access and placement, especially when under duress on lead. For a deeper understanding of this climbing style, many resources are available, including those defining trad climbing style. The American Alpine Club also provides excellent information on trad climbing protection essentials.
The Significance of a Well-Chosen Rack
Your trad rack is more than just a collection of metal and fabric; it serves as your primary safety system on routes devoid of pre-installed bolts or anchors. The reliability of each piece and its placement directly translates to your safety margin. The gear must be appropriate for the specific rock formations and types of cracks you expect to encounter. Attempting a route with a mismatched rack, or not enough gear, can lead to insecure placements or an inability to adequately protect challenging sections, significantly increasing risk. Even with a small rack, careful choices are important.
Building this arsenal of protection, your proper gear rack, represents a substantial investment, not only in monetary terms but also in your ongoing safety and overall progression as a climber. Furthermore, the organization of your rack on your harness is crucial. Efficient racking allows for quick and easy access to the right piece of gear, a vital factor when in strenuous positions or when swift decisions are paramount. Understanding the gear needed for trad climbing is fundamental, as is appreciating the importance of a functional rack. Ultimately, the process of choosing appropriate gear for safety is a skill developed over time, informed by experience and knowledge of how different items work.
Passive vs. Active Protection: Core Concepts
Trad climbing protection is broadly categorized into passive and active types; a clear understanding of this distinction is vital for selecting the right pieces for your rack and for understanding active and passive protection. Passive protection, such as nuts (also known as stoppers or chocks) and hexcentrics, features no moving parts. These pieces of metalwork work by being wedged securely into constrictions or tapering sections of rock. Generally, passive pro is lighter and less expensive than its active counterpart, making it a cornerstone of a beginner’s first rack.
Active protection, on the other hand, primarily consists of cams, technically Spring-Loaded Camming Devices (SLCDs). These devices have moving parts—lobes that retract with a trigger and expand to press against the sides of a crack when the trigger is released. Cams are particularly effective in parallel-sided cracks where passive protection might not offer optimal security. Learning to effectively place both types of protection is a fundamental skill. Developing good “nutcraft”—the art of placing nuts—is especially important for building a solid foundation in trad climbing and efficiently utilizing your gear. You can learn more about understanding active rock climbing protection and the types of passive rock climbing protection from reputable outdoor retailers.
Building Your Essential Trad Rack: Passive Protection First

This section details the foundational passive protection pieces for a beginner’s trad rack. We emphasize these items because they are crucial for skill development and are generally more cost-effective than active protection. We will cover nuts/stoppers, hexcentrics, and briefly touch upon more specialized passive pro, focusing on “Essential Gear” as you begin “Building Your First Trad Rack“. For many, this is where starting to assemble their trad kit begins.
Nuts/Stoppers: Your First Line of Defense
Nuts, also commonly referred to as stoppers or chocks, are tapered metal wedges attached to a wire loop. They are designed to be lodged securely in tapering cracks or constrictions in the rock, becoming more secure when weighted, such as during a fall. These pieces form the bedrock of any traditional climbing rack and are often the first thing a new trad climber purchases. A standard beginner’s rack should typically include a full set of nuts, usually numbering 10 to 14 pieces, which will cover a range of sizes from approximately 0.25 to 1.25 inches. Well-regarded brands in this category include DMM Wallnuts, Black Diamond Stoppers, and Wild Country Rocks.
Many experienced climbers and guides recommend starting with nuts because they are less expensive than cams, exceptionally durable, and vital for developing good gear placement skills, often termed “nutcraft”. The tactile feedback received when placing nuts helps climbers learn to read the rock and understand the nuances of secure placements. Offset nuts, which feature tapers in two directions, are particularly valuable for flared cracks or old piton scars where standard nuts might offer less stability; DMM Alloy Offsets are a popular example of this type. Micro nuts, often crafted from softer metals like brass or copper, are designed for very thin cracks or old piton scars. However, many micro nuts are rated only for body weight and are typically considered later additions to a rack, unless they are essential for specific local climbing areas. For those choosing nuts stoppers and chocks, Black Diamond provides excellent guidance, and the DMM guide to nuts offers further insights.
Hexcentrics (Hexes): Budget Mid-Range Option
Hexcentrics, or more commonly “hexes,” are six-sided, asymmetrical metal tubes typically slung on wire or, less commonly, cord. They are designed to protect larger cracks that may be too wide for standard nuts but potentially smaller than the initial range of cams a beginner might acquire. A key feature of hexes is their versatility; they can be placed passively, much like a nut, in a constriction in the rock, or they can be “cammed” into parallel or slightly widening cracks due to their asymmetrical shape. This dual placement capability makes them unique among passive protection.
Historically, hexes were a mainstay of a climber’s rack. They are lighter and significantly cheaper than large cams, offering a budget-friendly method for protecting mid-to-large sized cracks. A few hexes in these larger sizes can effectively complement a starter rack, especially if budget is a primary concern. However, opinions on hexes vary among climbers. Some find them more difficult to place efficiently compared to cams and dislike the noise they can make when jangling on a harness (earning them the nickname “cowbells”). Others value their versatility, lightweight nature, and the security they offer in certain types of placements, such as in icy or wet cracks where cams might be less reliable. For beginners prioritizing their first purchases, hexes can bridge a gap if funds for larger cams are tight. Many climbers, however, may choose to skip them if their budget allows for a more comprehensive set of cams sooner. The utility of hexes often depends heavily on the types of rock and crack features prevalent in local climbing areas, for example, they might be more useful than small cams in certain specific conditions. For beginner trad rack advice and a general trad climbing equipment guide, several resources offer valuable perspectives.
Incorporating Active Protection: Cams as Workhorses
This section focuses on active protection, specifically Spring-Loaded Camming Devices (SLCDs), more commonly known as cams. We’ll delve into how they function, the key features to look for, popular brands, and how to prioritize them when building your starter rack. Understanding and selecting cams is a crucial part of “Building Your First Trad Rack” as they are considered “Essential Gear” for most modern climbers. The design of these devices is quite ingenious.
Cams (SLCDs): Understanding the Mechanics
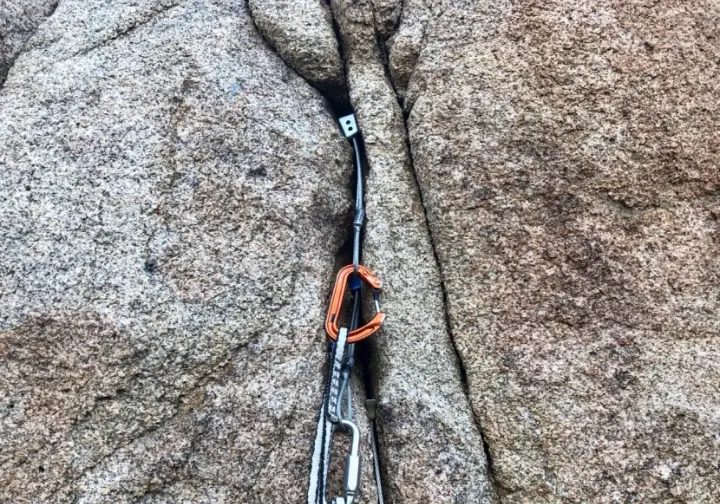
Cams are arguably the “meat-and-potatoes” of a modern trad rack. Climbers value them for their relative ease of placement, wide range of application, and reliability when placed correctly, particularly in features like parallel-sided cracks where passive protection may not be as effective. A cam consists of multiple (typically three or four) curved lobes that retract when a trigger mechanism is pulled. When the trigger is released, the spring-loaded lobes expand to make contact with the rock walls inside the crack. The way cams work is based on this expansion.
During a fall, the downward force exerted on the stem of the cam translates into outward pressure from the lobes against the rock. This outward pressure creates significant friction, which holds the cam securely in place. A standard starter rack usually includes a single set of cams covering common sizes, typically ranging from finger-width (around 0.3-0.4 inches) up to hand or fist-width (around 3 inches). These sizes are often color-coded (sometimes anodised in different colors by the manufacturer) for easy identification on your harness. Learning how to place trad gear correctly is paramount for safety, and understanding SLCDs for climbing is the first step.
Key Features: Lobes, Axles, Stems, and Head Width
Most modern cams feature four lobes, which provide good stability and holding power, though some smaller or specialized units may use three lobes to achieve a narrower head-width for tighter placements. A significant design variation is the axle configuration. Double-axle designs, famously used in Black Diamond Camalots, offer a larger expansion range per unit. This means that fewer cams might be needed to cover the same range of crack sizes, or they can provide more overlap between adjacent sizes, offering more placement options. Single-axle cams are also very common and remain highly effective.
Flexible stems are another crucial feature, allowing cams to seat properly in non-uniform or horizontal placements and helping to reduce “walking” – the undesirable movement of a cam due to rope drag after placement. The stem design is an important consideration. Narrower head widths can be advantageous for fitting into small cracks or shallow placements. While not typically first-rack items, offset cams, which have differently sized lobes on each side, are specialized for flared cracks or piton scars where standard cams would be less secure. Efficiently racking trad gear efficiently is a skill in itself, and a comprehensive guide to building first trad rack will often cover these features.
Popular Brands and Starter Cam Prioritization
When it comes to popular cam brands, Black Diamond (often referred to simply as Diamond by climbers) Camalot C4s are often considered classic workhorses, with their Z4s being excellent for smaller or offset placements, and Ultralights offering weight savings at a higher cost. Black Diamond cams are a very common first brand for many. Metolius Ultralight Master Cams are well-known for their narrow head width, making them suitable for tighter spots. DMM Dragon Cams feature extendable slings, which can help reduce rope drag without needing an extra quickdraw. Wild Country Friends hold historical significance as an original cam design; some might say the inventor of the modern cam concept has roots there. Totem Cams (often just called Totems) are highly regarded for their unique holding power and flexibility, particularly in unconventional placements, but they come with a premium price tag; Totem Basics are a good starting point to understand their range.
For beginners, the priority should be a single rack of cams in the most commonly encountered sizes. For instance, a selection covering Black Diamond sizes 0.3 or 0.4 up to #3 (or equivalent sizes in other brands) is a typical starting point. This range effectively protects a significant portion of cracks found on moderate trad routes. As climbers gain experience, they often find themselves needing doubles of mid-range sizes, such as Black Diamond 0.5 to #2, as these are frequently used for both protection and building gear anchors. One of the most valuable things a new trad climber can do is try different brands by climbing with experienced partners before making a significant investment; the “feel” of a cam, including its trigger action and flexibility, can be quite subjective. Many resources offer advice on choosing your first rock climbing trad rack and detail trad climbing gear essentials.
Tricams: Versatile and Budget-Friendly Options
Tricams, manufactured by CAMP (one of many manufacturers of climbing gear), are unique pieces of protection that offer a blend of passive and active functionality. They can be placed passively, much like a nut, by wedging them into a constriction. Alternatively, they can be used actively by “camming” the pointed tip and the rail against opposing walls of a crack. This dual nature makes them exceptionally versatile. Tricams particularly excel in horizontal cracks, solution pockets often found in limestone, and in icy or dirty cracks where standard cams might struggle to gain purchase or could be prone to slipping. The pink Tricam, one of the smaller sizes, has gained particular popularity and is often considered a secret weapon by many climbers.
From a budget perspective, Tricams are relatively inexpensive and lightweight when compared to cams that cover a similar size range. This makes them an attractive, budget-friendly option for expanding a rack‘s versatility. However, Tricams do have a learning curve; achieving secure placements and efficiently removing them requires practice and a good understanding of their mechanics. Opinions vary on their necessity for beginners; some climbers swear by them, while others find them fiddly or rarely use them. For a starter rack, Tricams are not usually a first-priority purchase unless local climbing areas have features where they are known to be particularly effective (like the aforementioned horizontals or pockets). They are more often a strategic addition made later as a climber gains experience and identifies specific needs. When considering what to buy for trad rack or looking at trad gear for different rock types, Tricams might be mentioned as a useful, though not always primary, component of your kit.
Essential Connectors and Extensions: Slings and Carabiners

This section will cover the critical roles of slings (often called runners) and carabiners (or biners) in a trad rack. These pieces of gear are the unsung heroes that connect your protection to your rope and help manage rope drag. We will discuss the different types, materials, and recommended quantities of these “Essential Gear” items for a beginner “Building Your First Trad Rack“. These are crucial tools for any trad climber.
Slings/Runners: Extending Placements & Building Anchors
Slings, also known as runners, are sewn loops of webbing that are indispensable in trad climbing. Their primary functions include extending pieces of protection to reduce rope drag, preventing placed gear from “walking” or moving out of position due to rope movement, and constructing anchors at belay stances. Effective and judicious use of slings significantly contributes to both safety and efficiency on a climb. Common lengths for slings include 60cm (approximately 24 inches), which are often used to create alpine draws (sometimes called trad quickdraws or trad draws); 120cm (approximately 48 inches), referred to as double-length slings, which are versatile for longer extensions or anchor building; and longer 180-240cm slings, useful for large natural features like trees or boulders, or for more complex anchor setups.
Slings are typically made from Nylon or Ultra-High-Molecular-Weight Polyethylene (UHMWPE), commonly known by brand names like Dyneema or Spectra. Nylon is generally more affordable, offers better abrasion resistance, has a higher melting point, and provides some dynamic elongation (stretch); it can be a bit more bulky nylon compared to Dyneema. UHMWPE slings are lighter, less bulky, and absorb less water, but they are more expensive, less resistant to abrasion, have a lower melting point, and are very static (offering little to no stretch). Many climbers opt to carry a mix of both materials to leverage their respective advantages. A starter rack should include approximately 6-12 alpine draws for trad climbing (a 60cm sling paired with two non-locking carabiners), which are prized for their versatility as they can be carried tripled for compactness or fully extended as needed. Additionally, having two to four double-length (120cm) slings, and often one or two even longer slings or a cordelette, is vital for building ERNEST/SERENE anchors, part of your anchor-building kit. When choosing climbing slings cord webbing, it’s wise to consult a comprehensive trad climbing gear checklist.
Cordelette: A Dedicated Anchor-Building Tool
A cordelette is a highly versatile and relatively inexpensive tool specifically dedicated to creating equalized anchors with a cordelette. It typically consists of an 18-22 foot (approximately 5-7 meter) length of 7mm or 8mm accessory cord, with nylon being a common material choice, tied into a continuous loop using a secure knot such as a double fisherman’s bend. The primary purpose of a cordelette is to connect multiple protection points (e.g., nuts, cams, or natural features) to create a single, unified, and equalized master point for an anchor. This is a fundamental piece of gear for multi-pitch trad.
The power of the cordelette lies in its ability to achieve effective load distribution across these anchor points. This equalization is crucial, especially when individual placements might have varying levels of security or are in different orientations. The standardized length of most cordelettes is designed to accommodate typical gear spacing and facilitate common equalization techniques effectively. Whether a climber chooses to carry a dedicated cordelette versus relying solely on longer slings for anchor building often comes down to personal preference regarding anchor construction techniques and the types of routes being climbed. Many climbers find the cordelette offers a straightforward and reliable method for building robust gear anchors. For those looking to delve deeper, resources on trad anchor building techniques and multi-pitch climbing anchor tips can be very informative.
Carabiners: Non-Locking and Locking Essentials
Carabiners are the critical metal links in your entire safety system, responsible for connecting your protection pieces to slings, slings to the rope, and climbers to anchors. A trad rack requires a significant number of carabiners—often 20-40 non-lockers and 4-10 lockers—which makes considering lightweight designs important to manage overall rack weight. Non-locking carabiners for racking gear are used extensively: one per cam for racking, often one or two for a set of nuts, and two per alpine draw. Wiregate non-lockers are generally preferred for trad climbing because they are lighter, less prone to “gate flutter” (a phenomenon where the gate can open and close rapidly during a fall), and less likely to freeze shut in cold conditions. Aim to start with around 20-30 non-locking carabiners. Color-coding carabiners to match cam colors is a popular organizational strategy. Keylock noses, which lack a notch that can snag on gear, are a desirable feature.
Locking carabiners for critical connections are absolutely essential for points in the system where failure is not an option: connecting your belay device to your harness, attaching your Personal Anchor System (PAS) to an anchor, and at anchor master points. A HMS carabiner is pear-shaped and ideal for use with a Munter hitch and for creating master points due to their wide basket, while D-shaped lockers offer a high strength-to-weight ratio. Screwgate lockers are common, reliable, and generally less expensive; auto-locking carabiners (such as twist-lock or tri-act/triple-action) offer an additional layer of security against accidental opening but can be pricier and heavier. A good starting point is to acquire 3-5 locking carabiners (sometimes called biners that lock). It’s a critical safety habit to always visually and physically check that lockers are actually locked after closing them. You can explore types of climbing carabiners and learn how to choose locking carabiners from various manufacturers and retailers.
The Indispensable Nut Tool
A nut tool (chock pick, nut key, or sometimes nutkey) is an absolutely essential piece of equipment for every trad climber. Its primary function is to help remove passive protection, such as nuts and hexes, that have become firmly wedged into cracks after being weighted, either by a fall or by the second climber. Beyond passive pro, a nut tool can also be invaluable for gently persuading stuck gear, including cams, to release, though care must be taken not to damage the cam. These tools are relatively inexpensive and typically feature a hooked or tapered end for manipulating wires and reaching into constrictions, and often a flat end that can be used for tapping pieces out.
Many climbers choose to leash their nut tool to their harness with a short piece of accessory cord or a dedicated tether to prevent the frustrating (and potentially dangerous) scenario of dropping it mid-route. Owning and using a nut tool is not just an economic consideration (it helps save the cost of lost gear), but also an environmental one, as it helps reduce the amount of abandoned gear left on cliffs. Learning to use a nut tool effectively without damaging the rock, the gear itself, or your knuckles is a skill that develops with experience and practice. Information on using a nut tool effectively and techniques for trad climbing protection retrieval can be found in various climbing resources.
Trad-Specific Personal Gear Considerations

While foundational personal climbing gear like your harness, helmet, shoes, and belay device are used across climbing disciplines, this section will highlight specific features and considerations that become particularly important for trad climbing. The demands of carrying a larger rack and often spending more time on routes, including multi-pitch adventures, mean that “Prioritizing” trad-specific aspects of this gear is key. This is your personal stuff, separate from the shared protection.
Harness: Comfort and Capacity for a Full Rack
When selecting a harness for trad climbing, a key difference from a typical sport climbing harness is the need for more gear loops—at least four, and often five or more, are preferable to organize a larger amount of protection effectively. A trad climbing harness with ample gear loops allows for better distribution and easier access to your cams, nuts, and slings. Poor organization of gear on your harness can waste valuable time and energy, especially when you’re in a challenging position on lead. Comfort is also paramount for trad climbing, as routes can be long, and you might spend extended periods at hanging belays. Therefore, ample padding and a supportive waist belt are crucial features to look for.
Adjustable leg loops can be beneficial, offering flexibility for different layering systems worn in varying weather conditions or allowing for a more customized and comfortable fit. Some harnesses also feature haul loops or dedicated ice clipper slots, which can be useful for more advanced trad or alpine objectives. Examples of harnesses well-suited for trad climbing include models like the Petzl harnesses for trad climbing such as the Aquila or Sitta (though Sitta is more alpine focused and minimalist), and the Black Diamond Big Gun or Solution Guide. For a segment of climbers, women-specific trad harness considerations are also important for optimal fit and comfort. When choosing a climbing harness for trad, pay attention to these features of a good trad harness.
Helmet: Essential Protection for Trad Environments
A helmet is an essential piece of safety equipment for all outdoor climbing, but its importance is significantly amplified in traditional climbing environments. This is due to the higher inherent risks of dislodged loose rock, which can be pulled off by the climber or the rope, and the potential for dropped gear from either the leader or the second. The importance of a helmet in trad climbing cannot be overstated. When selecting a helmet, ensure it meets recognized safety certifications, such as those from the UIAA (International Climbing and Mountaineering Federation) and/or CE (European Conformity). You can find more information on UIAA safety standards for helmets.
Beyond certifications, look for a helmet that provides a secure and comfortable fit, offers good ventilation to prevent overheating, and has a lightweight design to minimize neck strain during long days on the rock. Modern climbing helmets typically use EPS (Expanded Polystyrene) or EPP (Expanded Polypropylene) foam for impact absorption, often protected by a durable polycarbonate or ABS (Acrylonitrile Butadiene Styrene) shell. The choice between a more durable hardshell helmet (which might better withstand multiple smaller impacts and abrasion) and a lighter in-mold foam helmet (which is often lighter and better ventilated but may need replacement after a single significant impact) depends on personal preference and the type of climbing anticipated. Both types, however, must meet the required safety standards to offer all-around protection from modern climbing helmets.
Climbing Shoes: Comfort and Versatility for Longer Routes
The choice of climbing shoes for trad climbing generally prioritizes all-day comfort and versatility over the aggressively downturned, high-performance shoes often favored for steep sport climbing or bouldering. Since trad routes can involve many pitches and hours on the rock, a relatively flat or slightly asymmetric shoe that can be worn comfortably for extended periods is often preferred. These shoes should be suitable for a variety of movements, including crack climbing (where a flatter profile can be less painful in jams), smearing on slabs, and edging on small features. Understanding why specialized climbing shoes are needed for trad is a good start.
Stiffer shoes can provide better support for edging and help reduce foot fatigue on long pitches, which is a common scenario in trad climbing. While an extremely precise fit is always important, many trad climbers opt for a slightly more relaxed fit than they might use for single-pitch sport routes to ensure ensuring all-day comfort in trad shoes. Shoes like the La Sportiva TC Pro for trad climbing are iconic in the trad world for their excellent blend of comfort, crack climbing ability, and edging performance. Of course, other brands like Scarpa also offer finding versatile Scarpa shoes for trad that can be excellent choices. When choosing climbing shoes for trad, consider comfortable climbing shoes for multi-pitch.
Belay Device: Guide Mode for Multi-Pitch Efficiency
For trad climbing, particularly when venturing onto multi-pitch routes, a belay device equipped with a “guide mode” (also known as auto-blocking mode) is highly recommended. This feature allows the leader, once securely anchored at a belay station, to belay the second climber directly from the anchor. This transfers the load of the second climber (and any potential falls they might take) to the anchor itself, rather than to the belayer’s harness. Using a belay device with guide mode for multi-pitch trad is not only safer in many situations but also significantly more comfortable for the belayer, especially at hanging belays, and it facilitates smoother rope management. Popular and reliable guide mode devices include the Petzl Reverso, the Black Diamond ATC Guide, and the DMM Pivot. This device is a key piece of metal gear.
Tubular (or “tube-style”) belay devices are often favored over many types of assisted braking devices (ABDs) for trad climbing. This preference stems from several factors: they generally provide a more dynamic belay (which can be gentler on gear placements in the event of a leader fall), they typically handle two ropes more effectively (half and twin rope techniques are common in trad and alpine climbing), and they are often simpler, lighter, and less prone to malfunction in adverse conditions. Some ABDs are designed primarily for single ropes and may not be as versatile or suitable for all trad climbing scenarios, especially those involving two-rope systems. Of course, mastering safe belaying techniques for trad climbing is crucial regardless of the device chosen. Petzl offers information on guide mode belay devices explained.
Prioritizing Your Purchases: Building Your Rack Strategically and Economically
This section will guide beginners on how to strategically prioritize their trad rack purchases, starting with essential items and then expanding as experience and needs dictate. We will also cover important budget considerations and how the characteristics of your local climbing areas should influence your choices. This directly addresses how to “Prioritize Your Essential Gear” for “Building Your First Trad Rack,” with a keen eye on “budget” aspects. Making the right first purchases for your first gear is important.
Phase 1: The Absolute Essentials (What to Buy First)
The initial focus when building your first trad rack should be on acquiring a foundational, versatile set of protection that offers the most utility for learning and for typical beginner to intermediate routes. Almost universally, a full set of standard nuts (e.g., sizes #4-13 or #1-11 depending on the brand) is the first protection purchase recommended. This is due to their cost-effectiveness, durability, and the crucial skill-building they foster in learning to “read” and protect rock features. Next, add a small selection of versatile, mid-range cams as part of your starter kit. Three to five camming units covering sizes equivalent to Black Diamond 0.4/0.5 up to #2/#3 will allow you to protect a wide variety of common crack sizes encountered on moderate routes. This initial collection is more than just shiny gear; it’s your lifeline. Your personal stuff like shoes, harness, helmet, belay device, a HMS, nutkey and perhaps a 120cm sling should already be sorted.
To connect your protection to your rope and manage rope drag, include 6-8 alpine draws, which consist of a 60cm sling paired with two non-locking carabiners each. You’ll also need 3-5 locking carabiners for critical connections like belaying and anchor building. And, from day one, an essential nut tool is required for retrieving your passive protection. If multi-pitch climbing is an immediate goal, a cordelette or one to two double-length (120cm) slings are necessary for building robust anchors. Finally, ensure your personal gear—harness, helmet, shoes, and a belay device suitable for trad—is appropriate for the task at hand. This selection forms the foundational gear for beginner climbers transitioning to trad. Many resources offer guidance on beginner trad rack essentials and outline what to buy first trad rack.
Phase 2: Expanding Your Capabilities (What to Buy Next)
Once you’ve gained experience with your foundational rack and have a better understanding of your climbing style and the types of routes you frequent, it’s time to expand your capabilities. A common and highly practical next step is doubling up on your most-used mid-range cam sizes, such as those equivalent to Black Diamond 0.5, 0.75, #1, and #2. These sizes are frequently employed for both protection placements and for building robust gear anchors, so having duplicates (a double rack of these sizes) can be invaluable. If you find yourself climbing routes with consistently thin cracks, adding smaller cams (e.g., Black Diamond Z4s in sizes 0, 0.1, 0.2, or similarly small Metolius Master Cams) will become a priority.
You might also consider specialized nuts, such as offset nuts, which excel in flared cracks or old piton scars where standard nuts might not seat securely. Micro nuts, typically made of brass or copper, are for very thin placements; however, many are rated for bodyweight only or serve as psychological protection and are often later additions unless specifically required by your local climbing areas. Increasing your number of alpine draws and adding more double-length (120cm) or even longer slings will be beneficial for managing rope drag on wandering routes or for building more complex anchors. If your climbing ambitions lead you to wider cracks (off-hands to offwidths), cams larger than a Black Diamond #3 (e.g., #4, #5, #6) will be needed. These are expensive and heavy, so only purchase them if your chosen routes genuinely warrant them; this is when your rack tend to get heavy. If Tricams or hexes were not part of your initial rack, this is a good time to consider adding a few select sizes for their unique benefits. When expanding your trad rack, or looking for adding specialized trad gear, various resources can offer further guidance on building out your whole rack.
Budget Considerations: Getting the Most for Your Money
Building a trad rack involves a significant financial outlay, often ranging from $500 to $1500 or even more, with cams typically being the most expensive individual components. It’s wise to prioritize the Phase 1 essentials we discussed earlier. Since nuts are considerably cheaper than cams, starting with a full set of nuts and a few key, versatile cams is a budget-friendly approach to getting started when buying cams and nuts. One of the best strategies is to buy your gear in phases, incrementally expanding your rack as your skills develop and your specific need become clearer. There’s no need to feel pressured into buying everything at once. Keep an eye out for sales, end-of-season deals, and potential “trad rack packages” or bundles offered by retailers, which can sometimes provide discounts.
Considering used hard gear like cams, nuts, and carabiners from gear exchange sites or peers can be a way to save money, but caution is paramount. If you go this route, meticulously inspect cams for smooth trigger action, unfrayed wires, unbent stems, and undamaged lobes with even wear. Check nuts for intact wires and carabiners for snappy gates and no deep grooves or significant wear. Always try to buy from trusted sources like experienced climbers you know. Buying used soft gear (the fabric parts like slings, harnesses, ropes) is generally riskier due to the difficulty in assessing their history (exposure to UV radiation, chemicals, unknown fall loads) and age-related degradation, which isn’t always visible. If you do consider used soft gear, verify their age (manufacture date is usually on a tag), inspect them with extreme care, and buy only from a highly trustworthy source; however, new ropes and harnesses are often recommended for beginners for peace of mind. Another option is to share gear with trusted partners by coordinating purchases to reduce individual costs, but ensure you have clear agreements on ownership and responsibility. You can also convert sport climbing quickdraw carabiners into alpine draws by purchasing new 60cm slings, which can be a cost-effective upgrade. For those exploring this, Climbing Magazine offers tips on buying used climbing gear safely. There are also online discussions regarding budget trad rack building (though forum advice should be weighed carefully when assessing old gear).
Influence of Local Climbing Areas (Rock Type, Crack Sizes)
The specific characteristics of your primary climbing area—its rock type and the typical crack systems found there—should significantly influence your initial gear choices and subsequent rack expansion. For example, granite areas like Yosemite often feature many parallel-sided cracks where cams excel, and the gear needs for Yosemite granite may also include a good selection of offset nuts or cams due to the prevalence of pin scars and subtly flaring placements. Some areas, like the Gunks, have their own unique features that might influence your gear selection. Sandstone, on the other hand, can be softer and its features can vary widely. The famous Indian Creek rack is known for its remarkably uniform splitter cracks, often requiring many cams of the exact same size, while Southeastern sandstone might feature more horizontal breaks and pockets where Tricams can be particularly useful. Thinking about sandstone climbing gear for Red Rocks would involve similar considerations for that specific type of sandstone.
Limestone is highly variable, presenting everything from pockets and solution holes to irregular, flaring cracks where a diverse array of nuts, offsets, and Tricams can prove invaluable. Other rock types, such as basalt or quartzite, will have their own unique characteristics that influence the most effective types of protection. How do you determine what’s best for your area to make sure you have the right gear? Research local climbing guidebooks, as they often provide specific rack recommendations for crags or even individual routes. Talk to experienced local climbers and observe what gear you and your partners tend to use most frequently and effectively. If local cracks are predominantly thin and parallel, smaller cams and offset nuts will likely be a higher priority than very large cams. Conversely, if wide cracks are a common feature, then larger cams will become essential sooner in your trad climbing progression. Considering gear for varied rock types in Peru illustrates how a rack might adapt to different geological settings. You can often find information on gear for granite climbing through resources like the National Park Service for specific areas, or general advice on building a rack for sandstone cracks from climbing community platforms. The ideal rack varies by location.
Learning with a Partner/Mentor: Sharing Knowledge and Load
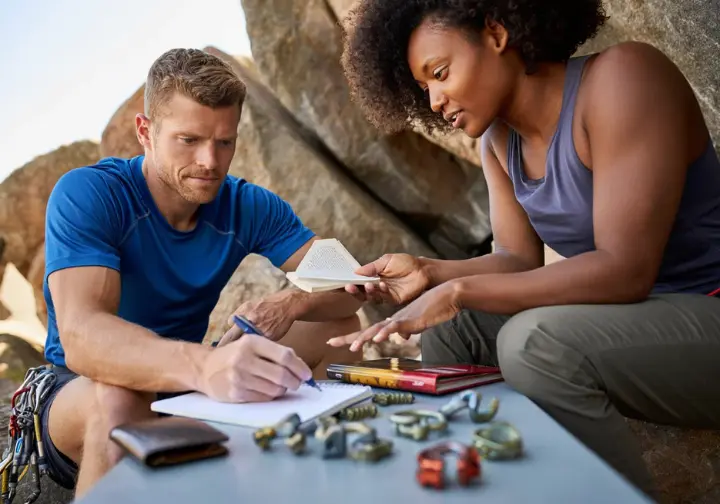
Learning to trad climb is ideally undertaken with an experienced mentor or a certified climbing instructor. This approach offers numerous benefits, one of which is often access to a more complete rack of gear from the outset. This allows you to learn with a diverse range of protection pieces without the immediate financial pressure of purchasing everything yourself. You get the invaluable opportunity to “try before you buy,” handling various brands and types of gear, such as different models of cams, to develop personal preferences for things like trigger action, flexibility, and overall feel before investing your own money. This is key to developing your trad-climbing skills.
Initially, you can supplement your partner’s or mentor’s rack with a few key pieces of your own, such as a set of nuts or a few essential cams. As you build your own rack over time, you can then combine your gear with your partner’s for more complex routes or longer adventures, which is a common and practical approach in the climbing community. Perhaps most importantly, a mentor provides direct, personalized feedback on your gear placements, anchors, and overall technique, which significantly accelerates the learning process and reinforces crucial safety habits. The focus for your initial purchases should be on personal safety gear (helmet, harness, appropriate belay device, shoes), and then gradually building your protection rack (starting with nuts and then essential cams), guided by your mentor’s advice based on your progress and local climbing areas. The importance of professional instruction for trad climbing cannot be overstated. You can often finding a climbing mentor through organizations like the AMGA, and explore the benefits of guided trad climbing instruction through local guide services. You might even find someone willing to let you try their Totem cams or other specialized gear.
Advanced Considerations, Gear Maintenance, and Safety
Beyond assembling your initial rack, there are advanced considerations for future expansion, the critical importance of gear maintenance for longevity and safety, and understanding safety certifications. This section touches on “Prioritizing” future gear and the long-term aspects of “Building Your First Trad Rack,” ensuring your equipment serves you well for many adventures to come. This includes considerations for a big wall rack or even specialized winter racks if your ambitions head that way.
Specialized Gear for Future Expansion
As your trad climbing skills progress and you begin to tackle more challenging and varied routes, you may find the need for more specialized pieces of gear. Offset cams, for example, which have differently sized lobes on each side, become invaluable for protecting non-uniform or flared cracks and old piton scars. These are particularly useful in areas with complex granite formations, such as when offset cams for Yosemite climbing. Similarly, micro nuts (often made of brass or copper for better grip in tiny placements) and micro cams (like small Black Diamond Z4s, Metolius Master Cams, or the highly specialized Totem Cams) become essential if you start climbing routes featuring very thin cracks where standard-sized protection simply won’t fit. This is when your possible gear list expands.
For those drawn to wider cracks, from fist-sized to full-on offwidths, big cams (such as Black Diamond Camalot sizes #4, #5, #6, and even larger) will be necessary additions. These are heavy and expensive pieces, so they are typically purchased only when a climber is specifically targeting routes that require them. Ball Nuts, like those made by Trango, offer a unique solution for protecting tiny, parallel-sided cracks or piton scars where even the smallest micro cams might not fit; these are often used in aid climbing or on desperate free climbs. If not part of your initial rack, specific sizes of Tricams or a small set of hexes might also be added later to take advantage of their unique strengths in certain types of placements, like horizontal cracks or pockets. For those tackling major objectives, understanding the need for specialized gear for big wall routes like Freerider becomes apparent. You can find information on advanced trad climbing protection from manufacturers, and guides on gear for offwidth climbing from retailers. An old trad climber might have many stories about such specialized items.
Doubling Up (and Tripling) on Key Cam Sizes
A very common step in expanding a trad rack beyond the initial set is acquiring “doubles” or even “triples” of your most frequently used cam sizes. This typically applies to cams in the finger-to-hand size range, for example, those equivalent to Black Diamond 0.4 up to #3. Why would you need multiple cams of the same size? There are several key reasons. Longer pitches naturally require more placements to maintain adequate safety margins. Some routes feature sustained sections of crack that are a consistent size, demanding multiple cams of that specific dimension to protect the entire segment. Furthermore, when building anchors, especially if you prefer to use cams as your primary anchor points, having doubles allows you to use some in the anchor while still retaining a full set for protecting the next pitch. A triple rack of certain sizes is common for specific areas.
Having more gear in these common sizes can also significantly increase your confidence, especially when you are pushing your limits on harder routes or when faced with sections where protection opportunities are sparse or less than ideal. The need for doubles (or more) usually becomes apparent with experience and as you start tackling more demanding or longer routes. Certain climbing destinations are notorious for requiring a substantial number of cams in particular sizes; for instance, areas like Indian Creek in Utah may necessitate carrying triples or even quadruples of certain cam sizes to safely protect its famous splitter cracks. You want to ensure you have enough gear for the objective. If you’re building a rack for sustained cracks at Red River Gorge, you’ll also appreciate having multiples of key sizes. Discussions about when to double up on cams are common in climbing forums, and a good rack strategy for long pitches often involves such redundancy. It’s not uncommon for partners to have nearly the same rack to combine for big routes.
Maintaining Your Gear for Longevity and Safety
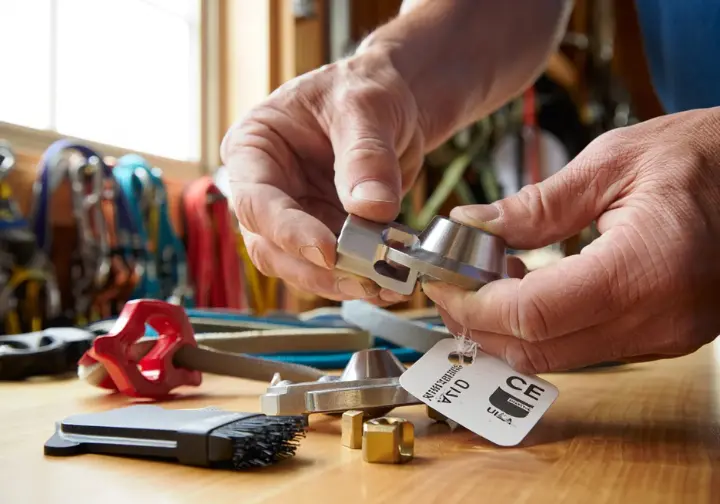
Proper maintenance is absolutely crucial for the longevity, safety, and reliability of your significant investment in trad gear. It’s a good habit to regularly inspect all your equipment both before and after each climbing day, looking carefully for any signs of wear, damage, or malfunction. For cams, check for smooth trigger action, any unfrayed wires or cables, bent stems, and look for worn, cracked, or deformed lobes. Also, inspect the condition of the sewn sling on the cam. With nuts and hexes, inspect the wires for fraying, kinks, or corrosion, and check the metal heads for significant deformation or cracks. For slings and all webbing (including on your harness), look for fraying, cuts, fuzziness, discoloration (especially from UV exposure), and any damage to the stitching. Carabiners should be checked for proper gate function (they should snap shut crisply), any cracks or significant burs, deep grooves worn by the rope, and the correct operation of locking mechanisms. Even your chalkbag needs occasional cleaning.
Cleaning your cams is important, especially if they become gritty or stiff. Use warm (not boiling) water, a soft brush (like an old toothbrush), and mild dish soap if necessary. Rinse them thoroughly and allow them to air dry completely away from direct heat. Once dry, lubricate the moving parts (axles, springs, trigger mechanism) with a wax-based or silicone-based lubricant specifically designed for climbing gear; avoid petroleum-based lubricants like WD-40, as they can attract dirt and potentially damage plastics or nylon. Clean your cams at least annually, or more frequently if you climb in sandy, dusty, or salty environments. Other gear like slings and harnesses can be washed by hand with mild soap and cool water, then rinsed thoroughly and air-dried away from direct sunlight. Store all your gear in a cool, dry place, shielded from direct sunlight, corrosive chemicals (like battery acid or solvents), and strong fumes. Avoid storing gear in car trunks for extended periods due to temperature extremes. It’s vital to retire gear based on manufacturer guidelines (soft gear like slings and harnesses typically have a lifespan of up to 10 years from the date of manufacture, even if unused; cam slings may need replacement every 2-5 years with moderate use, or up to 10 years if rarely used and stored perfectly). Always retire any piece of gear after it has sustained a major fall, if it is significantly damaged, or if you have any doubt whatsoever about its integrity. This includes understanding harness lifespan and retirement. For detailed advice, consult resources on when to retire climbing gear and how to clean trad climbing gear.
Understanding Safety Certifications (UIAA, CE/EN)
When you purchase climbing gear, you’ll notice it carries safety certifications, primarily from the UIAA (International Climbing and Mountaineering Federation) and CE (Conformité Européenne, which signifies compliance with European Norm or EN standards). The UIAA sets rigorous voluntary safety standards for climbing equipment; a UIAA certification means the gear has been tested and meets or exceeds high international benchmarks for strength, performance, and safety. The UIAA Safety Label, often a small circular logo, is an iconic symbol of this compliance and is recognized worldwide. These manufacturers adhere to strict testing.
The CE mark, on the other hand, indicates that the product conforms to health, safety, and environmental protection standards for products sold within the European Economic Area (EEA). For climbing gear, this often means compliance with specific EN standards, such as EN 12275 for carabiners or EN 892 for dynamic ropes. The UIAA and CEN (European Committee for Standardization, which develops EN standards) often collaborate, and their standards can be very similar or even identical in many respects, though the UIAA may sometimes have stricter requirements or test for aspects not covered by an EN standard. It is always advisable to buy climbing gear from reputable brands and retailers who ensure their products carry the appropriate certifications. These certifications provide an assurance that the gear has undergone standardized testing for strength, durability, and performance characteristics, which is fundamental to your safety. This is particularly important for critical items like UIAA/CE safety certifications for helmets and understanding carabiner strength ratings and certifications. You can find more UIAA safety label information on their official website, and explanations of how climbing rope label certifications explained can apply conceptually to all gear.
Common Pitfalls to Avoid When Building Your First Trad Rack
As you embark on building your first trad rack, it’s helpful to be aware of common mistakes beginners often make. Avoiding these pitfalls can save you money, reduce frustration, and help you assemble a more functional and appropriate setup for your initial foray into trad climbing. This awareness helps you understand what not to “Prioritize” in your early purchases of trad gear.
Buying Too Much, Too Soon, or Too Specialized
A frequent misstep for enthusiastic new trad climbers is purchasing a massive rack right from the start, perhaps including doubles or even triples of all cam sizes, or highly specialized gear (micro-nuts, offset cams, big cams) before gaining sufficient experience or understanding their specific local climbing need. This approach often leads to unnecessary expense and the burden of carrying heavy, frequently unused gear on climbs. Beginner and intermediate trad routes are unlikely to require such an extensive or specialized arsenal of equipment. Even a full rack of specialized gear can be too much at the start.
The more prudent solution is to begin with a basic, versatile single rack, focusing on standard nuts and a modest range of commonly used cam sizes. Expand this foundation incrementally, based on the experience you gain and the actual demands of the routes you find yourself climbing regularly. What are your most common placements? Are you frequently running out of a particular size? Let these experiences guide your future purchases of gear e.g., more mid-sized cams or specific nut shapes. For general advice on starting a trad rack, forums can offer peer insights, though always weigh such advice carefully.
Neglecting Passive Pro Skills for Cams
Another common pitfall is an over-reliance on cams, often leading climbers to focus heavily on purchasing a wide array of these active devices while underinvesting in a full set of nuts or, crucially, not dedicating enough time to mastering “nutcraft”. Nuts are generally cheaper, lighter, and are absolutely essential for many types of placements where cams may not be ideal or as secure, such as constrictions, certain types of pockets, and some flared cracks. Developing strong nut placement skills is fundamental for becoming a well-rounded and efficient trad climber. These skills involve not just finding a placement, but also understanding how the nut will behave under load and ensuring it’s oriented for optimal security.
Over-reliance on cams can be limiting in terms of placement options, is certainly more expensive, and can bypass the development of crucial rock-reading and gear-placement finesses that come from working extensively with passive protection. The recommended approach is to buy a full set of nuts early in your trad climbing journey and make a concerted effort to practice placing gear extensively. Seek out routes or climbing areas that particularly encourage or require nut placements to build proficiency and confidence in your ability to make them bomber. Focusing on developing strong nut placement skills will serve you well throughout your climbing career. The importance of nutcraft in trad climbing is often emphasized by seasoned climbers, and manufacturers like DMM Wales offer resources on learning to place nuts effectively. Your trad—or traditional—skills depend on this.
Ignoring Local Climbing Area Characteristics
A significant mistake beginners can make is purchasing a generic “standard rack” based on broad recommendations without adequately researching what specific types of gear are most suitable for the rock type and characteristic crack systems found in their primary or local climbing areas. This oversight can result in owning a rack that is ill-suited for the local crags. For instance, you might end up with too many large cams if your local cracks are predominantly thin, or you might lack offset nuts if your local granite (perhaps in areas like the Gunks or Yosemite) features numerous pin scars and flared placements where offsets would excel. Having the wrong tools for the job can be frustrating and can limit your route options or even compromise safety.
The solution here is proactive research. Consult local climbing guidebooks, which often provide specific rack recommendations for particular areas or even individual routes. Talk to experienced local climbers who have an intimate knowledge of the rock and its protection nuances. Observe what gear is commonly used and most effective in your area before making significant purchases, especially beyond your initial starter set of metal gear. For example, understanding the gear for Joshua Tree’s unique rock or specific Red River Gorge rack recommendations illustrates this principle. Guides like Karsten Delap often discuss tailoring trad rack to local rock. The goal is not just a rack, but the right rack for where you climb.
Underestimating Slings and Carabiners
A common oversight when assembling a first trad rack is not acquiring a sufficient number of non-locking carabiners for racking individual cams and for making alpine draws, or not having enough alpine draws and other slings for adequate extensions. Having an insufficient number of slings often leads to increased rope drag, which can make the physical act of climbing much harder and more tiring, especially on longer or wandering pitches. More critically, significant rope drag can potentially pull protection pieces upwards or outwards, compromising their security or even dislodging them entirely. These seemingly simple items are critical.
Furthermore, not having a dedicated carabiner for each cam (and often for each hex or larger nut) makes racking gear on your harness inefficient and can slow down gear selection significantly when you’re on lead and need to find the right piece quickly. The general rule of thumb is to plan for at least one non-locking carabiner per cam and two non-locking carabiners for each alpine draw you assemble. Start with a solid number of alpine draws; 6 to 12 is a frequently recommended range for a beginner’s rack. Ensuring you have having enough alpine draws for trad is crucial, and some climbers prefer durable quickdraws made specifically for trad. The importance of alpine draws for managing rope drag cannot be overstated.
Conclusion: Your Rack, Your Adventure
Building your first trad rack is a foundational and exciting step into a deeply rewarding climbing discipline. It requires thoughtful prioritization of essential trad gear, starting with a core selection of nuts, a few versatile cams, and an adequate supply of slings and carabiners. This initial setup, your first rack, will be your companion as you learn the art of placing gear and navigating the vertical world under your own steam. Consider this your starter guide to assembling that kit.
The journey begins by establishing a versatile foundation of gear suitable for your initial climbs and learning experiences. A strong emphasis should be placed on proficiently mastering passive protection placement, particularly with nuts, as this skill is fundamental. From this base, your rack should expand incrementally, guided by the experience you gain and the specific demands of the routes and rock types you encounter. Balance budget considerations with the critical need for safety. This involves purchasing strategically, perhaps considering reputable used hard gear with extreme caution, but always investing in certified, quality equipment. Meticulous gear maintenance and timely retirement of worn or damaged items are non-negotiable aspects of trad climbing safety.
Ultimately, the “perfect” trad rack is not a one-size-fits-all prescription; it is a dynamic collection tailored to your individual need, the characteristics of your local climbing areas, and your evolving experience level. Embrace the learning process, ideally with guidance from experienced mentors or qualified instructors, as this knowledge is key to unlocking the incredible adventures that trad climbing offers. Remember that your journey into trad climbing is unique, and the rack you build will be a testament to your growing skills and the amazing places it will take you. Our aim is to be a comprehensive resource for dedicated climbers, and we hope this guide to building your first trad rack serves as a cornerstone for your skill development and safe exploration of the vertical world. May your pack always contain the right gear for the climb.
Frequently Asked Questions about Building Your First Trad Rack
What are the absolute minimum pieces of protection I need to start trad climbing with a mentor? >
Should I buy all new gear, or is used gear safe for a beginner’s rack? >
How much should I expect to spend on my very first set of essential trad gear? >
Do I really need specialized offset cams or micro nuts for my first trad rack? >
We are a participant in the Amazon Services LLC Associates Program, an affiliate advertising program designed to provide a means for sites to earn advertising fees by advertising and linking to Amazon.com. As an Amazon Associate I earn from qualifying purchases. We also participate in other affiliate programs. The information provided on this website is provided for entertainment purposes only. We make no representations or warranties of any kind, expressed or implied, about the completeness, accuracy, adequacy, legality, usefulness, reliability, suitability, or availability of the information, or about anything else. Any reliance you place on the information is therefore strictly at your own risk. Additional terms are found in the terms of service.


