

In this article
The critical role of sport climbing knots and ropework in ensuring sport climbing safety cannot be overstated. While often perceived as safer due to pre-placed bolts, sport climbing still carries inherent risks. This article will serve as a comprehensive guide to mastering these essential skills, from foundational knots and core ropework techniques to critical safety protocols. We aim to build your competence and confidence by exploring correct selection, tying, application, and understanding of these techniques, drawing on expert knowledge. Understanding the mechanics, applications, limitations, and potential failure modes is what true mastery implies. Ultimately, safety rests with the individual climber, making a profound understanding and diligent practice paramount. Are you ready to tie in to a safer climbing future?
Foundational Knots: Your Lifelines in Sport Climbing
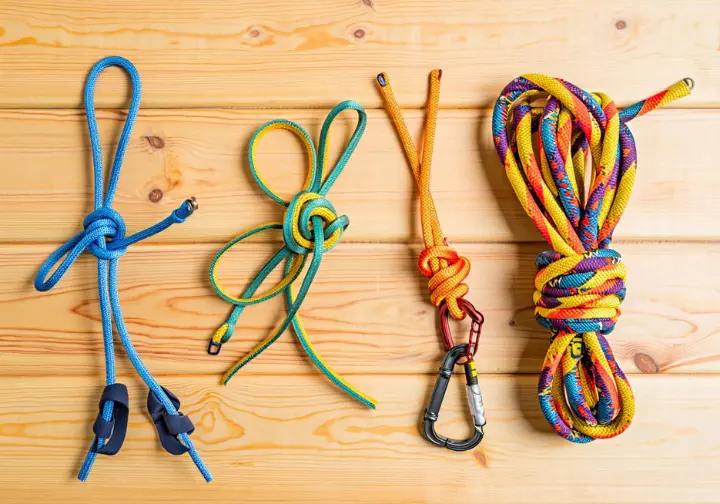
This section delves into the essential knots every sport climber must master. Proficiency in these knots forms the bedrock of on-rope safety. We will cover their specific applications, tying methods, and critical safety checks, helping you understand essential sport climbing knots and their applications. These basic knots are your lifelines.
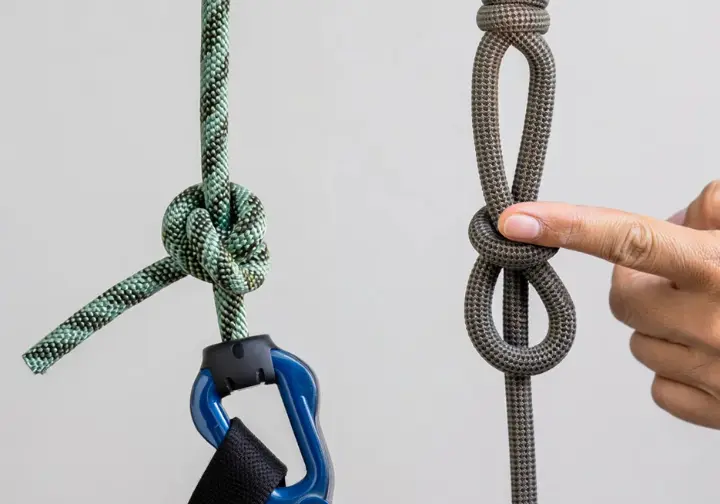
The Figure-Eight Family: Secure Tie-ins and Anchor Loops
The Figure-Eight Follow-Through is the primary knot for attaching the climbing rope to your harness. Its strength, security, and ease of visual inspection make it highly valued. It is crucial to thread it correctly through both designated tie-in points on the harness, not the harness belay loop or waist belt alone, for proper load distribution. Mastering this tie-in knot involves creating an initial loose figure-8 knot, meticulously retracing it after passing the rope through harness points, and ensuring all strands are parallel and without crosses—properly “dressed”. A minimum tail of 6 inches is standard, and a climbing partner check should always verify its correctness; this is a critical knot for safety-wise climbing.
Common errors with the Figure-Eight Follow-Through include incomplete retracing, incorrect dressing leading to crossed strands, an insufficient tail or extra tail being too short, or mistakenly tying into the belay loop. Any of these mistakes can compromise the knot’s security. The UIAA emphasizes that most accidents with this knot result from not completing it correctly; for more details, see the UIAA guidance on figure-eight knots. A helpful resource with animated knots like a visual guide to tying figure eight follow through is also available.
The Figure-Eight on a Bight creates a strong, fixed loop in the rope—a bight key knot for many situations. This knot is often used for building anchor points or creating a master point in sport climbing anchor setups. It’s vital to dress this knot properly and ensure the loop is secure and the knot well-formed before weighting it.
The Clove Hitch: Adjustable Anchoring and Tethering
The Clove Hitch is a versatile knot primarily used for attaching the rope to a carabiner, frequently to secure oneself to an anchor or create an adjustable personal tether or safety tether. Its main advantage is its adjustability even when weighted, allowing for precise positioning at an anchor. It can be tied one-handed or two-handed, adapting to various situations. When used as a life-supporting connection, it must always be secured with a locking carabiner to prevent accidental opening, ensuring the hitch clings securely. It’s a clove hitch easy to learn with good knot instruction.
Critical safety checks include ensuring the knot is correctly formed, as it can be mistakenly tied as a Munter Hitch or simple wraps, which are not secure for anchoring. Proper dressing is also vital; a poorly dressed Clove Hitch, especially in stiff or new ropes, can potentially slip under load—a common clove hitch slips scenario. For those looking to refine their technique, resources on tying the Clove Hitch efficiently and understanding its Clove Hitch characteristics and security are beneficial.
Stopper Knots: Closing the System and Backing Up Knots
Stopper knots, such as the Double Overhand Knot or Barrel Knot, play a crucial safety role in sport climbing by “closing the system.” This involves tying them in the ends of the rope before rappelling or lowering to prevent the rope end from accidentally passing through the belay device or anchor, which can have catastrophic consequences. The absence of a reliable stopper knot, sometimes a big honking knot for visibility, has led to serious accidents, highlighting their importance in preventing rappelling off rope ends.
These knots are also used to back up primary knots, like the Figure-Eight Follow-Through (though often not deemed necessary by AMGA if the primary knot is well-tied with a sufficient tail) or, more critically, knots like the Bowline, to prevent them from untying under cyclic loading. When tying a stopper knot (a brake knot in function), ensure it is snug, bulky enough not to pull through hardware, and leaves a sufficient tail of rope beyond the knot itself. Further information emphasizes the importance of knotting rappel rope ends. This is one of the required knots for rappelling.
Joining Knots (Bends): Safely Connecting Ropes for Rappels
The Flat Overhand Bend, often called the European Death Knot (EDK), is primarily used for joining knots to connect two ropes of similar diameter for rappelling or abseiling. Its flat profile is advantageous as it helps reduce the chance of the knot snagging when pulling the ropes down after a rappel. The UIAA offers UIAA guidance on joining rappel ropes for further reference. A critical safety requirement for the EDK is leaving very long tails, typically 12-18 inches (30-50 cm), to allow for potential rolling or cinching under load without the tails pulling through the knot. Proper dressing and pre-tensioning are also vital, and it’s crucial to avoid the visually similar but much weaker “Flat Figure-Eight Bend.” You can find more research on European Death Knot safety online. These bends are crucial for multi-pitch descents.
The Double Fisherman’s Bend (Grapevine Bend) is another secure method for joining ropes, especially rappel ropes, though it creates a bulkier knot than the EDK which might be more prone to snagging. The fisherman’s knot principle is doubled for security. It is also the standard knot for creating strong, permanent loops in accessory cord, such as for Prusik loops. When tying the Double Fisherman’s knot, each half (effectively a double overhand knot tied around the other rope) must be tied correctly with visible “X”s and parallel strands, and sufficient tails. Both knots must be cinched tight individually and then against each other; this knot becomes very difficult to untie after being heavily weighted. This is a strongest-holding rope bend.
Friction Hitches: Rappel Backups and Ascending Aids
Friction hitches, such as the Prusik Knot and Autoblock Hitch (French Prusik), are crucial for sport climbing primarily as rappel backups and occasionally for ascending a rope in self-rescue scenarios, a useful climbing aid. They are designed to grip the main climbing rope when weighted and slide when unweighted. The Prusik Knot is tied by wrapping an accessory cord loop around the main rope multiple times, typically three wraps. Correct cord diameter (generally 60-80% of the main rope’s diameter) is essential for reliable grip. Resources are available for tying and using Prusik knots. These rope-gripping hitches are essential.
The Autoblock Hitch is often preferred as a rappel backup or safety hitch because it tends to release more easily than a Prusik after being weighted, making for a smoother rappel experience. Care must be taken with hitch length to avoid it jamming into the rappel device or providing insufficient friction. Common mistakes with friction hitches—some of the most common friction knots—include using an incorrect number of wraps, using cord of improper diameter or stiffness, or incorrect attachment to the harness, all of which can compromise their holding ability. For more on rappel backup hitch techniques, REI offers expert advice. Knowing how hitches work is an essential skill.
Utility Hitches and Other Relevant Knots
The Munter Hitch (Italian Hitch) is an essential emergency belay or rappel method if a dedicated device is lost or dropped. It must be used with a large, pear-shaped (HMS) locking carabiner to function correctly and dissipate heat; awareness of its tendency to twist the rope is important. For those needing to learn, resources on belaying with a Munter hitch are available.
The Girth Hitch (Lark’s Foot) is commonly used to attach slings to harness tie-in points, belay loops, or anchor components. Proper dressing is crucial to maximize strength, as an improperly dressed Girth Hitch can significantly reduce the sling’s strength (up to 50% or more). You can find animated Girth Hitch instructions online. The Water Knot (Ring Bend) is used for joining two ends of nylon webbing to create slings or runners, often used to tie slings. It requires sufficient tails (minimum 3 inches), proper dressing so it lays flat, and regular inspection as it can work loose over time, especially under cyclic loading; it is not recommended for Dyneema webbing due to its lack elasticity and slickness.
The Bowline creates a fixed loop and is sometimes used for tying into the harness (especially double bowline) due to its ease of untying after loading. However, it MUST be secured with a reliable backup-knot (e.g., double overhand) as it can untie itself if not backed up; the Figure-Eight Follow-Through remains the more widely recommended tie-in for sport climbing due to its inherent security without a backup if tied correctly. This is a standard knot from early climbing days.
Mastering Essential Ropework Techniques for Sport Climbing
This section transitions from individual knots to their application within broader sport climbing procedures. It covers skilled rope handling during belaying, lowering, rappelling, rope management sport climbing, and anchor cleaning, all crucial for safety and climbing—efficiency. These are core ropework skills for sport climbing safety.
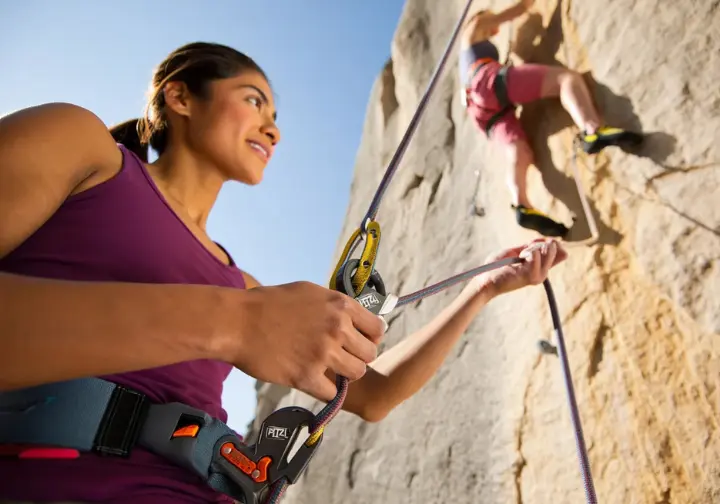
Belaying: The Art of a Secure Catch
Fundamental belaying sport routes principles include the consistent application of techniques like PBUS (Pull, Brake, Under, Slide) and the absolute rule that the brake hand must always maintain control of the rope. Losing control of the brake strand is a primary cause of belaying accidents. What habits do you reinforce to ensure your brake hand never leaves the rope? Different belay devices, such as tube-style (ATC) and assisted-braking devices (e.g., GriGri), have specific handling nuances for feeding rope, taking in slack, and catching falls. Understanding your specific device’s operation is paramount for safety.
Common belay errors include taking the brake hand off the rope, incorrectly setting up the belay device, inattention or distraction, or poor communication with the climber. Regular practice and partner checks help mitigate these risks. Petzl provides helpful Petzl partner check guidelines, and UMaine offers insights into UMaine belay technique principles.
Lowering a Climber: Smooth and Controlled Descent
Controlled lowering a climber involves smoothly and steadily paying out rope through the belay device, ensuring the climber descends without sudden drops or excessive speed. Consistent brake hand control is just as critical during lowering as it is during belaying a lead climber. The Munter Hitch can be used for emergency lowering if a standard belay device is unavailable, though it will twist the rope and requires careful handling. You can find information on techniques for Munter Hitch lowers and the reasons and methods for lowering a climber.
A crucial safety measure before lowering is ensuring a stopper knot is tied in the dead end of the rope to prevent the climber from being lowered off the end—a common and potentially fatal accident. Clear communication between the climber and belayer is also vital throughout the lowering process, especially in top-rope scenarios.
Rappelling: Safe Descents on Fixed Lines
Proper rappel setup involves correctly threading the rope through the anchor, ensuring the rope ends are even (or managed for stacked rappels), and confirming both ends reach the next stance or the ground. Always double-check the anchor’s integrity before committing to the rappel. Using a friction hitch (Autoblock or Prusik) on the rope below the rappel device as a backup is a critical safety measure for the rappelling climber. This backup can arrest your descent if you lose control. Knowledge of Rappelling: Safe Descents is key when transitioning outdoors, especially for single-rope rappel techniques.
Tying bulky stopper knots (e.g., double overhand or barrel knots) in both rope ends is non-negotiable to prevent accidentally rappelling off them. Before starting the rappel, perform a systematic safety check using an acronym like BRAKES (Buckles, Rappel device/Rope, Anchor, Knots, Ends, Safety backup). Common rappelling errors include rappelling off the ends of the rope (sometimes because the rope backwards was threaded or misjudged), incorrect setup of the rappel device or backup hitch, failure to use a backup, or mismanaging the friction hitch. These errors often have severe consequences. For guidance, consult resources on steps for safer rappelling or Devil’s Lake rappelling knot advice.
Rope Management: Efficiency and Tangle Prevention
Effective rope coiling techniques, such as the Butterfly knot coil or Mountaineer’s/Backpack coil, help transport the rope organized and minimize twisting, making it ready for the next climb. Flaking or stacking the rope at the base of a climb or at a belay station is crucial to ensure it feeds smoothly to the leader or through a belay device without tangles or knots. This preparation saves time and frustration and helps untangle rope issues preemptively. How often do you re-evaluate your coiling method for climbing—efficiency?
Avoiding and managing rope drag involves strategic placement of quickdraws and using longer runners (alpine draws) to create a straighter rope path, reducing friction and the effort needed to pull up rope. Preventing twists and kinks, especially when using a Munter Hitch or with certain belay techniques, involves conscious rope handling. If twists do occur, methods like trailing the rope or specific unkinking techniques can resolve them. Petzl offers information on Petzl rope coiling methods, and Ortovox discusses managing rope drag in alpine climbing, principles of which apply here, because alpine climbing—efficiency equals safety.
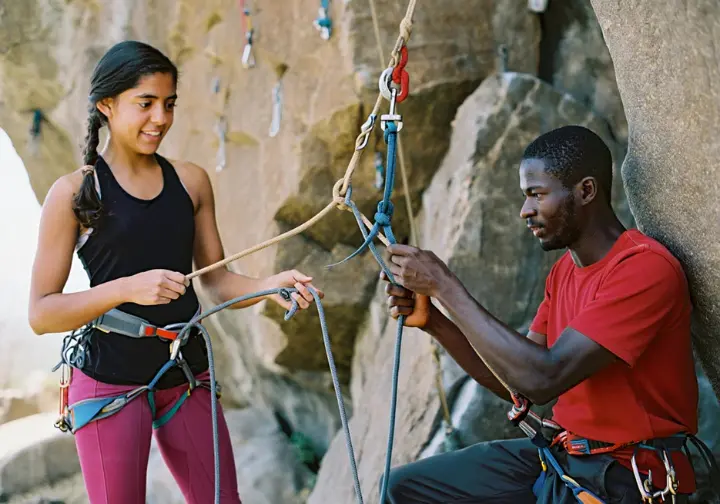
Anchor Cleaning: Safely Retrieving Your Gear
Safely cleaning a sport climbing anchor involves securely tethering oneself to the anchor using a personal anchor system (PAS) or slings while transitioning the rope. This personal anchoring ensures the climber remains safe while reconfiguring the system. The procedure for being lowered from an anchor requires re-threading the rope through the fixed anchor hardware (e.g., rings or chains) while remaining on belay from below. Clear communication with the belayer is absolutely critical during this multi-step process.
Alternatively, a climber can choose to rappel from the anchor after cleaning it, which involves setting up a rappel system as previously discussed. The choice between lowering and rappelling can depend on anchor wear, route characteristics, and personal preference. Constant self-checks, verifying each step of the process, and maintaining unambiguous communication with the belayer are vital to prevent mistakes during anchor cleaning, which is a common point for accidents. For detailed procedures, see guides on how to clean sport climbing anchors and REI setting and cleaning top rope anchors.
Systemic Safety Protocols: Weaving Knots and Ropework into a Secure System

This section emphasizes the overarching safety checks and principles that ensure knots and ropework are correctly applied within the entire climbing system. It highlights partner checks, proper knot finishing, and understanding the implications of knot strength, all part of implementing safety checks for knots and ropework systems.
The Non-Negotiable Partner Check Ritual
The climbing partner check ritual is a mandatory step before every climb, involving both climber and belayer meticulously checking each other’s systems. This ritual helps catch errors that can occur due to distraction, fatigue, or complacency. Key elements to verify on the climber include a correctly fastened harness, a properly tied tie-in knot (e.g., Figure-Eight Follow-Through) that is well-dressed with a sufficient tail and threaded through the correct harness points.
For the belayer, checks include ensuring the rope is correctly threaded through the belay device, the device is attached to the belayer’s belay loop with a locked carabiner, and the belay carabiner is indeed locked. Checking for a stopper knot in the end of the rope (especially for single-pitch sport climbs where lowering is common) is another vital part of the partner check system. Reputable organizations and manufacturers consistently promote this simple yet life-saving habit. For further information, consult resources on climbing safety checks and commands and articles discussing common climbing accidents and avoidance.
Dressing and Setting Knots: Maximizing Strength and Security
“Dressing” a knot refers to the process of arranging its strands neatly, ensuring they are parallel and without unnecessary crosses or twists. A well-dressed knot is not just aesthetically pleasing; it is significantly stronger and more reliable, a truly good knot. “Setting” or “stressing” a knot involves tightening it firmly and evenly after it has been tied and dressed. This ensures the knot—the core of your safety system—cinches down correctly and is less likely to slip, deform, or change shape under initial load or tension. Properly dressed and set knots contribute to Maximizing Strength and Security.
Properly dressed and set knots are easier to visually inspect for correctness and are often easier to untie after being heavily weighted. Failure to dress and set knots properly can lead to reduced knot strength or unexpected behavior, potentially compromising safety. For a deeper understanding, explore resources on knot terminology and principles and the REI guide to tying climbing knots.
Understanding Knot Strength Reduction and Rope Care
It’s crucial to understand that tying any knot in a rope inherently reduces its overall breaking strength, typically by 20-50% depending on the specific knot and how well it’s tied and dressed. For example, the Figure-Eight Follow-Through and Bowline can reduce rope strength by about 20-30%. This strength reduction reinforces the need for using climbing ropes well within their safe working limits and retiring them appropriately based on age, usage, and condition. How often do you inspect your climbing rope for wear, especially considering the impact on its elasticity?
Regular rope inspection is vital for safety, looking for cuts, abrasions, flat spots, core damage, or excessive fuzziness, all of which can further compromise the rope’s integrity and the security of knots tied in it. Proper rope care also includes cleaning the rope to remove dirt and grime that can cause internal abrasion, and storing it in a cool, dry place away from chemicals, UV radiation, and sharp objects, preferably in a rope bag. This applies to both dynamic ropes used for leading and static ropes if used in specific setups (though static rope is not for lead climbing). You can learn how knots weaken ropes and find UIAA recommendations for rope inspection and retirement.
Risk Awareness & Mitigation: Avoiding Common Pitfalls
This section focuses on developing a critical awareness of common errors in knot tying and rope handling, understanding their potentially severe consequences, and implementing proactive strategies to avoid these mistakes. It emphasizes appreciating the forces involved, how they impact knots and gear, and how to prevent an injury, key for identifying and preventing common knot and ropework errors.
Common Knot-Tying Mistakes and Their Grave Consequences
An improperly completed or misdressed Figure-Eight Follow-Through is a frequent error, often stemming from distraction or rushing, and can lead to the knot failing under load after a hard fall. The UIAA states most Figure-Eight accidents are due to incomplete tying. Mistakenly tying a Clove Hitch such that it resembles or functions as a Munter Hitch, or tying it with insecure wraps, can result in an anchor attachment that is not secure and could fail. Poor dressing, especially with stiff or thick rope, can also lead to Clove Hitch slippage.
Forgetting or improperly tying the mandatory backup knot for a Bowline is a critical error that can lead to the Bowline untying itself, especially under intermittent loading. Incorrect formation of the initial Bowline loop is another common mistake. Using insufficient tail lengths for knots like the Flat Overhand Bend (EDK) or the Water Knot is a primary cause of their reputed failures. The EDK requires very long tails to allow for potential rolling without catastrophic failure. A common climbing mistakes analysis and AMGA knot tying resources can provide further insight.
Frequent Ropework Blunders in Sport Climbing
Losing control of the brake strand while belaying is one of the most severe errors, potentially leading to an uncontrolled fall for the climber. This can happen due to inattention, incorrect technique, or being lifted off the ground unexpectedly. Common safe clipping techniques are often overlooked, leading to errors such as back-clipping or Z-clipping which can have dangerous consequences. Back-clipping can cause the rope to unclip itself during a fall, while Z-clipping creates excessive rope drag and can lead to a longer fall if the climber falls before unclipping the mistake.
Rappelling off the ends of the rope is a preventable yet tragically common accident, often resulting from not using stopper knots, misjudging rope length, or failing to see the rope ends in low light, especially with wet ropes that handle differently than dry ropes. Incorrect use of belay devices, such as improper hand placement with assisted-braking devices or incorrect loading, can negate the device’s safety features and lead to accidents. Familiarity and correct technique with one’s specific device are paramount. For further learning, explore the Petzl analysis of rope drag consequences and be aware of GriGri misuse accident reports.
Continuous Learning: The Path to True Ropework Mastery
This final section underscores that mastering sport climbing knots and ropework is an ongoing adventure. It highlights the importance of qualified instruction, dedicated practice, adherence to evolving best practices from authoritative sources, and cultivating a vigilant safety mindset for advancing your sport climbing ropework and knot safety knowledge.
The Value of Qualified Instruction and Diligent Practice
Learning knots and ropework from experienced, certified instructors or guides (e.g., AMGA certified) is crucial for establishing correct habits from the outset and understanding the nuances of each technique. Some climbing gyms require certified instruction for certain skills. Self-teaching can inadvertently ingrain incorrect or unsafe practices. Opting for qualified instruction is a significant first step. Safe at-home practice methods, such as using short lengths of old rope or accessory cord, allow climbers to repeatedly tie knots, building muscle memory and ensuring reliability under pressure. Visualization and mental rehearsal can also supplement physical practice.
The goal of practice is to achieve consistency and make correct knot tying and rope handling automatic, even when fatigued or in stressful climbing situations. This “safety intuition” comes from repetition and a deep understanding of the systems. For resources, consider AII practicing climbing knots online or the US Army knot tying guide, which emphasizes standardization and checking. Many gym climbers hone their skill here.
Staying Updated: Adhering to Evolving Best Practices
The world of climbing safety is not static; new research, accident analyses, and equipment innovations can lead to evolving best practices. Dedicated climbers, whether focused on sport climbing, trad climbing, or alpine climbing, should make an effort to stay informed through reputable sources like the outdoor adventure network of publications and organizations. Adhering to guidelines from authoritative bodies like the UIAA (International Climbing and Mountaineering Federation) and the AMGA (American Mountain Guides Association) provides a strong foundation for safe practices. These organizations often publish safety recommendations and standards.
Reputable manufacturers like Petzl and Black Diamond also play a vital role in climber education by providing detailed instructions for their gear and promoting safety content. Paying attention to their advisories is important. Cultivating a mindset of vigilance and being open to learning from incident reports or new information is key to long-term safety in climbing. Complacency can be a significant risk, even for experienced climbers. Understanding the UIAA Safety Commission role and the UIAA stance on definitive knot lists can also be beneficial.
Conclusion: Tying It All Together for Safer Climbs
Mastery of essential knots (like the Figure-Eight series, Clove Hitch, Munter, friction hitches, and appropriate bends) and fundamental ropework (belaying, lowering, rappelling, anchor cleaning, rope management) is non-negotiable for sport climbing safety and efficiency. This includes roping up knots, joining knots and safety knots. Beyond rote memorization, true understanding involves comprehending the “why” behind techniques, their applications, limitations, and the critical importance of meticulous safety protocols like partner checks and system checks (e.g., BRAKES for rappel).
Acknowledge that human error is a significant factor in accidents; therefore, diligent practice, avoiding complacency, and adhering to guidelines from authoritative sources (UIAA, AMGA, reputable manufacturers) are paramount. Continuously seek to improve your knowledge and skills, address common pain points like stuck knots or rope twist proactively, and foster a culture of safety within your climbing partnerships and the broader community. By committing to this deeper understanding and skill development, you can significantly manage the inherent risks of sport climbing and pursue your passion with greater confidence and security.
Frequently Asked Questions about Essential Knots and Ropework for Sport Climbing Safety
Is a backup knot always necessary for my Figure-Eight Follow-Through tie-in knot? >
What’s the biggest mistake people make when joining ropes for rappel with a Flat Overhand Bend (EDK)? >
Why is “dressing” a knot so important if it’s tied correctly? >
What should I do if my Munter Hitch severely twists my rope? >
We are a participant in the Amazon Services LLC Associates Program, an affiliate advertising program designed to provide a means for sites to earn advertising fees by advertising and linking to Amazon.com. As an Amazon Associate I earn from qualifying purchases. We also participate in other affiliate programs. The information provided on this website is provided for entertainment purposes only. We make no representations or warranties of any kind, expressed or implied, about the completeness, accuracy, adequacy, legality, usefulness, reliability, suitability, or availability of the information, or about anything else. Any reliance you place on the information is therefore strictly at your own risk. Additional terms are found in the terms of service.


