
In this article
Every dedicated climber, at some point, hits a plateau where the path to progress clearly leads through stronger fingers. Hangboard training for beginners is a primary method, and hangboarding stands out as one of the most effective, targeted types of strength training to build this crucial power. While hangboards are incredibly beneficial, they also carry a significant risk of injury if used improperly, a primary concern for anyone new to this type of intense training. This guide promises to be your definitive, safety-first resource. It will show you not just how to train, but when you are ready, why certain techniques are safer, and how to integrate hangboarding into your climbing life for sustainable, long-term gains. We’ll cover everything from readiness and safety to choosing gear, mastering form, and following a structured training plan.
Are You Ready? The Hangboard Readiness Checklist
Before you ever touch a hangboard, it’s critical to self-assess if you are truly prepared to start. Having a clear, actionable framework helps prevent premature training and injury by defining what “readiness” truly means, moving beyond simple timelines to focus on physical adaptation and pain-free performance for any beginner.
When to Start Hangboarding
The common advice to have “6-12 months of climbing” under your belt is more of a guideline than a strict rule. For novices, the most critical factor isn’t time, but the physical adaptation of your tendons, which strengthen far more slowly than muscles. This deeper understanding is key to a safe start with this training tool.
Performance-based indicators can offer a better signal of tendon development. Consistently climbing at a V3-V4 bouldering grade or a 5.10 sport climbing grade without finger pain often correlates with readiness. These are not prerequisites, but indicators; pain-free climbing is the most important signal. A solid base of training volume is necessary because it develops foundational grip strength and body awareness. It teaches you to differentiate between the discomfort of effort level and the pain of potential injury.
However, hangboarding isn’t for everyone. It should be avoided by absolute beginners, a few beginner climbers with current finger or elbow pain, those recovering from a recent upper-body injury, and junior climbers whose growth plates may not be fully closed. For a deeper analysis, an article on Climbing.com asks, “Are You Ready To Start Hangboarding?“.
The Dangers of Starting Too Soon
Understanding the difference in adaptation rates between tissues is vital. Muscles get stronger relatively quickly, but the connective tissues like tendons and the flexor pulleys adapt very slowly. Overloading the flexors before they are conditioned is a primary cause of common hangboard injuries, a concept further explained by understanding the biomechanics of climbing grips.
Think of your finger pulleys like the guides on a fishing rod that hold the line (tendon) close to the pole (bone). The A2 pulley is the most commonly injured because a finger-intensive hangboarding session places immense stress directly on this structure. Jumping in too early doesn’t just risk a single acute injury; it can lead to chronic conditions like tendinosis or synovitis. These issues can derail your climbing progress for months or even years, reinforcing the importance of a patient, long-term approach to your training schedule.
Choosing Your First Hangboard and Essential Gear
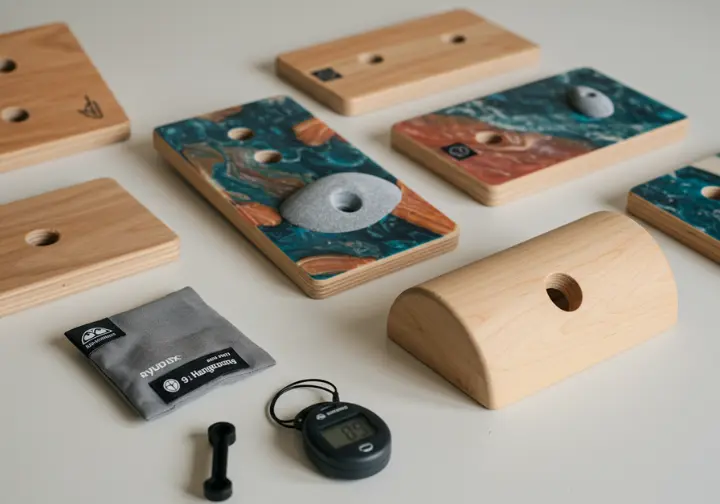
Selecting your first fingerboard and the necessary accessories doesn’t have to feel overwhelming. We will demystify the process by providing clear, actionable advice on what to look for in a beginner’s board and what other simple training tools you’ll need, helping you avoid being bogged down by too many choices for your first piece of equipment.
Wood vs. Resin: What’s Best for a Beginner?
Wood is overwhelmingly recommended for beginners. Wooden hangboards are significantly more skin-friendly, which is a huge advantage when starting out. This allows for more consistent training without being limited by raw or split fingertips, promoting a sustainable practice.
The texture of wood also allows for well-radiused, or rounded, edges that are more comfortable and forgiving on your finger joints during flexion. This is a stark contrast to some resin boards which can have sharper, more aggressive textures designed for advanced training. While resin boards are durable and can offer a variety of hold shapes that mimic outdoor rock, wood remains the superior choice for a beginner’s first board focused on foundational strength and skin health.
Key Holds and Features to Look For
A beginner hangboard must have a variety of large holds. Look for edges in the 20-25mm range, which is about a full finger pad deep and a perfect starting point for your strength building program. Some boards feature even longer 30-40mm+ edges that are excellent for warm-ups. Having a pair of large, comfortable jug holds is also critical. These aren’t for training finger strength but are essential for warming up, performing scapular engagement drills, and doing supplemental exercises.
Beginners should avoid different boards that are overly focused on very small micro-edges, single-finger pockets, or extremely difficult slopers. These are an injury risk and unnecessary for building a solid foundation. For more expert advice on this, check out this REI Expert Advice article. When considering Recommended Beginner Models, look at the Beastmaker 1000, often seen as a gold standard, and the Metolius Wood Grips II, a great budget-friendly, entry-level option for your next gear purchase.
Other Essential Gear You’ll Need
Hangboard protocols are precise, relying on specific hang and rest durations (e.g., 7 seconds on, 53 seconds off). A smartphone timer or a simple gym stopwatch is absolutely essential for structuring workouts correctly. You’ll also need Climbing Chalk just as you do for climbing; it ensures a consistent, dry grip for both safety and accurate strength measurement. You don’t need any other fancy equipment.
It is also helpful to have a way to reduce the load if you cannot yet hang at full body weight. Common methods include using a pulley system with counterweights, a resistance band hooked over the hangboard and stepping into it, or simply using a chair or stool under the board to rest your feet on and assist the hang. Finally, keep a training log from day one. A notebook or an app like Lattice Training’s “Crimpd” helps track progress, as Lattice Training use is common among climbers. Trail & Crag offers a solid primer called “Hangboard Training 101“.
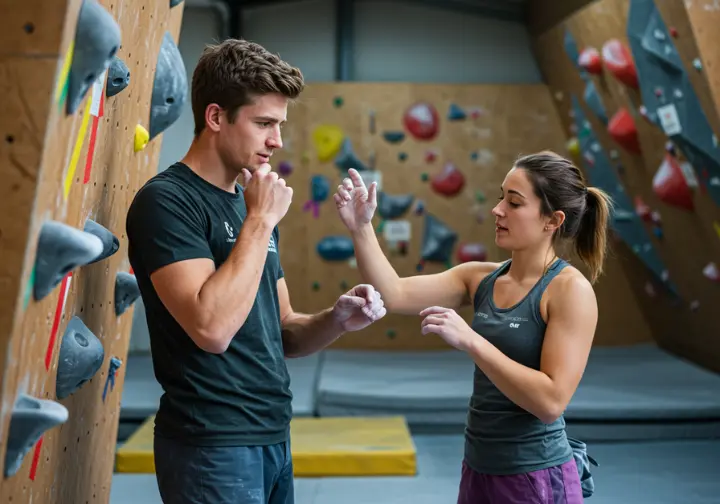
Mastering Form: The Non-Negotiable Warm-Up and Proper Technique

When you begin hangboarding, correct execution is far more important than intensity. To that end, it’s vital to focus on the details of a step-by-step warm-up and the clear instructions for perfect hanging form. This approach directly addresses the critical need for safety and injury prevention above all else in your workout routine.
The Comprehensive Hangboard Warm-Up
You cannot skip the warm-up routine. A proper warm up increases blood flow to the muscles and connective tissues of the fingers, forearms, and shoulders, making them more pliable and resistant to injury. It also activates the neural pathways needed for maximal muscle recruitment. For more ideas, check out our article on The Comprehensive Hangboard Warm-Up.
First, raise your pulse with 5-10 minutes of light cardio like jumping jacks or light jogging. Next, mobilize your joints and activate muscles with dynamic stretches. Include shoulder circles, wrist rotations, and cat-cow stretches for the spine. Use a light resistance band for shoulder-specific movements like pull-aparts to activate the crucial rotator cuff muscles. Avoid deep static stretches at this stage.
Finally, transition to the board itself. Start with gentle hangs on the largest jugs, focusing on activating the pulling muscles. Perform “scapular shrugs” to practice proper shoulder engagement. Then, progress to very short hangs on a large edge, possibly with foot assistance. You can find more community discussion on warm-ups in this Mountain Project thread: “How do YOU warmup for hang boarding?“.
Perfecting Your Hanging Form
Engaging your shoulders is the most critical form cue. Pull your shoulder blades down and back, creating a “proud chest” posture, and avoid hanging passively with shoulders shrugged by your ears. Maintain a slight, soft bend in your elbows—never fully locked out—to keep the joint under active tension and reduce injury risk during your hangs.
Hangboarding isn’t just for your fingers; it requires full-body tension. Engage your core muscles to prevent swinging or sagging, which creates instability in the hanging position. Always enter and exit a hang in a controlled manner, using a stool to get into position and stepping off gently. This prevents shock-loading the joints and ensures each repetition is performed with intention. For more on building this type of strength, see our article on strength exercises for climbing.
Essential Grip Types for Beginners
For a deeper look into this topic, our guide on Essential Grip Types for Beginners is a great resource. The open-hand grip (drag) is generally the safest as it places the least amount of stress on your finger pulleys. Your fingers are draped over the hold with a slight bend.
The half-crimp is a more active position where the middle knuckle of the fingers is bent at approximately 90 degrees. This is a fundamental and highly functional grip for climbing, and building strength here is a key skill. Beginners should avoid the full-crimp, where the thumb locks over the index finger. While a necessary grip in actual climbing, its high-strain nature is best avoided in repetitive hangboard training to minimize injury risk. For some workout ideas, Climbing.com has “5 Easy-to-follow Hangboard Drills for Stronger Fingers“.
A Beginner’s Hangboard Training Plan

To remove the guesswork from starting a hangboard routine, what follows are clear, actionable, and conservative workout protocols. These simple, effective training plans focus on quality of execution and safety, providing a direct path to get you started with your first hangboard training without information overload.
Protocol 1: Foundational Maximum Hangs
This hangboard protocol focuses on recruiting as many muscle fibers as possible in a short, intense hang. For a beginner, “high intensity” means hanging at full bodyweight on a comfortable hold. The goal is Building Max Strength, which is the foundation of finger power. This is a key part of any beginner program.
The workout involves a 10-second hang on a large ledge (20-25mm), followed by a crucial 2-3 minutes of rest. Perform 3-5 max hangs for each grip type. If a 10-second hang at bodyweight is impossible or causes your form to break down, you must reduce the load. Use a pulley, bands, or a chair to remove weight until the hang is challenging but achievable with perfect form. The Climbing Doctor offers great insights on “Optimal Training and Injury Prevention Techniques“.
Protocol 2: Introductory Repeaters
Repeaters involve shorter hangs with very short rests, repeated multiple times. This max hang protocol is excellent for Building Strength-Endurance, improving your ability to recover on smaller holds during a climb. The workout uses a medium, comfortable ledge (start with the same 20-25mm edge).
The protocol is 7 seconds of hanging followed by 3 seconds of rest. Repeat this cycle 6 times to complete one set. Rest for 2-3 minutes between sets, and aim to complete 2-3 total sets for one grip type. The forearm “pump” will be the limiting factor here. Quality over quantity is paramount, so reduce bodyweight with assistance if you cannot complete the sets with good form. For more detailed testing protocols, see this document from “Lattice Training – Test Instructions“.
How Often to Train and When to Rest
For beginners, recommend a maximum of two hangboard sessions per week; one hangboard session is often sufficient if you are also doing hard climbing at the gym. The stimulus is intense, and your body needs time to adapt. Tendons are slow to heal and strengthen, requiring at least 48-72 hours of rest between high-intensity sessions.
For maximum quality and safety, training sessions should be done when you are fresh. This means either on a dedicated training day off from climbing, or before a light climbing session. Performing an intense gym workout after a hard climbing session when fatigued increases injury risk. When thinking about Scheduling Your Sessions, this is a key consideration. The most important rule is to listen to your body. If you feel any sharp pain, stop immediately. For more on this topic, Mend Colorado has an article on “Utilizing The Hangboard To Improve Your Rock Climbing“.
Safe Progression and Common Pitfalls

Once you’ve established a hangboard routine, this final part of our guide will show you the path forward. It explains how to safely increase difficulty over time and highlights the most common mistakes to avoid, reinforcing the article’s core themes of sustainable, injury-free progress. You may even consult a training professional or trainer.
How to Progress Your Hangboard Training Safely
Progression should only happen after a full training cycle (e.g., a 6 week program of repeaters) where the final sessions feel manageable with perfect form. Progression should be patient and methodical. There’s a clear hierarchy of variables to change: first, add one rep to a set; second, increase hang time by just one second (e.g., from 10s to 11s); third, reduce rest time; and fourth, move to a smaller ledgesize. This article provides a great overview of “The Proven Way to Get Stronger Fingers With Hangboarding“.
Adding weight with a harness is an advanced technique. It should only be considered after many months of consistent training. Also, introduce deload weeks. After a cycle, taking a week with no or reduced hangboarding is crucial for recovery. For more advanced routines, consider adding 1-2 days per week where you train “no-hangs” on a hangboard, such as scapular pull-ups or even high feet drills to improve body tension. Understanding How to Progress Your Hangboard Training Safely is key to long-term success.
Top 5 Beginner Hangboarding Mistakes to Avoid
This section on Beginner Hangboarding Mistakes to Avoid is critical for safe training.
- Rushing the Warm-Up: A skipped or rushed warm-up is a direct path to injury. The 15-20 minutes spent preparing your body is the most important part of the training session.
- Using Bad Form (Especially Shoulders): Letting your shoulders slump up to your ears not only risks a shoulder injury but also leads to ineffective training, as it fails to build strength in the proper “active” climbing posture.
- Progressing Too Quickly (Ego Lifting): Jumping to smaller holds or adding weight before your tendons are ready, driven by ego rather than physiology, almost always leads to setbacks.
- Ignoring Pain: There’s a difference between the discomfort of muscular effort and sharp, localized pain in a joint or tendon. Pain is a signal to stop immediately.
- Neglecting Actual Climbing: A hangboard is a supplement, not a replacement, for climbing. The goal is to get better at climbing, not just hangboarding. Focusing too much on focused hangboard sessions can lead to unbalanced skill development. MonkeyTail Climbing also discusses the mental aspect in “Mental Training on the Hangboard“.
Conclusion: A Patient Path to Power
A safe approach is the only sustainable approach to hangboard training. The principles of readiness, proper form, and meticulous warm-ups are the foundation upon which all finger strength gains are built. For a hangboarding beginner, consistency beats intensity. Showing up 1-2 times a week for a high-quality workout consistently will yield far better and safer results than sporadic, overly intense sessions. Patience is the true secret to progress.
Be an active participant in your own training. Learn to interpret your body’s signals and use a training log to make intelligent decisions about your progression. The fingerboard is just one powerful tool in a comprehensive climbing training program. Integrate this newfound knowledge with on-the-wall practice and other forms of training to become a more well-rounded, resilient, and stronger climber.
Frequently Asked Questions about Hangboard Training for Beginners
How long does it take to see results from hangboarding? +
Can I hangboard on my rest days from climbing? +
What should I do if I feel a “tweak” or sharp pain in my finger? +
Is it better to use smaller holds or add weight when I progress? +
We are a participant in the Amazon Services LLC Associates Program, an affiliate advertising program designed to provide a means for sites to earn advertising fees by advertising and linking to Amazon.com. As an Amazon Associate I earn from qualifying purchases. We also participate in other affiliate programs. The information provided on this website is provided for entertainment purposes only. We make no representations or warranties of any kind, expressed or implied, about the completeness, accuracy, adequacy, legality, usefulness, reliability, suitability, or availability of the information, or about anything else. Any reliance you place on the information is therefore strictly at your own risk. Additional terms are found in the terms of service.


