In this article
Taking care of your climbing shoes is not a chore; it’s a critical component of performance, safety, and financial savvy. For any dedicated climber, knowing how to maintain your gear is an essential skill. Proper climbing shoe care directly impacts on-wall performance by ensuring your rubber provides optimal grip, which boosts confidence on tough holds. It also offers significant economic benefits, extending the life of expensive footwear and saving you money. This guide covers everything from daily habits and deep cleaning to minor repairs and knowing when to seek professional shoe resoling.
The Science of Stink: Preventing and Eliminating Shoe Odor

Let’s tackle the most common climber complaint: shoe odor. Moving beyond simple tips, this is a complete strategy for prevention and elimination that starts with understanding the root cause of bad smells. By addressing the “why,” you can effectively win the war against stink for good.
Understanding the Root Cause of Odor
The primary cause of shoe odor isn’t sweat itself, but the bacteria that thrive in the dark, damp environment inside your climbing shoe. These microbes feast on the sweat and dead skin cells from your feet, producing smelly organic acids as waste products. Understanding this biological process is the first step to effectively combating the stink and preventing issues like foot rot.
Shoe types also play a part. Less breathable synthetic shoes can trap more moisture, creating a more hospitable home for bacteria compared to naturally breathable unlined leather shoes. This is often why synthetic footwear develops a more stubborn odour. Bad habits accelerate the problem; leaving your precious shoes zipped up in a gym bag or trunk immediately after a session creates a perfect incubator for bacteria. You can learn more about how to avoid prevent stinky smelly climbing shoes to keep your gear fresh.
Proactive Habits to Prevent Odor Buildup
The most effective odor management strategy is prevention, starting with disciplined habits after every single one of your climbs. The single most important habit is to immediately air out your shoes. Take them from your pack or shoe bag, open the straps wide, and place them in a well-ventilated area so moisture can escape. This simple action starves odor-causing bacteria of the damp environment they need to multiply.
Good foot hygiene is another critical, often overlooked, preventative measure. Simply having clean feet by washing with soap and water before climbing significantly reduces the amount of bacteria transferred into your shoes. You can also use moisture-absorbing inserts or foot care powder. Stuffing shoes with newspaper or using commercial products like Boot Bananas or other shoe deodorisers draws out moisture and often contains odor-neutralizing agents. Thinking about your whole kit is part of the process, which relates to the broader topic of what to wear for indoor rock climbing.
Effective Methods for Odor Elimination
For existing smells, baking soda is a powerful DIY deodorizer. Sprinkle a generous amount inside your shoes and leave it overnight to absorb moisture and neutralize acids. For a deeper clean, you can create a paste with water, scrub the interior, then rinse and dry them thoroughly. Another effective method is using a diluted disinfecting spray for odor control.
A 50/50 solution of water and white vinegar or isopropyl alcohol can be lightly sprayed inside the shoe to eliminate odor-causing bacteria. It’s vital to let the shoes air dry completely afterward to prevent new growth. There is also a range of commercial deodorizing products, from sprays to inserts. Look for products with antimicrobial agents that won’t degrade shoe materials. For those who want a simple solution, absorbent inserts filled with activated charcoal are a great “set and forget” option, similar to other gear like recovery aids like skin salves.
The Deep Clean: A Step-by-Step Guide to Washing and Drying
Properly washing and—just as importantly—drying your climbing shoes can be confusing with all the conflicting advice online. Here, we’ll provide clear, actionable instructions with material-specific guidance, ensuring you can clean your gear without causing damage.
Hand Washing: The Safest Method
Hand washing is the universally recommended method for cleaning climbing shoes. Before you begin, use a soft brush to remove all loose dirt and chalk from the exterior and interior of the footwear. Next, use a basin of lukewarm water and a very small amount of mild soap or gentle cleaner. Gently scrub the inside and outside of the shoe with a soft brush. One of the best ways to clean dirty shoes is by wiping insoles and linings with a damp cloth, paying special attention to the interior where odor originates, but avoid oversaturating leather shoes.
After scrubbing, a thorough rinse with clean, cool water is essential to remove all soap residue, which can attract more grime or irritate your skin. Gently squeeze out any excess water. Be careful not to wring or twist the shoes aggressively, as this could damage their shape and structure. For more manufacturer-specific advice, you can learn how to care for your climbing shoes from the experts.
Machine Washing: A Cautious Approach
Be warned: machine washing rock shoes is highly controversial and generally not recommended, especially for leather models. Manufacturers like Evolv explicitly advise against it, as the process can cause leather to stretch or bleed color, permanently damaging the shoe’s fit. The agitation and heat can ruin your footwear.
If you must machine wash synthetic shoes, and the manufacturer permits it, proceed with extreme caution. Use a cold, delicate cycle only, with a minimal amount of a gentle laundry detergent. It is highly recommended to place the shoes in a mesh laundry bag or a pillowcase to prevent them from tumbling violently. The risks, which include weakening the adhesives that bond the rand and sole, often outweigh the benefits. Hand washing is always the safest method for preserving a shoe’s lifespan.
Proper Drying to Maximize Lifespan
Proper drying is just as critical as washing, and the number one rule is to avoid direct heat at all costs. Never use a hairdryer, place shoes on a radiator, or leave them in intense, direct sunlight. Heat can irreversibly damage the adhesives holding your shoe together, causing the rubber to delaminate. It can also cause leather to shrink and become brittle.
The best practice is slow air-drying in a cool, shaded, and well-ventilated area. After washing, loosely stuff the shoes with newspaper or paper towels. This helps absorb internal moisture and maintain the shoe’s shape. Change the paper every few hours on the first day to speed up the process. A thorough air-dry can take 24-48 hours, so be patient. Clipping them to a fan (with no heat) can also help circulate air safely.
Caring for Your Climbing Shoes: Maximizing Rubber Grip and Performance
The most critical performance component of your ultimate climbing shoe is its rubber. Maintaining the sole’s essential tackiness is key to staying secure on the wall, so we’ll detail the techniques and habits that preserve grip and protect your soles from premature wear.
Techniques to Keep Rubber Sticky
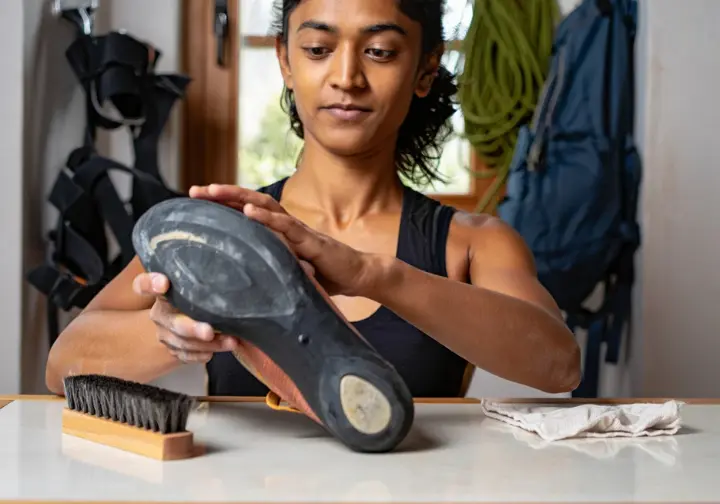
The main reason your grippy rubber loses its grip is contamination from dirt, chalk dust, and skin oils. The easiest and most effective way to maintain stickiness is to clean the soles regularly. Simply wiping the dirty soles with a damp cloth after a session can remove the layer of grime and significantly restore stickiness. For a deeper clean to remove stubborn dirt, a soft brush and a little water can be used to gently scrub the soles.
Some climbers use a small amount of isopropyl alcohol on a rag to wipe down the rubber. This helps dissolve oils and evaporates quickly, often providing a noticeable improvement in tackiness. Be cautious with overly aggressive methods. While a wire brush or sandpaper can remove a glazed rubber surface, this should be a last resort as it accelerates wear. Consistent, gentle cleaning is a far better long-term strategy.
The Impact of Footwork and Habits
The single greatest factor in preserving your shoe’s rubber is precise footwork. Every time a climber scrapes their foot against the climbing wall while searching for a hold, they are essentially sanding away the rubber. Focusing on quiet, deliberate, and accurate foot placement dramatically reduces this abrasion. Honing your technique through mastering movement and footwork can effectively double the lifespan of your sole.
It is also vital to take your shoes off between climbs. This not only airs them out but also minimizes unnecessary wear. Walking around the gym or the crag base on abrasive surfaces like dirt or a carpet grinds down the rubber and can embed grit that reduces friction. Finally, develop a routine of inspecting the high-wear areas, particularly the toe area, after each session. This helps you catch thinning rubber early, which is the key indicator that it’s time to consider a resole.
Proper Storage and Transport Practices
A critical rule to remember is to avoid heat, which means never storing climbing shoes in a hot car. On a sunny day, vehicle temperatures can easily get high enough to soften the adhesives used in shoe construction. This can cause the rand and sole to delaminate. Proper storage is key to preventing this kind of damage.
For transport, use a breathable mesh bag instead of keeping your shoes compressed at the bottom of a pack. This allows for constant air circulation, helping them dry out and preventing odor, while also protecting them from being crushed. For long-term storage, ensure shoes are clean and completely dry, and keep them in a cool, dark place. Loosen the closure system to avoid putting prolonged stress on the uppers. This relates to general gear care, like selecting a suitable chalk bag or bucket for your other equipment.
Repair, Resole, or Replace: Extending the Life of Your Gear
Knowing when to repair, resole, or replace your shoes empowers you to make smart decisions about their longevity. We’ll provide guidance on simple DIY fixes, explain the entire resoling climbing shoes process, and offer clear indicators for when a shoe is truly at the end of its life.
Minor DIY Repairs You Can Do
You can often fix small areas of delamination where the rand or sole starts to peel away. The key is proper surface preparation. First, clean both surfaces with isopropyl alcohol. Then, lightly scuff them with sandpaper for better adhesion. Apply a thin, even layer of a climbing-shoe-appropriate contact cement or shoe goo like Barge Cement to both surfaces and press them together firmly.
For small, worn spots on the upper before they become holes, you can apply a thin layer of a flexible urethane adhesive like Aquaseal SR. These adhesives are designed to be durable and flexible, extending the usability of the shoe’s upper. Avoid using superglue for anything other than a temporary, last-ditch fix. It is brittle and does not flex with the shoe, meaning the repair will likely crack and fail quickly.
When and Why to Resole Your Climbing Shoes
The golden rule of resoling is to act before you wear a hole through the sole and into the rand. The key visual cue is when the rubber at a high-wear point, usually under the big toe, becomes paper-thin. If you can see the rand’s different texture or color through the sole, it’s time to send them in. Resoling and Shoe Care 101 can offer additional perspectives on this.
Climbing-shoe resoling offers a significant economic benefit. A typical resole costs a fraction of a new pair of high-performance shoes, saving you money. It is also an environmentally sustainable choice that reduces landfill waste. Furthermore, a resoled shoe retains the comfortable, molded shape your foot has created, eliminating the painful break-in period of a new pair and preserving the performance of a shoe you trust. This is directly connected to the initial challenge of Finding the right climbing shoe fit.
Understanding the Resoling Process and Costs
During a professional resole, a specialist will carefully remove the old, worn rubber. They then meticulously prepare the shoe’s surface by sanding away old glue and apply new rubber using specialized contact cement and presses. This ensures a strong, durable bond that restores the shoe’s performance.
A standard half-sole resole costs around $60, with extra charges for rand repair. The entire process, including shipping, typically takes a few weeks, so it’s wise to plan accordingly. A well-cared-for pair of shoes can typically be resoled one to three times. If the leather or synthetic upper is in excellent condition, some shoes might even handle more, but once the upper is severely damaged, the shoe is likely beyond saving.
Material Differences: Leather vs. Synthetic Shoe Care
Caring for leather and synthetic climbing shoes requires different approaches. Material properties affect everything from stretch and breathability to cleaning methods and odor retention, so understanding these distinctions is key to providing the best maintenance for your specific pair.
Caring for Leather Climbing Shoes
The primary characteristic of leather shoes is that they stretch. Unlined leather can stretch up to a full size, molding to your foot for a custom fit, while lined leather stretches less. This property means the initial fit is critical. It also means washing, especially with heat, can cause undesirable shrinking or hardening.
Manufacturers recommend gentle cleaning with a damp cloth and mild soap, while some advise against washing leather shoes at all. The consensus is to use minimal water and never use heat to dry, as it can make the leather hard and brittle. If your treasured shoes become stiff, wearing them with slightly damp socks for a short period can help soften them. Conditioning leather is debated, as it could affect the adhesives. Choosing the ideal La Sportiva climbing shoe often involves considering these leather care factors.
Caring for Synthetic Climbing Shoes
The main feature of synthetic shoes is that they stretch very little. The fit you get in the store is largely the fit you will have for the shoe’s entire life. This makes sizing more straightforward but offers less opportunity for a custom-molded fit over time. These materials are generally more tolerant of washing than leather.
Many synthetic shoes can be hand-washed with mild soap and lukewarm water without much risk of damage. Some may even be machine-washable on a cold, gentle cycle, but always check the manufacturer’s recommendation first. A primary downside of synthetic materials is their lower breathability, which can trap moisture and lead to more significant odor buildup. Proactive odor prevention, like diligent airing and using deodorizing inserts, is especially important for these shoes, including many popular Scarpa climbing shoes.
Key Takeaways for Long-Lasting Climbing Shoes
- The most impactful habits are preventative. Always air out your shoes immediately after climbing, take them off between climbs, and use precise footwork to minimize abrasion.
- When cleaning, hand washing with mild soap and cold water is the safest method for all shoe types. Always air dry slowly away from direct heat or sun to protect adhesives and materials.
- Embrace shoe resoles as a cost-effective and sustainable practice. Learn to spot the signs of thinning rubber at the toe and send your shoes for repair before you wear through the rand.
- Understand your shoe’s material. Leather stretches and requires careful drying to avoid hardening, while synthetics stretch less but often need more diligent odor management.
- Treating your shoes as critical performance equipment will improve your climbing, save you money, and reduce your environmental impact.
Frequently Asked Questions about Caring for Your Climbing Shoes
How often should I actually clean my climbing shoes? >
Can I use a household cleaner like Lysol or Windex on my shoes? >
What are the definitive signs my shoe is beyond repair and must be replaced? >
Does climbing in a gym versus outdoors affect how I care for my shoes? >
Safety Notice: Rock climbing and mountaineering are inherently high-risk
activities that can involve physical trauma or fatal incidents. The information on Rock Climbing Realms is for
educational and informational purposes only. Techniques and advice presented here are not a substitute
for professional, hands-on instruction. Conditions and risks vary by location. Always seek guidance
from a qualified instructor before attempting new techniques. By using this website, you agree that you
are solely responsible for your own safety. Any reliance you place on this information is strictly
at your own risk, and you assume all liability for your actions. Rock Climbing Realms and its authors
will not be held liable for any harm, damage, or loss sustained in connection with the use of this information.
Affiliate Disclosure: We are a participant in the Amazon Services LLC Associates Program, an
affiliate advertising program designed to provide a means for us to earn advertising fees by advertising and linking
to Amazon.com. As an Amazon Associate, we earn from qualifying purchases. We are also an official affiliate partner
of Black Diamond Equipment via the AvantLink network. If you click on a Black Diamond affiliate link and make a
purchase, we may earn a commission at no additional cost to you. We also participate in other affiliate programs.
Additional terms are found in the terms of service.