

In this article
A complete ice climbing gear setup is far more than a collection of items; it’s a synergistic system where each component of your climbing gear performs in harmony. The common beginner mistake is choosing gear in isolation, which can lead to dangerous mismatches like incompatible boots and crampons, severe discomfort, and poor performance on the ice. This guide will walk any ice climber through a “system of systems” approach, breaking down the essential equipment into four core sub-systems. This will empower you to make informed, safe, and personalized decisions for everything from single-pitch ice climbing to more demanding alpine climbing.
The Foundation System: Your Connection to the Ice
The most critical components of your kit are those forming your direct interface with the ice. The focus here is on the synergistic relationship between your mountaineering boots and crampons, a connection that is paramount for safety, warmth, and efficiency of movement on any terrain. Every other piece of gear builds upon this foundation.
Mountaineering Boots: The Cornerstone of Your System
The single most important gear purchase you will make is a pair of well-fitting, appropriately stiff mountaineering boots. They are the platform for all your movement, provide vital ankle support, and are your first line of defense against cold injuries like frostbite. An improper fit can cause debilitating pain, blackened toenails from toe-bang, and blisters from heel-lift—all of which are dangerous and performance-killing when you need to focus on tricky ice. Standard hiking boots simply lack the required stiffness.
Understanding boot stiffness, formally categorized by a “B-rating,” is a matter of safety and performance. B3 (fully rigid) boots are the standard for technical ice. They feature a completely rigid sole that prevents any flex, thanks to stiff internal shanks and PU midsoles. This rigidity allows for maximum power transfer to your crampons and is necessary for sustained front-pointing on steep, vertical ice. Without it, your feet would fatigue almost instantly.
Boot construction directly impacts warmth and suitability for different winter trips. Single boots, like the La Sportiva Nepal Cube, are ideal for most ice climbing in temperate climates or when temps are a little warm. Supergaiter boots, such as the Scarpa Phantom Tech, offer more warmth and weather protection. For expeditions, extreme-altitude objectives, or a cold day in the Rocky Mountain backcountry, Double boots with removable liners are the warmest option; they allow the liner to be dried inside a sleeping bag, part of the specialized gear designed for extreme alpine conditions.
Achieving the perfect fit is a meticulous process. A common technique is to size up from your street shoes and ensure you can slide one finger behind your heel when your toes touch the front of the unlaced boot. This method helps prevent “toe bash” when kicking into hard ice while ensuring your heel is locked down to prevent blisters and a loss of climbing precision. Getting this right requires patience, and expert boot and crampon compatibility advice is invaluable.
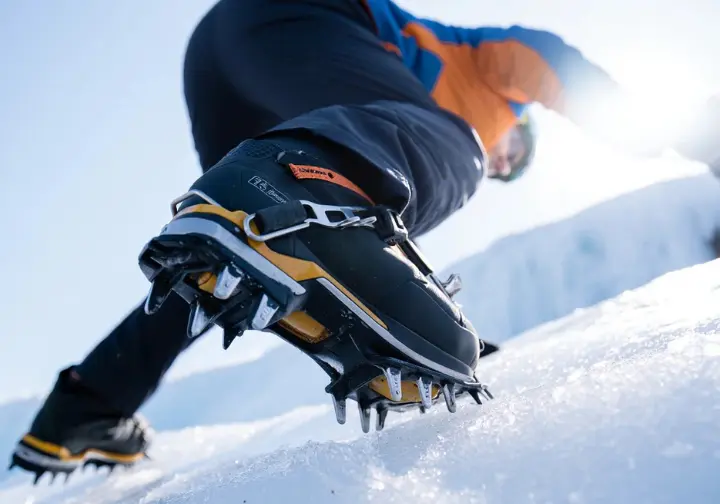
Crampons: The Sharp End of Traction
Crampons are the metal frames providing your essential traction on ice, and their design must be perfectly matched to your boots and climbing objective. The most critical compatibility feature is the binding system, with distinct straps and levers, which depends on the welts—rigid grooves—on your boot. Automatic (C3) bindings, which use a toe bail and heel lever, are the most secure system for technical ice climbing and require fully rigid B3 boots with both toe and heel welts for a secure grip.
For technical ice, vertical front points are non-negotiable. They are designed to penetrate bullet-hard ice like miniature ice tool picks with minimal fracturing. In contrast, horizontal front points are designed more for flotation on snow and general mountaineering. Many modern technical crampons, like the Petzl Lynx, feature modular front points and high-traction lugs. This lets climbers switch between a stable dual-point setup for pure waterfall ice and a precise mono-point for mixed climbing or a hanging ice dagger.
The frame material dictates the crampon’s durability and weight. Steel is the industry standard for its strength and ability to withstand contact with rock, making it the clear choice for water ice and mixed climbing. Lightweight aluminum crampons, like the Blue Ice Harfang, are designed only for snow travel, like ski mountaineering, as they are not durable enough for rock contact and will quickly become damaged.
A crucial but often overlooked safety feature is the anti-balling plate, or anti-bot. These flexible plastic plates fit under the crampon frame to prevent wet, sticky snow from accumulating, which can create a dangerous “platform” effect and cause a total loss of traction. Most modern crampons come with these plates included, and you can see the official UIAA position on anti-balling systems to understand their importance when you ascend frozen formations using specialized tools.
The Action & Safety System: Tools for Ascent and Security
Here we detail the equipment used for upward movement and the core components of your safety chain. The focus is on how ice tool design impacts performance on different types of ice and the specific features to look for in a climbing harness and hardware suited for a freezing, wet environment.
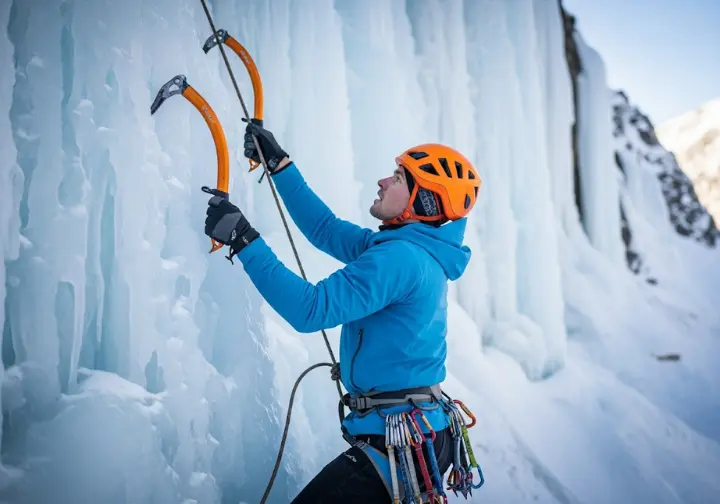
Technical Ice Tools: Your Upper Body Connection
Technical ice tools are your primary connection for upward movement, and their design is fundamentally different from a general mountaineering ice-axe. The most significant feature is shaft geometry. A curved shaft provides knuckle clearance on bulges and creates a more natural swing arc for steep ice. Moderately curved tools (like the Petzl Quark) are versatile all-rounders, while aggressively curved tools (like the Petzl Nomic or Trango Kestrel Ice) are optimized for the steepest ice and overhanging mixed routes.
The pick is the business end of the tool and is rated by the UIAA/EN as either ‘T’ for Technical (Type 2) or ‘B’ for Basic (Type 1). T-rated picks are stronger and thicker, designed to withstand the high torquing loads of mixed climbing on rock. B-rated picks are often thinner, designed for optimal penetration and minimal ice displacement in pure water ice, but are less durable against rock. It’s wise to learn how to choose the right ice axe for your goals.
Pick geometry—its angle, thickness, and tooth profile—greatly affects performance. A more aggressive downward angle, or “droop,” provides a more secure placement on techy ice but can be more difficult to remove, or “clean.” Modern ice tools provide ice—perfect sticks in everything from plastic-like blue ice to super-hard ice. The choice between an adze for chopping steps and a hammer for placing pitons on mixed routes on the back of the tool head depends entirely on your intended terrain. For a deep dive, consider Petzl’s guide on choosing the right ice tool for your objective.
Climbing Harnesses & Hardware: The Safety Chain
While any rock-climbing harness can be used, models designed specifically for winter sports offer significant advantages. Key features include adjustable leg loops and butt straps to accommodate bulky layers, hydrophobic materials that don’t absorb cold water and freeze, and dedicated ice-clipper slots. These slots allow for the attachment of plastic ice clippers for efficient, one-handed organization of ice screws on your gear loops. Having a properly fitting climbing harness is the first step.
Your belay device must be reliable with ropes that are potentially wet, stiff, or icy. Classic tube-style devices with high-friction modes, like the Petzl Reverso or Black Diamond ATC-Guide, are overwhelmingly popular. Their simple design with no moving parts makes them less prone to freeze or jam, and they are adept at handling double/half rope systems common in ice-climbing. There’s a lot of wisdom in selecting equipment for waterfall ice and mixed climbing.
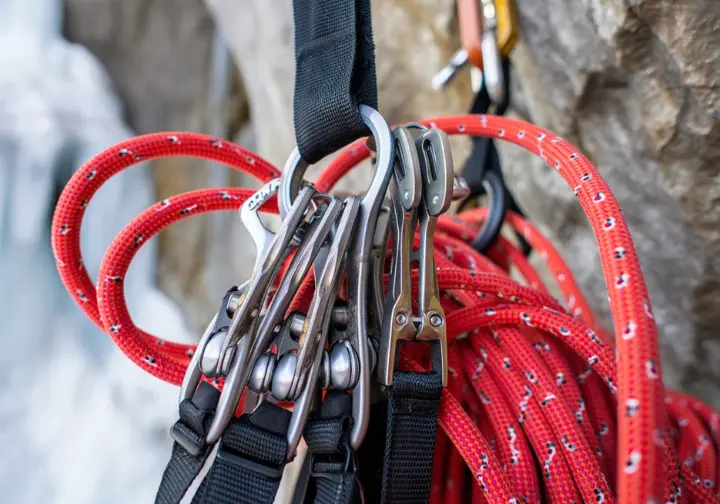
For carabiners, wiregate models are strongly preferred because their gates are far less susceptible to freezing shut than solid gates. A “keylock” or notchless nose design is also a valuable feature, preventing snags on gear loops, jacket hems, or slings. This is especially helpful when operating with bulky gloves.
Slings made from Dyneema or Spectra are the top choice for ice and alpine climbing. They are incredibly lightweight and absorb almost no water, which prevents them from freezing into stiff, unmanageable cables. An alpine draw, made from a 60cm sling, is a core part of the system, used for extending protection placements to reduce rope drag on wandering routes.
The Environmental Shield: A Technical System for Warmth and Survival

Apparel for ice climbing should be viewed as a life-support system, not just clothing. The primary pain points of getting cold can be solved by understanding the technical principles behind layering, moisture management, and the crucial multi-glove system. This is about active temperature regulation for survival and performance during your cold mission.
The Layering System: Managing Moisture and Temperature
The goal of a layering system is not just to stay warm, but to actively manage your body temperature and moisture to prevent both hypothermia and overheating. The core principle is to avoid sweating during high-output activity (climbing) and to trap heat during low-output periods (belaying). This is achieved through a modular system of layers that can be added or removed as conditions and your output change.
The system begins with a next-to-skin base layer made of merino wool or a synthetic fabric. Its sole purpose is to wick sweat away from your body; cotton is exceptionally dangerous as it absorbs moisture and loses all insulating value. The mid-layer is your primary insulation worn while active, typically a polar-pile fleece jacket or a highly breathable “active insulation” piece. Finally, a breathable windproof softshell jacket is often the preferred “action shell” for climbing, reserving a waterproof hardshell jacket for very wet conditions.
Arguably the most important piece of your apparel system is the belay parka. This is a heavily insulated (down or synthetic) “puffy” jacket sized large enough to fit over all other layers, including your helmet. You wear it only during inactive periods like belaying to trap body heat and improve warmth, and it comes off immediately before you start climbing again. A crucial belay parka is an investment in your safety and comfort. You can learn the basics of how to dress in layers from many outdoor resources.
The Multi-Glove System: Solving the Cold Hands Problem
Cold hands are the most common and debilitating problem in ice climbing, often stemming from poor circulation, moisture, and over-gripping the tools. The solution is not one “perfect” glove but a gloves system of multiple pairs for different tasks. This typically includes a light pair for the approach hike, a pair of thin gloves for leading, and a very warm pair of thick belay gloves or mittens.
The expert philosophy is to use thin, tactile lead gloves for the high-output activity of climbing. Bulky, warm ski gloves force you to grip the tools harder, which restricts blood flow and ironically makes your hands colder. You should immediately swap to your warm, dry belay mitts the moment you stop climbing. You can find a lot of user experience and community discussion on cold hands that reinforces this system.
Keeping spare ice gloves dry and warm inside your jacket is a critical strategy. This ensures you always have a warm, dry pair ready for the next of many ice pitches. Managing moisture is key; once a glove gets wet, it loses much of its insulating capability. The same system thinking applies to your pants and feet. Durable, weather-resistant softshell pants are key, paired with vapor barrier socks for the coldest temps and a thicker wool sock for insulation to combat cold toes.
The Logistics & Protection System: Your Lifeline and Rack
Your lifeline when moving above gear includes your lead climbing protection, rope system, and the pack to carry it all efficiently. This is your must-have gear list for safety. We’ll cover practical advice on building a first ice climbing rack, choosing the right rope for icy conditions, and selecting a pack that won’t get in your way.
Building Your First Ice Climbing Rack
Your ice rack is your primary means of protection when lead climbing. The core components are ice screws. For a beginner’s rack, durable steel screws are recommended over lighter, more expensive aluminum models. Modern screws with integrated crank knobs are a must-have, as they allow for much faster and more efficient placement with gloved hands. You can see a detailed comparison of aluminum vs. steel ice screws to understand the tradeoffs.
A standard starter rack for a day of cragging consists of 10-12 ice screws. This should include a versatile mix of lengths: a few short “stubbies” (10cm) for thin ice, a majority of workhorse lengths (13cm and 16cm), and one or two long screws (19-22cm) for building strong V-thread ice anchors.
In addition to screws, you will need a quickdraw for each one you plan to place. A mix of standard sport draws and longer alpine draws is ideal. Alpine draws are vital for extending placements on wandering pure ice routes to minimize rope drag, which can be a significant and tiring problem on multi-pitch ice.
An essential piece of safety equipment for multi-pitch climbing is a V-thread/Abalakov kit. This allows you to build strong, reliable rappel anchors using only the ice itself. The kit consists of a long ice screw, a hook tool to pull the cord through the ice, and a length of 6mm or 7mm accessory cord. Learning to build these is a fundamental ice climbing skill.
The Rope System: Your Lifeline
A dry-treated rope is a non-negotiable feature for ice climbing. An untreated rope will absorb water, becoming incredibly heavy, stiff, and prone to freezing solid, which is both dangerous and miserable to handle. The highest certification is the UIAA Water Repellent standard, which ensures the rope absorbs less than 5% of its weight in water. The benefits of a dry treated climbing rope are clear for any winter-specific ropes.
Climbers have several options for their rope system. Using two half/double ropes (typically 8.0-9.0mm) is a popular technique for multi-pitch routes. It allows for full-length rappels and reduces rope drag by clipping each rope to alternating pieces of protection. This system, however, requires more complex rope management from the belayer.
A simpler system involves using a single rope (9.0-9.8mm), which is easier to handle but limits rappel length. To overcome this, many climbers pair a single rope with a thin, static “tag line.” The tag line is not for climbing but is used solely to retrieve the main rope after a full-length rappel, offering a lightweight compromise. Knowing when to retire my rope is as important as choosing one.
The Complete System: Pack & Safety Essentials
A certified climbing helmet is mandatory for ice climbing because of the high and constant risk of falling ice dislodged by the leader or from above. Durable hardshell helmets are often recommended for their resistance to impacts from sharp ice chunks. The helmet must be adjustable to fit comfortably over a beanie or warm ski hat.
If your climb or its approach lies in avalanche terrain, a beacon, shovel, and probe are mandatory for every member of the party. The risk of an avalanche is real. This gear is useless without the proper training (like an AIARE 1 course) and regular practice to perform a swift companion rescue. This is a non-negotiable aspect of risk management on many mountain slopes. You can see a comprehensive equipment list for an ice route from major organizations.
A 30-40 liter pack is generally the right size for a day of single or multi-pitch ice climbing. An ideal pack is streamlined and simple, featuring a secure ice tool attachment system and points for crampons. The design of your backpack system should be minimalist to avoid interfering with your helmet or the swinging motion of your arms.
Decoding the Standards: What UIAA & EN Ratings Mean for You
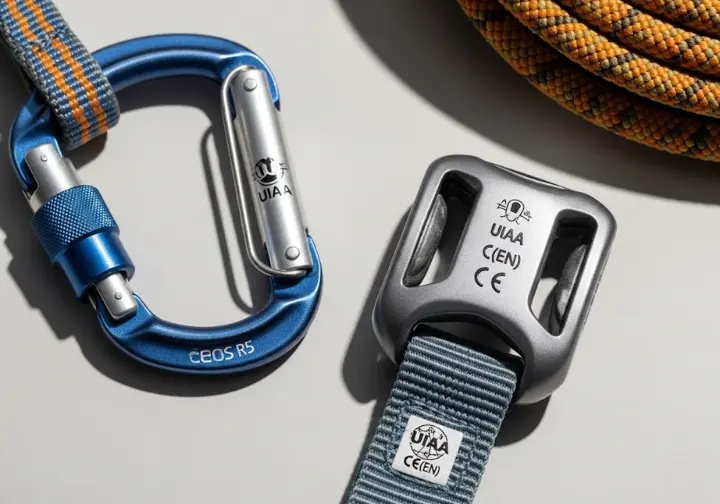
Understanding the technical standards on your gear provides immense value. It translates abstract codes into practical, performance-related benefits, empowering you to make safer and more informed choices. This knowledge is part of becoming a self-sufficient climber with trustworthy safety gear.
Organizations like the UIAA (International Climbing and Mountaineering Federation) and CEN (European Committee for Standardization) create the safety standards that reputable gear must meet. These EN and UIAA standards are not suggestions; they represent rigorous testing for strength, durability, and performance under specific loads and conditions. You can review the official UIAA safety standards to learn more.
These ratings have practical implications. For example, a T-rated (Type 2) ice tool pick (UIAA 152 / EN 13089) is tested to withstand higher torquing forces, making it more suitable for mixed climbing. An ice screw rated to 10 kN (UIAA 151) has been tested to hold approximately 2,200 pounds of force in standardized ice, giving you a baseline of trust in your protection.
All gear has a finite lifespan, especially textile components like harnesses and ropes. The generally accepted maximum lifespan is 10 years from the date of manufacture, even if unused. Regular inspection is critical, and gear must be retired immediately after a significant fall or if it shows signs of excessive wear or damage.
Always look for the CE and/or UIAA marks on any piece of life-safety equipment you purchase. This certification is your assurance that the product has passed the industry’s minimum safety requirements. Buying uncertified gear from questionable sources is a risk that is never worth taking.
Expert Philosophy: The “Don’t Fall” Mindset
A profound layer of wisdom elevates a simple gear list into true expertise. It’s the risk management philosophy of experienced climbers, which reframes the purpose of gear and promotes a safer approach to the sport.
The core philosophy of many expert ice climbers is this: the gear is not there to make falling safe, but to make your climbing so secure that falling becomes a remote possibility. Unlike sport rock-climbing, where falling is an expected part of the process, a leader fall on ice can have much more severe consequences. This is due to the nature of the protection and the potential for crampons or tools to cause injury.
The renowned climber Will Gadd’s central tenet is: “The first rule of ice climbing is don’t fall off.” This mantra shifts the mental focus from pushing physical limits to the point of failure towards precise, efficient, and controlled movement. It encourages you to stay well within your abilities and to prioritize solid tool and foot placements above all else. His article on how not to fall off ice climbing is a must-read for all climbers.
Avoid getting “pumped” (severe forearm fatigue) while leading on ice. This is a red-flag situation that should be avoided at all costs. A pumped climber is more likely to make a mistake, have their tools pop, and take an uncontrolled fall. The goal is to climb with relaxed efficiency, conserving energy to maintain a high margin of safety.
Your entire gear system—from rigid boots and sharp crampons to well-placed screws—is designed to support this “don’t fall” ethos. It provides the security and confidence needed to move with precision. Adopting this mindset is one of the most important steps a climber can take to ensure a long and safe career in the mountains.
Key Takeaways: Building Your Personalized Ice Climbing System
- Think in Systems, Not Lists: Approach your gear for ice climbing as an integrated system. Your boot choice dictates your crampon choice, your objective dictates your tool choice, and your layering system is your primary defense against the cold. Every piece should work in harmony.
- Invest in the Foundation: Your single most important investment is in a pair of perfectly fitting, fully rigid (B3) mountaineering boots. Do not compromise on fit or stiffness. This is the foundation upon which your entire safety and performance system is built.
- Prioritize Warmth and Moisture Management: Master the technical layering and multi-glove systems. Staying warm and dry is not about comfort; it is a fundamental safety requirement to prevent debilitating cold and life-threatening hypothermia. The belay parka is your best friend.
- Learn and Respect the Standards: Understand what the UIAA and EN ratings on your gear mean. This knowledge empowers you to choose the right equipment for the job and trust it when used correctly. Inspect your gear regularly and retire it when necessary.
- Adopt the Expert Mindset: Embrace the “don’t fall” philosophy. Use your gear to climb with precision, control, and a high margin of safety. Seek professional instruction to build a solid foundation of movement technique and safety skills.
Frequently Asked Questions about Gear for Ice Climbing
What is the most important piece of gear for a beginner to buy first? +
What is the difference between an ice axe for mountaineering and a technical ice tool? +
Do I really need two pairs of gloves? +
How much does it cost to get into ice climbing? +
We are a participant in the Amazon Services LLC Associates Program, an affiliate advertising program designed to provide a means for sites to earn advertising fees by advertising and linking to Amazon.com. As an Amazon Associate I earn from qualifying purchases. We also participate in other affiliate programs. The information provided on this website is provided for entertainment purposes only. We make no representations or warranties of any kind, expressed or implied, about the completeness, accuracy, adequacy, legality, usefulness, reliability, suitability, or availability of the information, or about anything else. Any reliance you place on the information is therefore strictly at your own risk. Additional terms are found in the terms of service.


