

In this article
Finger strength stands as your direct connection to grasping challenging rock features and moving towards higher climbing grades. Many rock climbers face the difficult balance of pushing for stronger fingers against the significant risk of finger injuries. This article, focused on rock climbing finger training, aims to offer a clear, actionable, and holistic guide for any climber looking to develop powerful, resilient fingers safely. We will explore anatomy, various training methods of training finger strength, injury prevention tactics, and how to create personalized programs for building finger strength. Let’s begin this exploration to enhance your climbing.
Foundations: Understanding Your Fingers for Climbing
To train finger strength effectively and safely, it’s beneficial for any rock climber to grasp the fundamentals of climbing-specific finger strength. This section will define what that means for your fingers, look into the critical anatomy involved in gripping, and explain the biomechanics of how different grip types function on the rock. Building this foundational knowledge is the first step on your path to stronger, healthier fingers.
What is Climbing-Specific Finger Strength?
In climbing, finger strength is the ability of the finger to apply and maintain finger force on various rock hold types, a capacity that underpins both static and dynamic movements. It’s more than raw power from muscles; it encompasses sustaining effort and generating force quickly – key for any rock climber.
Different facets of strength are relevant: Maximal Strength (the peak force for limit moves, a measure of specific strength), Strength-Endurance (for sustained effort on long sequences, a form of endurance training), and Contact Strength or Rate of Force Development (RFD), how rapidly you generate force for dynamic moves. Developing these aspects of strength training contributes to overall climbing performance and finger strength, enabling you to manage smaller holds, excel in bouldering, and execute diverse movements.
A well-rounded finger training for climbing program addresses all these, as finger strength (and a good strength-to-weight ratio) is often a primary predictor of ability to climb harder, built through patience and consistency. For those looking to build practical finger strength, understanding essential grip strength exercises is a good starting point for their workout. Some training programs also focus on the physiological adaptations to finger training to maximize finger strength gains and improve your finger strength score.
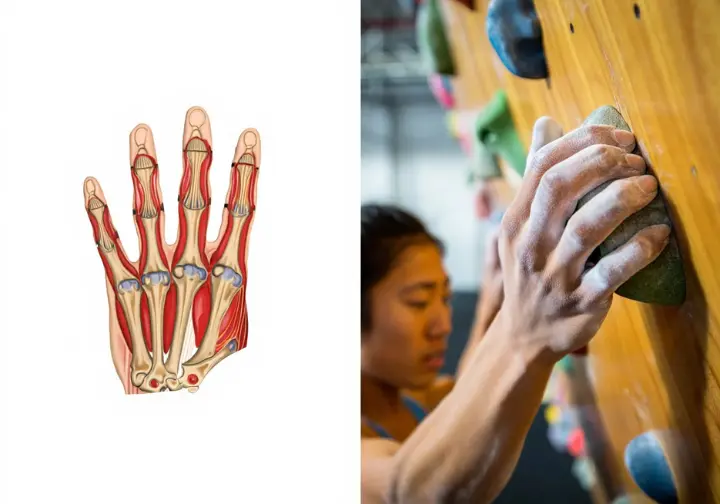
Climber’s Finger Anatomy: A Deep Dive
The primary forearm muscles for finger flexion are the Flexor Digitorum Profundus (FDP) and Flexor Digitorum Superficialis (FDS); these finger flexors are the engines of your grip and overall hand strength. Tendons, the tough connective tissues (your finger tendon structures), transmit force from these forearm flexor muscles to your finger bones (phalanges), adapting slower than muscles, which is a consideration for injury risk.
The critical finger pulley system, especially annular pulleys like A2 and A4, holds flexor tendons close to the bone, preventing bowstringing and ensuring efficient force transmission to each distal finger joint. A comprehensive view of the anatomy of climbers’ fingers includes the finger joints (MCP, PIP, DIP) and phalanges. For climbers, understanding finger anatomy for climbers is quite useful, particularly the role of the flexor tendon pulley system in preventing injuries.
Biomechanics of Essential Climbing Grips
The Full Crimp, often involving a thumb lock over the index finger, offers strength on small edges but stresses A2/A4 pulleys. The Half Crimp (or finger half crimp), with PIP joints near 90 degrees, is generally safer and highly functional for training finger strength, balancing strength and joint health. The Open Hand grip (or open hand / open grip), with less PIP joint flexion, is vital for slopers and reduces pulley stress, promoting tendon health.
Other common grip types include Pockets (challenging for individual fingers, like a two-finger pocket or three-finger pocket), Slopers (needing large contact area and body tension), and Pinches or pinch grips (engaging different muscle groups). A motion analysis of climbing grips can provide deeper insight into their mechanics.
Understanding these essential climbing grip types explained and how to train each specific grip type or chosen grip type in various grip positions helps in targeted training. Some climbers might focus on one specific grip if it’s a weakness, but a balanced approach to different grip types is usually best.
Essential Finger Training Equipment and Tools
This section introduces key equipment and any necessary training tool for dedicated rock climbing finger training. Familiarity with these tools is important for implementing effective finger training for climbing protocols, helping you select what’s right for your journey to stronger fingers.
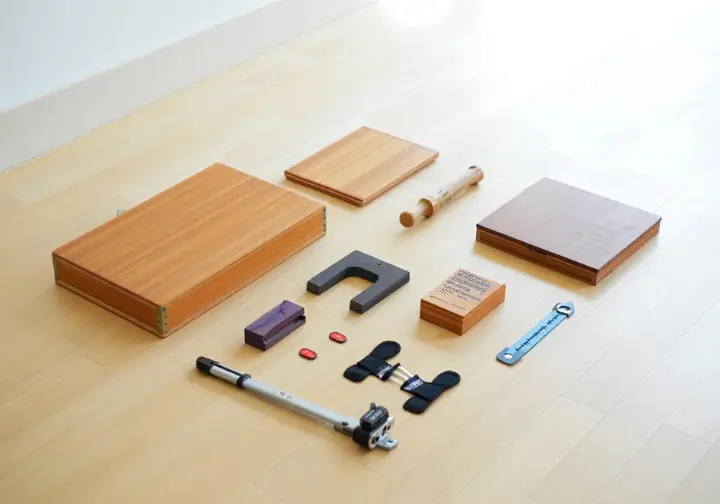
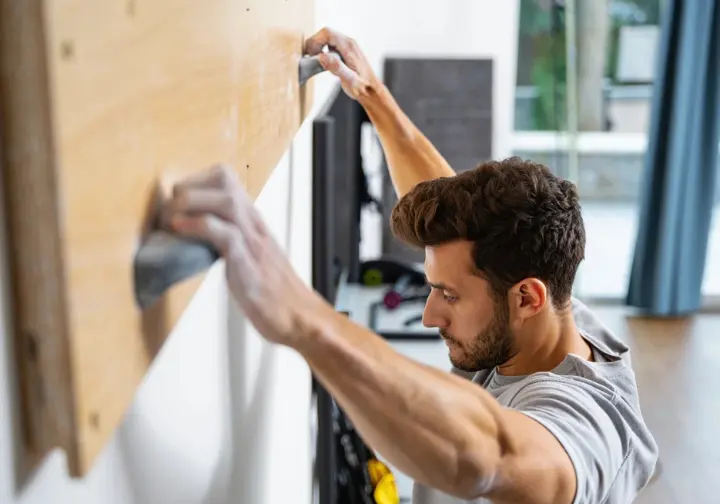
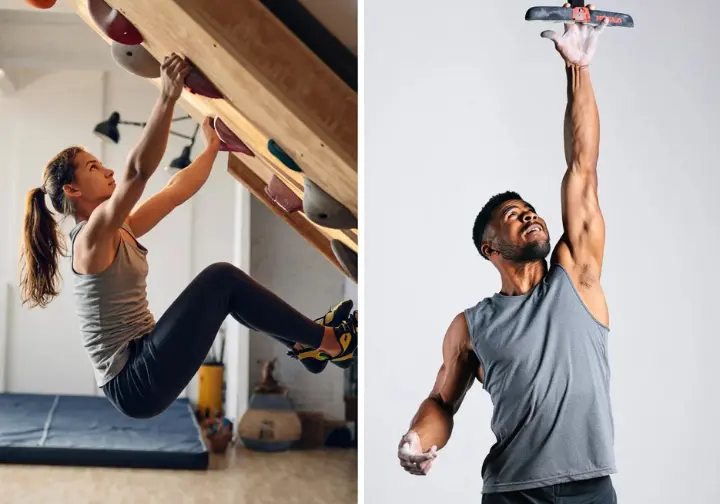
Hangboards (Fingerboards): Your Primary Tool
Hangboards, or fingerboards, are central to finger strength training, featuring various holds like edges, slopers, and pockets for isometric exercises like hangs. These training tools allow controlled stress application to the finger flexors and connective tissues. Materials vary, with wood being skin-friendly and resin offering diverse textures.
Designs differ in edge sizes, hold types (like a hangboard/lifting edge), and layout, with some fingerboards suiting specific training systems. Notable brands include Beastmaker, Tension Climbing, Lattice Training, Metolius, and Frictitious, offering a range of options for your first finger board or an upgrade.
Learning how to use a hangboard correctly is fundamental for essential fingerboard training, and resources on choosing a fingerboard can guide your selection from the essential training equipment for climbers including hangboards.
Campus Boards: Building Power and Contact
Campus boards feature wooden rungs for dynamic exercise targeting explosive power, contact strength (RFD), and upper body strength, engaging many arm and core muscles. This training is generally for more advanced climbers due to its high intensity and injury risk. Common campus board exercises include laddering, max-reach moves, and bumps/touches.
Proper technique, a solid strength base (like multiple pull-ups), and thorough warm-ups are paramount before campusing to minimize injury risk to fingers/elbows/shoulders. Rung depth and spacing vary, allowing progression. For those ready, there are specific campus board exercises for contact strength. Always prioritize campus board training safety when incorporating advanced techniques like campus board protocols into your routine.
Pinch Blocks, No-Hangs, and Portables
Pinch blocks are training tools for training pinch grip strength by lifting added weight, isolating a grip type often missed by standard hangboarding. No-hang devices (sometimes called grip-strength trainers) allow lifting weights rather than hanging bodyweight, useful for precise load management when looking to train finger strength.
Portable training tools like the Tension Flash Board or Lattice Micro Bar enable warming up at the crag or maintaining finger training for climbing consistency while traveling. Other accessories include weights, a harness (for removing load with a pulley system), and rice buckets for general conditioning.
Some climbers also use grippers or heavy grippers for supplemental grip strength work, though their specificity to climbing is debated. Many climbers train finger strength with no-hangs as a primary or supplementary method. The availability of portable hangboards for climbing means you can find various training tools like pinch blocks and portable devices to suit your needs.
Core Finger Training Exercises and Protocols
This section details specific finger training exercises and recognized protocols for hangboards, campus boards, and other tools. We’ll explain the goals, execution, and typical parameters for each workout method, giving you the practical “how-to” for your finger training, whether you’re looking for a new fingerboard protocol or trying to understand your favorite fingerboard protocol better. This is where we discuss the actual hangboard workout.
Hangboard Protocols: Max Strength Focus
Max Hangs are a primary method for maximal finger strength (often called max finger strength), involving short, high-intensity hangs on specific holds during fingerboarding. Common protocols include Eric Horst’s 10-second hangs or the 7-53 protocol (7s training hang, 53s rest).
Eva Lopez’s MAW (Maximal Added Weight) and MED (Minimum Edge Depth) protocols, a form of minimum-edge fingerboard training, offer systematic intensity increases to build maximum strength. Proper form (engaged scapula, slight bend in elbows, neutral wrist), appropriate grip selection (often half crimp or open-hand), and progressive overload are key for these fingerboard hangs.
There are many fingerboard training protocols that work, including the well-regarded Eva Lopez MaxHangs routine. Effective hangboard training for maximal grip strength is a cornerstone for many climbers aiming to increase their maximal strength potential. Some session max fingerboards focus entirely on these maximum-grip-strength protocols.
Hangboard Protocols: Strength-Endurance Focus
Finger strength-endurance is the ability to sustain repeated submaximal contractions, vital for longer routes and extended periods of climbing. Repeater protocols, a common form of endurance training on a fingerboard, train this quality. Well-known examples include the Anderson Brothers’ 7/3 repeaters (7s hang, 3s rest, 6 reps/set) or Eva Lopez’s IntHangs.
Intensity for repeaters is typically lower than max hangs (e.g., 60-80% MVC), allowing multiple repetitions within a set to improve endurance. The goal is often to induce hypertrophy and improve metabolic efficiency in the forearm muscles. Variations exist in work/rest intervals and sets.
Completing the full set of reps indicates appropriate intensity. For developing this capacity, hangboard repeaters strength endurance protocols are widely used, including the Eva Lopez IntHangs protocol. You can find specific hangboard protocols for endurance and other endurance tips to integrate into your training for route climbing.
Protocols for Connective Tissue, RFD, and Other Goals
Density Hangs, involving longer hangs (20-45s) at lower intensity (40-70%), are theorized to promote connective tissue density, a key part of tendon/ligament training. Protocols for Rate of Force Development (RFD), or contact strength, like Velocity Pulls or campus drills, aim to improve how quickly fingers can generate force.
Minimum Edge protocols involve hanging from the smallest manageable edge, targeting maximal strength on tiny holds. Emerging training methods like Blood Flow Restriction (BFR) training for climbing with fingers use cuffs to restrict blood flow during low-load exercise, potentially stimulating gains with less stress. For those interested in training for connective tissue density or exploring options like blood flow restriction training for climbers, these specialized approaches offer further avenues for improvement, including advanced training concepts like RFD.
Supplemental Exercises: Curls, Rice Buckets, Extensors
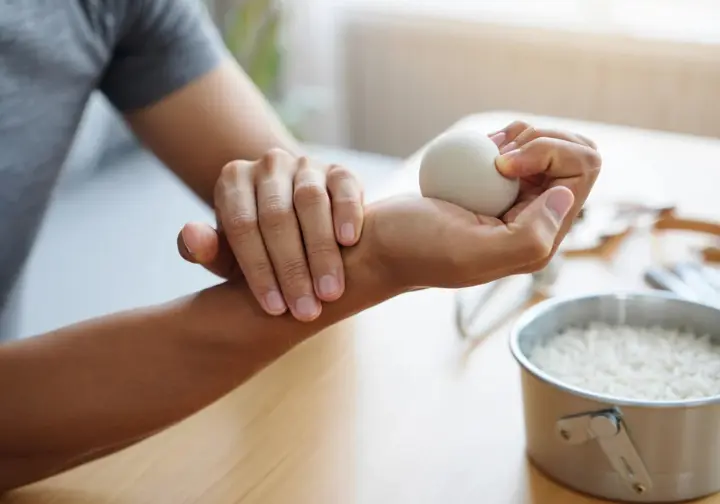
Finger curls with dumbbells target finger flexors concentrically, complementing the isometric exercises of hangboarding. Rice bucket training offers simple, low-cost general hand and forearm conditioning for flexors and extensors, often used for warm-ups or rehab; it’s a workout you can easily do at a gym or home.
Antagonist training for finger and wrist extensors (e.g., reverse wrist curls, rubber band extensions for all fingers including pinky fingers) promotes muscular balance of the forearm flexor muscle groups and may reduce overuse injury risk. These supplemental exercises support primary training methods and overall hand health. Some climbers might add a decent gripper workout here too. Effective finger extensor training for climbers is a common recommendation, alongside general grip strength exercises for rock climbing. Consider incorporating supplemental exercises like rice bucket training at home.
Structuring Your Finger Training: Building a Smart Plan

This section covers organizing your finger training: progressive overload, warm-ups, cool-downs, key variables (intensity, volume, training frequency, rest), and periodization for long-term progress. A smart plan for your own training, including a certain workout structure, is your roadmap to sustainable gains.
Warm-Up, Cool-Down, and Recovery Essentials
A thorough warm-up before any finger training session prepares tissues and reduces injury risk. It should include general cardio, dynamic stretching, and specific finger/forearm warm-ups like tendon glides, light hangs, or even do at least 30 minutes of easy bouldering or route climbing. A cool-down with gentle stretching can aid recovery.
Rest and recovery, including neuromuscular recovery, are when adaptations occur; adequate rest between reps, sets, sessions, and cycles, plus sleep and good nutrition, are vital. Active recovery on non-training days can also help. Comprehensive finger warm ups for climbing are available, and understanding tendon rehabilitation principles for climbers can inform recovery strategies. Many find benefits by integrating mobility into warm-ups and cool-downs.
Key Variables: Intensity, Volume, Frequency, Rest
Intensity (“how hard” your training sessions are) is manipulated by weight, edge size, RPE, or %MVC. Volume (“how much” training is done) is total hangs, sets, reps, or time under tension. Training frequency (“how often” training sessions are performed) is typically 1-3 sessions per week for dedicated finger training, adjusted by experience and overall load before your next workout.
Rest includes periods between hangs, sets (2-5 mins), sessions (24-72 hours for fingers), and cycles (deload weeks). Understanding training intensity for finger strength is key. Proper fingerboard training frequency and volume are also important considerations for program design. How do you currently balance these variables in your training?
Periodization: Structuring Training Long-Term
Periodization is the planned variation of training variables (intensity, volume, exercise type) over time, organized into cycles (macro, meso, micro), to optimize performance, prevent plateaus, and reduce injury risk. Common mesocycle phases applicable to finger training for a climber with a good training background include Anatomical Adaptation (preparing tissues for higher loads), Hypertrophy (increasing muscle size/capacity), Maximal Strength (increasing peak force), and potentially Power/RFD (increasing rate of force development).
These can be sequenced over a macrocycle (e.g., a 12-16 week training experiment) and integrated into an annual plan. Even simple, structured variations can be beneficial. Consistency and progressive overload within each phase are fundamental. For a structured approach, consider learning about periodization training for climbers and long term planning for climbing.
Integrating with Climbing and Tracking Progress
Integrate dedicated finger training sessions with regular on-wall climbing. Options include training fingers before climbing (fresh, may impact climbing performance), after climbing (e.g., after a session of hard bouldering or a few climbs on routes, when fingers are warm but fatigued), or on dedicated finger training days. Adjust overall training load (climbing + finger training) to avoid overtraining.
Measure and test finger strength progress via standardized tests (max weight on an edge), smallest edge held, or apps like Crimpd to ensure finger strength gains. Consistency in testing conditions is vital for reliable progress tracking, especially after intense climbs or non-maximal bouldering sessions. Some protocols, like Steve Bechtel’s 3-6-9 Ladders, inherently involve tracking. Research into the effects of different loading programs on finger strength also underscores the need for assessment. A systematic training approach to track progress is beneficial for any climber.
Finger Health: Injury Prevention and Management
This crucial section focuses on maintaining long-term finger health by detailing common finger injuries in climbers, comprehensive injury prevention strategies, and foundational principles for rehabilitation. Prioritizing healthy fingers and learning from past finger injuries is key to sustainable strength gains and a long climbing career. How mindful are you of these aspects?
Common Finger Injuries: Know Your Enemy
A2 and A4 pulley injuries (sprains, tears, ruptures) are the most common acute finger injury in climbers, often from high load in crimps, causing pain, swelling, and bowstringing of the tendon. Flexor tendinopathy (tendinitis/tendinosis) is an overuse injury characterized by pain and dysfunction in the finger flexor tendons, often due to excessive training volume or insufficient recovery.
Other potential finger issues include capsulitis (joint capsule inflammation), stress fractures in the phalanges (rare but possible with extreme loading), and lumbrical muscle tears (often associated with pocket pulling). Understanding these common finger injuries helps climbers recognize early symptoms and seek appropriate management. Many resources discuss common climbing finger injuries and offer guidance on rehabilitation for finger pulley injuries. Taping can offer support for finger injuries like pulley strains.
Proactive Injury Prevention Strategies
Thorough warm-ups before any climbing or finger training, and consider cool-downs involving gentle stretching. Stress proper technique for all training exercises, especially hangboarding (e.g., maintaining scapular engagement, avoiding full elbow lock-out, using open or half-crimp grips more often than full crimps for training). Implement gradual progressive overload; avoid sudden large increases in training intensity, volume, or frequency, especially for the hard-training climber.
Allow tissues time to adapt. Listen to your body whilst training finger strength; distinguish normal fatigue from pain that signals potential injury. Do not train through sharp or persistent pain, which can result from excessive finger strength application without proper conditioning. Adequate rest, sleep, and nutrition are necessary for tissue repair. Antagonist training can help. Learning about preventing climbing finger injuries and avoiding fingerboard training mistakes is a good investment. Consider injury prevention through balanced training.
Basic Rehabilitation Principles for Fingers
Rehab is phased: relative rest, pain management (Optimal Loading), then restoring mobility (e.g., tendon glides). Progressive loading follows, starting with light isometrics and gradually increasing load as pain allows and strength returns. A gradual return to climbing involves modifying intensity and volume, avoiding aggravating moves. One caveat is that pushing too hard too soon can re-injure the finger. Consulting a qualified healthcare professional is strongly advised for accurate diagnosis and personalized rehabilitation plans, especially for significant injuries. There are helpful accounts on rehabbing A2 pulley injuries and information on rock climbing finger tenosynovitis treatment. Often, mobility work as part of rehabilitation is beneficial.
Tailoring Your Approach: Context Matters
This section guides adapting finger training strategies based on individual climber experience levels (from beginner to intermediate climbers, strong climbers, or even high level climbers), available resources (home vs. gym), and specific climbing goals. It emphasizes that there’s no one-size-fits-all solution, and a good trainer can help personalize your approach.
Training for Different Experience Levels
Beginners (<1-2 years climbing) should focus primarily on technique and natural adaptation of their formative months/years—finger tendons through regular climbing. If dedicated finger training is introduced, it should be low-intensity (light hangs, foot-on hangs) for beginner finger strength development, perhaps an entry-level fingerboard program. Intermediate climbers (e.g., 2-5 years climbing) can start more structured training, often repeaters or introductory max hangs, with careful form.
Advanced climbers and experienced climbers (e.g., 5+ years, potentially elite climbers) may employ more complex periodized plans and fingerboard programs, targeting weaknesses with advanced protocols. These are general guidelines; listen to your body. There’s specific advice on fingerboard training for novice climbers and advanced hangboard training techniques. Beginners should establish foundational techniques before intensive finger training.
Effective Home Finger Training Solutions
Effective finger training can be done at home. Installing a hangboard is a primary solution for a basic hangboard workout. No-hang devices with loading pins and grip tools require only weights. Bodyweight or assisted hangs can use doorframe pull-up bars with attachments or portable hangboards.
Simple options include rice bucket workouts and rubber band extensor exercises. Principles of progressive overload, proper form, and rest apply rigorously to any home training setup. Many resources detail the best home training for climbers and offer a minimalist climbing strength routine. You can achieve significant gains by building climbing strength with an at-home workout routine.
Science vs. Anecdote: Finding Your Path
The climbing training world blends scientific research with anecdotal experience from seasoned climbers and coaches. Maintain a critical but open mindset: understand the scientific basis (SAID principle, progressive overload, muscle physiology) for informed choices about your fitness and strength—and how to improve it.
Anecdotal methods from elite climbers may work for them due to specific genetics or training history, but may not be universally applicable for achieving maximum-strength adaptations or apparent strength gains. Use scientific principles as a foundation, experiment cautiously with established protocols, meticulously track your own responses (changes in apparent strength—and actual strength, pain levels, recovery), and gradually refine your approach based on what demonstrably works for your individual body and goals to reach your maximal strength potential.
Consulting experienced coaches or PTs can be invaluable. Academic sources discuss the validity of finger flexor strength tests, while some brands like Beastmaker advocate a Beastmaking fingers-first approach that encourages self-experimentation.
Conclusion: Your Journey to Stronger, Healthier Fingers
Mastering rock climbing finger training is a long-term commitment over many months/years—finger development takes time, balancing dedicated strength work with a profound respect for finger health and injury prevention. Understanding anatomy, biomechanics, and sound training principles (including appropriate grip choice) is foundational.
Consistency, diligent warm-ups, proper exercise technique, and listening to your body are more important than quick fixes. Injury prevention is not an afterthought but an integral part of any successful finger training strategy; prioritize sustainable practices. Empower yourself with knowledge, track progress, adapt your training, and seek expert guidance when needed for a lifetime of climbing.
Frequently Asked Questions about Rock Climbing Finger Training
How often should I do dedicated finger training? >
When is it safe for a beginner to start hangboarding? >
Can I train finger strength effectively without a hangboard? >
What’s more important: how much weight I can hang or how small an edge I can hold? >
We are a participant in the Amazon Services LLC Associates Program, an affiliate advertising program designed to provide a means for sites to earn advertising fees by advertising and linking to Amazon.com. As an Amazon Associate I earn from qualifying purchases. We also participate in other affiliate programs. The information provided on this website is provided for entertainment purposes only. We make no representations or warranties of any kind, expressed or implied, about the completeness, accuracy, adequacy, legality, usefulness, reliability, suitability, or availability of the information, or about anything else. Any reliance you place on the information is therefore strictly at your own risk. Additional terms are found in the terms of service.


