

In this article
- The Essence of Adventure and Self-Reliance in Trad Climbing
- Gearing Up: Your First Trad Rack – The Essentials
- The Art of Placement: Core Principles for Solid Protection
- Placing Your Pieces: A Detailed Guide to Trad Protection
- Building Your Lifeline: Trad Anchor Fundamentals
- Safety First, Always: Risk Management in Trad Climbing
- The Trad Leading Process: Taking the Sharp End
- Following and Cleaning: The Second’s Crucial Role
- Your Journey in Trad Climbing: Learning and Progression
- Respecting the Rock: Trad Climbing Ethics and Leave No Trace
- Conclusion: Embracing Your Trad Climbing Journey
- Frequently Asked Questions about Introduction to Trad Climbing: The Art of Placing Your Own Protection
Traditional (trad) climbing, a distinct pursuit in the world of climbing, invites you into a world of adventure defined by self-reliance and a deep connection with the rock. This discipline, where climbers place and remove their own protection, differs fundamentally from sport climbing with its pre-placed bolts. We’ll explore the unique rewards of this path, such as profound self-sufficiency and the allure of navigating the rock’s natural features. We will also acknowledge the inherent challenges, including a steeper learning curve and greater risks. If you’re drawn to a more committing and holistic practice, understanding the art of placing own protection is your first step in mastering trad’s art: intro to placing protection. This guide aims to lay the foundations for your learning process.
The Essence of Adventure and Self-Reliance in Trad Climbing

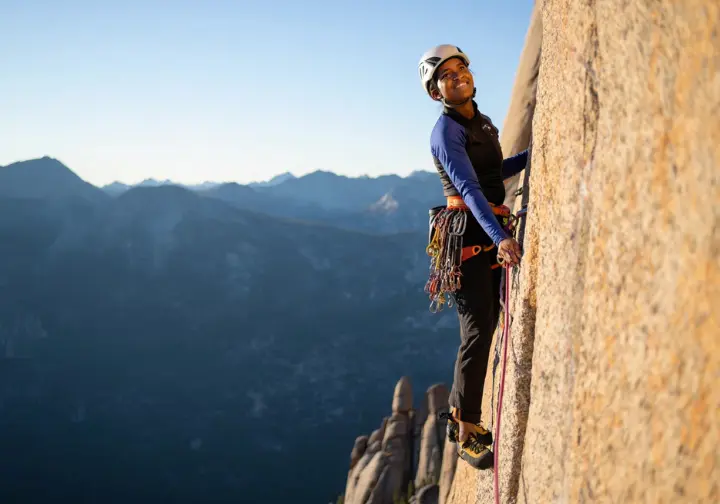
Traditional climbing, or “trad climbing,” is a discipline where the lead climber places removable protection into the rock as they ascend, which is later removed by the follower. This practice, the original form of rock climbing, fosters a deep sense of self-sufficiency as the climber is entirely responsible for their safety system. The process involves interpreting the rock face for paths and protection possibilities, unlike following a line of bolts in sport climbing. For anyone wondering what is trad climbing, this is its core.
This form of climbing is considered free climbing, meaning progression is made using only hands and feet on rock features; the gear is solely for protection against falls, not for direct aid. The intimate engagement with the rock and the responsibility for one’s own safety system cultivate a profound sense of adventure and personal accomplishment. This “art” involves skill, judgment, and creativity in placing gear. You can learn more about the basics of traditional climbing to grasp these foundational concepts of trad protection.
Historically, trad climbing was the dominant form of free climbing, its history rich with stylistic advancements. Despite the rise of sport climbing for pushing physical limits due to enhanced safety, trad climbing has maintained its appeal and even experienced a resurgence. It is valued for its unique combination of physical, mental, and technical skills, presenting unique challenges.
Trad vs. Sport Climbing: Understanding Key Differences
The most significant difference between trad versus sport climbing lies in their protection systems. Trad climbers place removable gear like cams and nuts into natural rock features, which the follower then removes. Sport climbers, conversely, clip into permanent, pre-drilled bolts on a wall. This core distinction has a ripple effect on nearly every other aspect of the climbing experience.
This difference heavily influences the mental game. Sport climbing allows focus on physical movement due to reliable fixed protection, while trad climbing demands continuous assessment of rock quality, gear placement basics, and fall consequences. Route-finding also differs: sport routes follow obvious bolt lines, whereas trad climbers must interpret the rock to find their path and protection.
The approach to falling varies significantly. Sport climbers are generally more comfortable with repeated falls, while trad climbers are more cautious due to the variable reliability of self-placed protective gear. Consequently, trad climbing involves a higher level of objective and subjective risk, requiring acute risk assessment skills and a greater tolerance for uncertainty. This distinction is crucial for climbers transitioning from sport versus trad. A detailed trad vs sport climbing comparison can further clarify these points and aid your understanding of each style.
Why Choose Trad Climbing? Rewards and Challenges
A primary attraction of trad climbing is the profound sense of adventure and freedom it offers, allowing access to a wide array of rock faces beyond bolted routes. The mental engagement is another significant draw, often described as a “mental puzzle” requiring continuous problem-solving in assessing rock, choosing gear, and managing risk. This intellectual challenge provides deep satisfaction and motivation. The rewards of trad climbing are multifaceted.
Many appreciate trad climbing for its self-reliant journey, fostering a unique “first ascent” feeling even on established routes, as there are no pre-placed markers. It is also valued as the “cleanest way to climb outdoors,” minimizing permanent impact on the rock, a core tenet of clean climbing ethics and the LNT (Leave No Trace) principles.
However, these rewards come with challenges: trad climbing inherently carries higher risks, as the safety system depends entirely on the climber’s skill. Equipment requirements are more extensive and costly, and the learning process is considerably steeper, demanding dedicated practice and mentorship. The motivation to embrace these often stems from a desire for a more holistic climbing experience.
Gearing Up: Your First Trad Rack – The Essentials
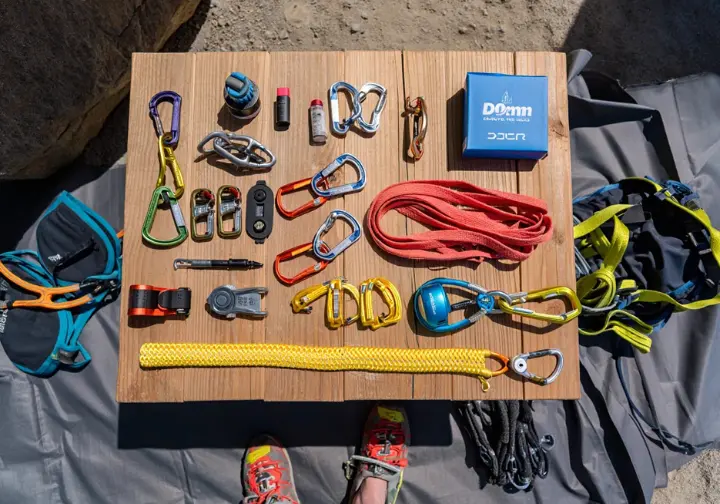
Assembling your first trad rack is a significant step to learn trad climbing. This involves understanding the crucial difference between active protection, which has moving parts like cams, and passive protection, such as nuts, which do not. We will outline the key components for a beginner’s setup and discuss strategies for racking gear efficiently for quick access during a climb. A well-organized rack, filled with appropriate trad gear, is vital for both safety and cognitive offloading, particularly when you’re starting out.
Active vs. Passive Protection: Understanding Your Lifeline
Trad climbing protection is categorized into active and passive protection types based on whether they have moving parts. Passive protection, like nuts (also known as stoppers or chocks) and hexcentrics, have no moving parts. They rely on being wedged into constrictions or tapered cracks. Nuts are tapered metal wedges that jam firmly when weighted, while hexes are six-sided pieces that can be wedged or sometimes cam slightly.
Active protection features moving, typically spring-loaded, parts that adapt to the crack’s shape. The most common example is a cam, or Spring-Loaded Camming Device (SLCD). It has three or four curved lobes that expand against the crack sides when the trigger is released. The outward force and friction hold the cam during a fall. Understanding how climbing cams work is fundamental for any trad climber. These are amazing tools when used correctly.
The mechanical differences dictate placement: passive protection needs constrictions, while active protection like cams suit parallel-sided cracks. This requires climbers to read the rock for features matching their diverse protection pieces. Active gear is often quicker to place and fits where passive pro won’t, but is heavier and more expensive. Passive pro is lighter, simpler, and very secure in good constrictions but needs specific crack geometry. You can explore more about types of climbing protection for a broader view of traditional protection.
Building Your Starter Trad Rack: Key Components
A beginner’s trad rack should focus on essential tools, versatile pieces for moderate climbs, typically starting with medium-sized gear. Key components include a standard set of nuts (8-12 pieces) and a nut tool for removal. A selection of 6-10 cams covering common sizes (e.g., 0.5 to 3 inches) is crucial for parallel cracks. This initial skillset development is key for trad climbing for beginners.
A small set of hexes can supplement cams cost-effectively. A variety of slings (single and double-length) are needed for extending placements and building anchors, often configured as alpine draws with non-locking carabiners. Around 12-16 non-locking carabiners (wire-gates are light) and 4-6 locking carabiners (for critical connections like belays and anchors) are essential. For a detailed list, consult a beginner trad rack checklist.
A dynamic climbing rope, a comfortable harness, a helmet, climbing shoes, and a belay/rappel device are fundamental. A helmet is non-negotiable. You’ll also need a belay/rappel device and suitable trad harnesses. A 20-25ft cordelette or long webbing sling is invaluable for building equalized anchors. Optional additions for later include tricams. Learning how to rack trad gear efficiently is also a key skill. Your personal gear choices will evolve with trad experience.
Racking Gear Efficiently for Quick Access
Efficiently racking trad gear on a harness or gear sling is critical for performance and safety, allowing quick identification and retrieval, reducing fatigue, and freeing mental capacity. Consistency is paramount, regardless of the chosen system. Climbers typically choose to have carabiner gates facing either all “in” or all “out” and stick with it. These strategies are worth practicing.
Common organization methods include racking by size (smallest to largest, front to back on gear loops) or by type (nuts on one carabiner, cams arranged by size, draws on the other side). Nuts are usually racked on one or two non-locking carabiners, grouped by size to avoid tangles. Each cam should ideally be on its own non-locking carabiner, arranged by size for quick selection. For further details, REI offers REI’s advice on trad lead climbing.
Hexes, like cams, are best on individual carabiners. Quickdraws and alpine draws can be racked on available loop space, often towards the rear or spread out. Alpine draws should be easily extendable with one hand. While most modern climbers rack on their harness, some use a gear sling for large racks. Familiarity through practice is key to a system that feels intuitive for organizing your climbing rack.
The Art of Placement: Core Principles for Solid Protection
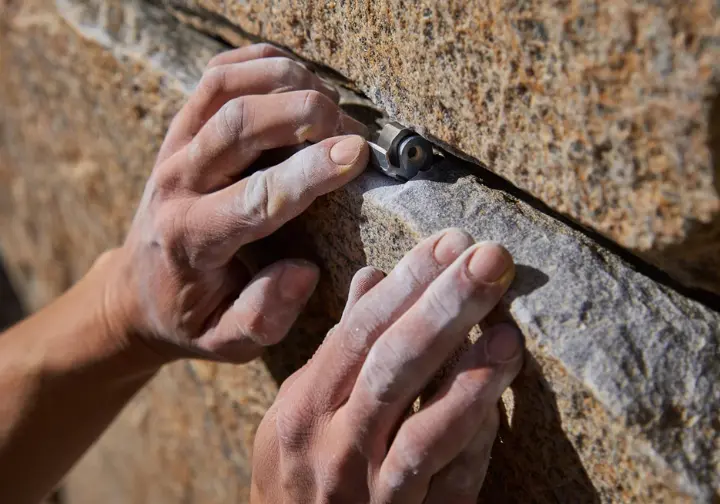
Safe trad climbing fundamentally hinges on the quality of your gear placements. This begins with a critical assessment of rock integrity, as even the best gear is useless in poor rock. We will then explore the universal principles that guide the efficient protection placement of all types of protection, forming the bedrock of your safety on the wall. Understanding trad systems is vital here.
Bomber Placements Start with Bomber Rock Quality
The single most critical factor for a strong gear placement is the protection quality of the rock itself. Even perfect gear in weak or loose rock is unreliable. Continuous and meticulous rock assessment is a primary risk mitigation strategy. Climbers must look for signs of instability like fractures, loose blocks, or detached flakes, and assess if features are integral to the main cliff. More information on assessing rock quality for placements can be very helpful.
Suspicious rock should be physically tested by thumping or tapping it with a hand or nut tool. Rock that vibrates or sounds hollow is likely detached or fractured and untrustworthy. Different rock types have varying characteristics affecting placements. Granite is generally strong but can have loose sections. Knowing when to place trad gear also involves this critical rock evaluation and understanding of the environment.
Sandstone varies greatly; some types are soft, prone to erosion, and lose significant strength when wet, requiring avoidance after rain. A hard outer patina on sandstone can mask weaker rock underneath, where cams might punch through. Limestone can feature pockets but also be smooth or brittle with variable quality. The responsibility for evaluating trad rock rests entirely with the trad climber.
Guiding Principles for Every Secure Gear Placement
Beyond solid rock, several universal principles govern effective trad protection placement. Each piece must be oriented to resist the force of a potential fall, generally a downward and slightly outward pull. This involves visualizing how forces will act on it. Maximizing surface contact with solid rock helps distribute forces and resist pull-out. For nuts, this means full metal seating, and for cams, all lobes evenly engaged for secure placement. A good placement inspires confidence.
Avoid shallow placements where gear could lever out. Nuts should be well-seated in constrictions, and cams deep enough to avoid “walking” but still be cleanable. Selecting the correct gear size for a placement is crucial, often by visual estimation or using hands as a gauge. Many resources explain how to place trad climbing gear, offering valuable tips.
The leader must also consider ease of cleaning for the second climber, avoiding overly deep or excessively wedged placements. Placements often need extension with slings or alpine draws to prevent rope drag from dislodging gear or creating excessive friction, especially on wandering routes or under overhangs. These principles demonstrate that placement is a dynamic cognitive process. Learning how to lead climb on trad gear incorporates all these elements for mastering the craft.
Placing Your Pieces: A Detailed Guide to Trad Protection
This section offers specific techniques for placing various types of traditional climbing protection. We will cover nuts (stoppers/chocks), cams (SLCDs), hexcentrics (hexes), and tricams. For each type, we’ll discuss their unique mechanics, ideal applications, and common mistakes to avoid, ensuring you build a solid understanding of how to place traditional protection effectively and safely. This is where practical skills meet technical knowledge.
Mastering Nuts (Stoppers/Chocks) for Trad Climbing
Nuts are fundamental to trad racks due to their simplicity, light weight, and reliability in constrictions. Their holding power comes from being wedged, not from outward force like cams, making them good in rock where cam pressure might be detrimental. Effective placement requires identifying cracks that taper downwards, placing the nut above the constriction, and seating it downwards with a firm tug. You can find guides on how to place climbing nuts for detailed instructions.
Select the nut size and orientation (they often have asymmetrical shapes offering multiple placement options) that achieves maximum surface contact with the rock for better grip. Once a good fit is found, give the nut a firm downward tug on its wire or an attached quickdraw to “set” it, ensuring it’s less likely to shift. This simple tool is a cornerstone of trad.
The nut’s cable should align with the anticipated fall direction, generally down and slightly out. Place it fully inside the crack but not so deep it becomes uncleanable. Common mistakes include placing nuts in parallel or outwardly flaring cracks, insufficient surface contact, and not setting them firmly. Climbing Magazine offers insights on using nuts for climbing protection.
Understanding and Placing Cams (SLCDs) Securely
Spring-Loaded Camming Devices (SLCDs), or cams, are active protection prized for protecting parallel-sided cracks and their placement speed. However, their security relies on precise placement and good rock. Cams have curved lobes on an axle, shaped in a logarithmic spiral for a constant camming angle. Pulling the trigger retracts lobes for insertion; releasing allows them to expand against crack walls. Fall force converts to outward pressure, holding the cam via friction; this necessitates solid rock as cams can break weak rock.
Choose a cam size so lobes are optimally retracted (25%-75%, mid-range ideal); over-cammed (too big) makes it hard to remove, while under-cammed (too small, “tipped out”) will likely fail. Insert by retracting lobes, ensure all lobes contact solid rock, release smoothly, and align the stem with the anticipated pull. Visually check lobe retraction and contact. For those seeking expert tips on cam placement, dedicated resources are available. The cam placement itself is an art.
Place cams deep enough to prevent “walking” (shifting due to rope movement) but with the trigger accessible for cleaning. Extend placements with slings to mitigate walking. For horizontal cracks, orient the stem downwards; offset cams are ideal for flared cracks. Common mistakes include wrong sizing, placing in flaring cracks or poor protection situations, uneven lobe contact, and insufficient extension. The right protection choice is key.
Working with Hexcentrics (Hexes)
Hexcentrics (“hexes”) are six-sided, often asymmetrical passive protection that can also exhibit a camming action, bridging the gap between nuts and cams. They can be placed in a passive mode, wedged into a constriction like a nut, where their asymmetrical shape often finds secure fits in irregular placements. They can also be placed in an active (camming) mode in parallel-sided or slightly tapered cracks by orienting them so a downward pull causes rotation and outward pressure against the rock.
Orientation is key for camming action. Place the hex so opposite long faces contact crack walls, with the sling typically exiting diagonally from the bottom. Experiment with rotation to find the tightest fit and maximize camming potential. Ensure good surface contact with solid rock on the faces that will be loaded to achieve a reliable hold in the camming position.
Hexes excel in irregular cracks, slightly tapered cracks (in active mode), and some climbers prefer them in icy or wet conditions due to their larger surface area providing better grip. Larger hexes offer cost-effective protection in wider cracks compared to large cams. Considerations include their noise on the rack and the skill required for effective camming placement, as they can be more “fiddly” than cams. Always extend placements as needed to ensure proper function and reduce rope drag. For more on using climbing hexes effectively, specific guides are available.
Utilizing Tricams for Specialized Placements
Tricams are unique protection with a shaped metal head (fulcrum point on one side, two rails on the other) attached to a webbing sling. They are placeable in active (camming) and passive (like a nut) modes. In passive mode, they wedge into constrictions, fitting well in sharp-angled slots. Set them with a firm tug and extend as they can wobble out.
Active mode is their specialty: the head is flipped, sling through cam rails, fulcrum point set in a dimple or pocket, and rails against the opposite wall. A downward pull rotates the head, driving the fulcrum in and pushing rails out for camming action; a sharp tug sets it. A positive feature for the fulcrum to bite into is crucial for holding power. Learning how to use tricams can unlock many tricky placements, showcasing their specific advantages.
Tricams excel in horizontal cracks (where nuts fall out and cams are difficult), small pockets/pods too irregular for cams, and in icy, wet, or soft rock where the fulcrum’s point bites well. Security in active mode highly depends on a good fulcrum placement; they need a firm tug to set. Cleaning involves reversing placement, often disengaging camming by rotating the head or lifting the fulcrum with a nut tool. They are specialized but indispensable for certain placements.
Building Your Lifeline: Trad Anchor Fundamentals
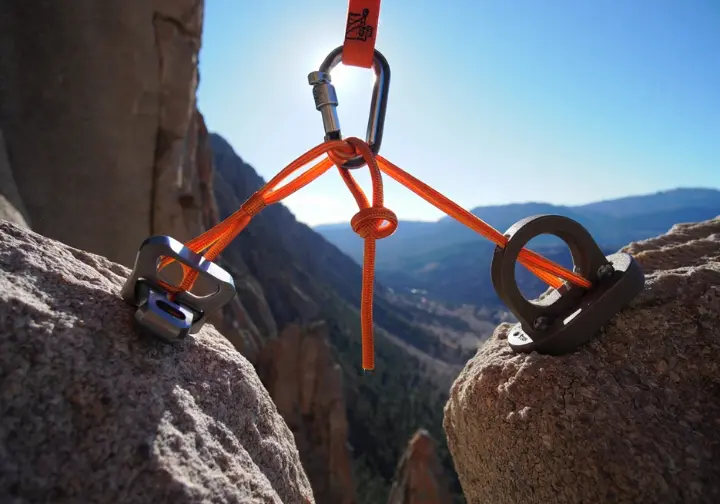
Building secure traditional climbing anchors is a critical skill, arguably the most important for a trad climber. This section will detail the guiding principles, often remembered by acronyms like SERENE, ERNEST, or IDEAS, which serve as a mental checklist for reliability. We’ll provide a step-by-step guide to constructing a basic trad anchor using gear, discuss incorporating natural protection like trees and boulders, and highlight common mistakes to avoid. Trad anchor building is a cornerstone of safe trad climbing.
Principles of a Bomber Anchor: SERENE/ERNEST/IDEAS
Reliable trad anchors are built on guiding principles often remembered by acronyms like SERENE, ERNEST, or IDEAS, serving as vital cognitive checklists. ‘S’ stands for Solid/Strong/Sound: each individual piece must be “bomber” in solid rock, as the anchor’s strength is limited by its components. ‘E’ for Equalized: the load should be distributed as evenly as possible across all pieces to prevent any single piece from bearing the entire load and failing. These trad anchor principles are fundamental.
‘R’ for Redundant: an anchor must be built using multiple, independent protection points, typically 3 or more protection pieces, so if one fails, others hold the load. Independence means one failure doesn’t cause others to fail (e.g., not all in the same questionable block). ‘E’ for Efficient/Timely: construct anchors efficiently in gear and time, especially in multi-pitch or adverse conditions, but never compromise safety.
‘N’ for No Extension: if one piece fails, the system should introduce minimal slack and not shock-load remaining pieces. ‘A’ for Angles: angles formed by slings/cordelette connecting pieces to the master point should be small (ideally <60°, max 90°). Wider angles multiply force on individual pieces, negating equalization benefits (e.g., 120° angle means each piece sees 100% of load). The anchor must also be Directional, built for the expected pull direction. Finally, Safety Checks ensure the entire system is checked. VDiff Climbing offers comprehensive trad information on trad anchor building principles.
Step-by-Step: Building a Basic Trad Anchor with Gear
Constructing a trad anchor starts with determining the direction of pull, which dictates gear placement, orientation, and equalization strategy. Misjudging pull direction can compromise well-placed gear. Select at least three locations for “bomber” gear placements, ideally in different rock features for redundancy, and rated to at least 10 kN each. This technique requires practice making sound judgments.
Placements shouldn’t be too close (risking single block failure) nor too far (making equalization hard and creating wide angles). Include at least one piece that withstands upward/outward pull. Using a cordelette (e.g., 7-8mm cord in a loop), clip it to carabiners on each piece, positioning the cordelette’s joining knot below one component.
Gather cordelette strands, pull them in the anticipated load direction, adjust lengths for equal load sharing, and tie a master knot (overhand, figure-eight, or figure-nine on a bight) using all strands to create the master point. Alternatively, a quad anchor can be used for self-distribution. Attach to the master point with a strong locking HMS carabiner. Finally, perform SERENE/IDEAS checks: Solid pieces? Equalized? Redundant? No extension? Angles good? Directional? Knots/carabiners correct and locked? For a visual guide, learn how to build a trad anchor with cordelette.
Incorporating Natural Protection (Trees, Boulders)
Natural protection features like trees and boulders can provide excellent anchor points, often simplifying construction and saving gear, but require diligent assessment. Trees must be alive, healthy, well-rooted (no movement at base when tested), and sufficiently thick (at least wrist-thick or 5 inches diameter). Avoid dead trees or those in shallow soil (like Joshua Trees).
Sling trees at the base to minimize leverage, using a long sling or cordelette, and protect from abrasion if needed. Girth hitching or wrapping and clipping sling ends with a locking carabiner are common methods. Boulders must be large, heavy, well-seated (not precariously balanced), and made of solid rock. Climbing Magazine Skills offers guidance on using trees and boulders for climbing anchors, which is an essential tool in your skillset.
Rock horns or spikes must be thick, solid, well-attached, and inspected for cracks at the base. Ensure the sling cannot slip off the horn, ideally using a natural constriction. Loop slings around boulders or horns, positioning them securely and padding sharp edges. Natural pro can be one or more points in a multi-piece anchor, combined with gear for redundancy and equalization.
Common Anchor Building Mistakes for Beginners
Poor protection choices or construction in anchors is a common error. Simply connecting pieces doesn’t guarantee equalization, and one piece can take most of the load if slings aren’t adjusted for the pull direction. Incorrect V-angles (wider than 60-90 degrees) significantly multiply force on each piece, often from spacing pieces too far or not bringing strands together tightly.
Lack of true redundancy or independence occurs when pieces are in the same small, isolated, or questionable block of rock. If the block fails, all pieces fail. Creating anchors prone to extension means if one piece fails, significant slack is introduced, shock-loading remaining pieces. This can lead to inadequate protection.
Ignoring outward or upward pull potential is another mistake. Anchors built only for downward pull can fail if the leader falls above the belay or the belayer is pulled up, unless pieces like opposed nuts or well-set cams are used. Using insufficient pieces (less than three solid, well-equalized ones generally) or having an insecure master point (incorrect knots, unlocked carabiners) are also serious errors. Complacency with natural anchors without thorough assessment is dangerous. Many common climbing mistakes and how to avoid them are applicable here.
Safety First, Always: Risk Management in Trad Climbing
Trad climbing carries inherent risks due to the climber’s ultimate responsibility for their safety system. This “responsibility transfer” means you create and validate your lifeline with every piece placed. We’ll emphasize non-negotiable safety protocols, explain fall dynamics on trad gear, and discuss managing rope drag for safer, more efficient ascents. Understanding these elements is fundamental to mitigating risks and ensuring an enjoyable trad experience. This management of risk is paramount.
The Inherent Risks: Understanding What’s at Stake
Transitioning to trad climbing involves a significant “responsibility transfer” because the climber is responsible for every aspect of their protection, unlike in sport climbing where bolts are pre-set on artificial walls or outdoor crags. This active creation and validation of the safety system is a core element of the discipline.
Increased responsibility comes with objective hazards like gear failure due to incorrect placement, poor rock, or inappropriate gear choice. Rock failure, where the feature itself breaks under load even with “perfect” gear, is another major risk. Rock About provides essential rock climbing safety tips which are a good starting point for any trad climber.
Some routes may offer limited protection opportunities, leading to long runouts with serious fall consequences. Improperly constructed trad anchors can fail catastrophically. The complexity of systems, gear management, and decision-making in trad climbing also increases the potential for human error. Acknowledging these risks fosters respect for the discipline.
Key Safety Protocols You Must Always Follow
Diligent partner checks before any climber leaves the ground are essential. This includes checking the climber’s tie-in knot (correctly tied, dressed, adequate tail, through correct harness points), both harness buckles (fastened, doubled back if needed), and checking the belay device (rope threaded correctly, locking carabiner locked and correctly attached). This critical safety technique cannot be overlooked.
Thorough gear inspection is crucial, both regularly before climbing (checking for wear, damage, aging on all personal gear) and visually inspecting each piece as it’s placed. Retire suspect gear immediately. The BMC offers valuable BMC trad climbing safety tips and general advocacy for safe climbing practices.
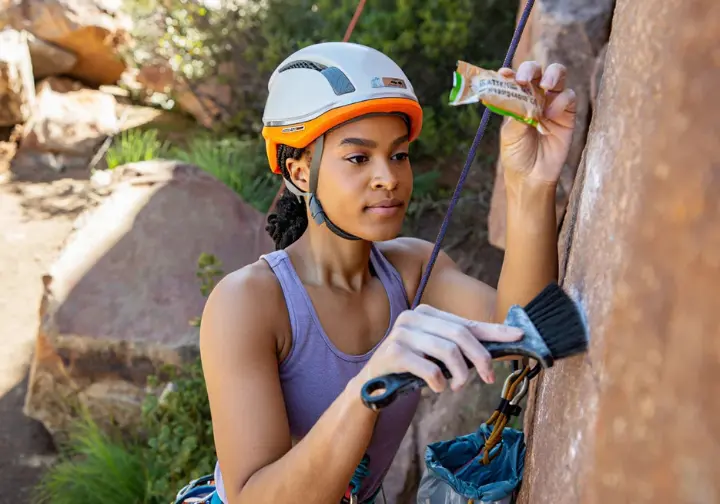
Clear, unambiguous, and standardized communication between climber and belayer is vital, especially when out of sight or in noisy conditions; confirm calls if unsure. Always wear a helmet (climber and belayer) to protect against falling rock, dropped gear, or head impact. Critically inspect any fixed gear encountered on a trad route, as its integrity should not be blindly trusted. Ritualizing these checks introduces redundancy into the human element of safety.
Understanding Fall Dynamics on Trad Gear
Understanding fall dynamics like fall factor, impact force, and rope elongation is crucial for appreciating forces on gear. Fall Factor (FF) quantifies fall severity, calculated by fall length divided by active rope length available to absorb energy (FF = Length of Fall / Length of Rope in System). FF ranges from 0 to a theoretical maximum of 2. A Factor 2 fall is most severe, occurring when a leader falls twice the rope length out from the belay without intervening protection, maximizing force on the anchor and belayer. Lower FF generally means lower impact forces. For an in-depth look, Petzl explains fall factor and impact force theory.
Impact Force is the peak force on climber, belay system, and protection during fall arrest. Dynamic ropes elongate (stretch) to dissipate fall energy and reduce peak impact force. Factors like FF, rope properties, slack, and belayer movement influence it. Gear is rated in kilonewtons (kN); leader falls on trad gear often generate 2-5 kN, but higher FF can produce greater forces. Trail & Crag also offers useful resources for understanding climbing fall factor.
The “Zipper” Effect is a dangerous phenomenon where the highest piece fails, and subsequent force causes lower pieces to fail sequentially. This happens if pieces are weak, poorly placed, or not oriented for outward/upward pull (especially early pieces). Mitigate by placing a solid, multi-directional first piece ASAP above the belay and ensuring subsequent good placements considering pull direction. This highlights the need for backup placements and understanding fall forces.
Managing Rope Drag for Safer, Easier Ascents
Rope drag is friction from the rope running over rock and through carabiners, working against the climber and safety system. Excessive drag makes pulling rope to clip difficult, causing fatigue and rushed moves, and can cause gear (nuts, shallow cams) to “walk” or lift out. Drag also effectively shortens active rope length, increasing fall factor and impact forces. Andy Kirkpatrick offers insights into understanding rope drag in climbing and effective management tactics.
The primary method to minimize drag is extending placements with slings (alpine draws), often 60cm or 120cm, allowing the rope a straighter line. Alpine draws (sling with two carabiners) are versatile for adjusting length. Extend placements on wandering routes, over roofs/bulges, when gear is deep in corners/overhangs, or anytime a piece creates a significant rope bend.
Visualize the rope line and try to place protection for as straight a path as possible, compromising with good placement availability. Using two ropes (half/twin) on very wandering routes can significantly reduce drag by clipping each rope to alternate pieces. Thinner ropes with slick sheaths and larger radius carabiners generally create less friction. Back-cleaning (removing lower problematic pieces) is an advanced tactic requiring extreme caution. There are many techniques for preventing rope drag available to learn.
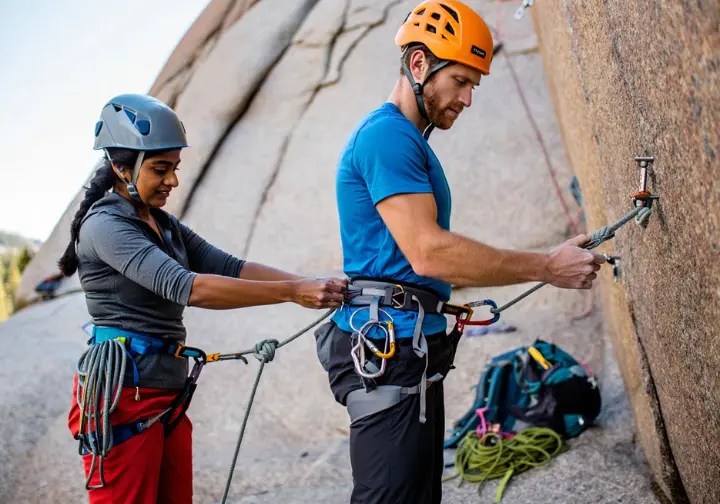
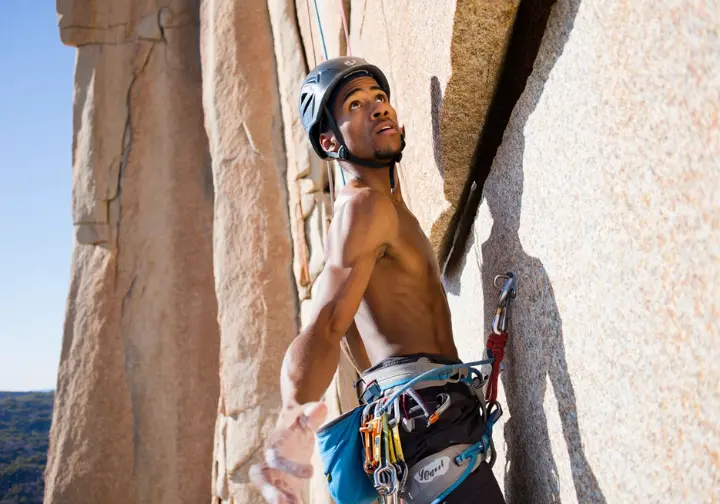
The Trad Leading Process: Taking the Sharp End
Leading a trad climb is where all your skills converge: gear placement, risk assessment, and mental fortitude. This section covers the basic principles of leading, from anticipating placements and managing your rack to moving efficiently. We will also delve into the critical mental game, exploring how courage, calm, and sound decision-making are cultivated under pressure. Taking the sharp end on a trad project is a significant step.
Basic Principles of Leading Trad Climbs Efficiently
Successful trad leading involves continuously scanning the rock for potential gear placements, assessing rock quality, and selecting appropriate trad gear while moving upwards. This includes reading terrain for features like cracks and constrictions, and anticipating needs further up the route. Good movement skills are essential.
Place gear from stable stances whenever possible to conserve energy and ensure careful placement; avoid waiting until pumped or scared. Pacing and energy conservation are vital as trad leading is often slower and more strenuous; use good technique and find rests from good stances. Efficient, smooth, controlled climbing with good footwork and body positioning helps save energy for placing gear and crux sections. The BMC provides resources on training for trad climbing performance.
While placing enough protection (especially at pitch starts or above ledges) is crucial, leaders must manage their rack to have gear for the whole pitch and anchor. This may involve choosing a nut over a cam to save cams for specific sections. Maintain ongoing, clear communication with the belayer about intentions, gear status, and hazards. Trad climbing often requires commitment to moves between protection, trusting one’s ability and gear. This style demands a broad skillset.
The Mental Game: Courage, Calm, and Decision-Making
The psychological dimension of trad leading is as significant as the physical and technical aspects, requiring fear management, composure, and sound judgment. Fear of falling onto self-placed gear is a primary barrier, as gear reliability is tied to the leader’s skill, creating anxiety especially when runout. One way to manage this is by maintaining mental focus to conquer fears and boost confidence.
Techniques for managing fear include controlled deep breathing to calm the nervous system, positive self-talk to replace negative thoughts (e.g., “Focus on this move,” “My gear is solid”), and visualization of successful movements. Gradual exposure through controlled practice falls onto well-placed gear (with backup initially) can desensitize fear and build trust. It’s helpful to psychologically train the climber’s mind.
Developing trust in one’s placements and judgment is crucial, built through experience, diligent practice, and honest self-assessment. Trad leading demands continuous decision-making (rock quality, gear choice, placement security, push on or place more?) often while fatigued and anxious. Maintaining calm and clarity is essential, as anxiety impairs evaluation and efficiency. Consistent pre-climb rituals can manage anxiety and foster focus. Understanding the psychology of rock climbing can also be beneficial for any trad climber.
Following and Cleaning: The Second’s Crucial Role
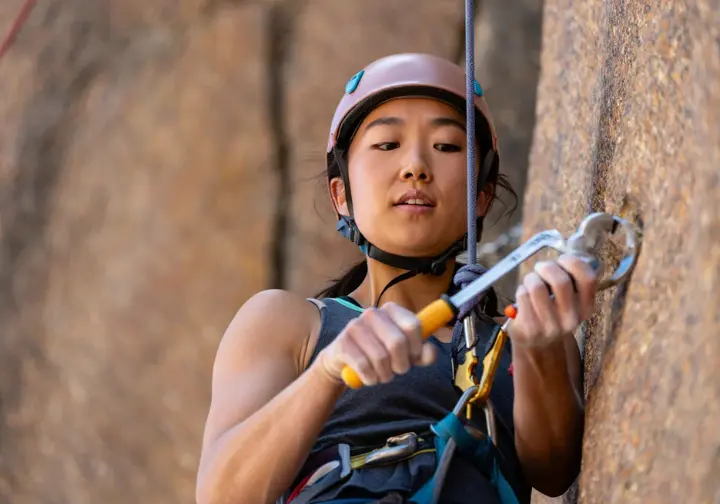
The second climber, or follower, plays a vital role in trad climbing. Their primary responsibility is to efficiently and safely remove (clean) all the gear placed by the leader. This section details techniques for removing various types of protection, offers tips for dealing with stubbornly stuck gear, and covers how to organize collected equipment for a smooth handover. This part of the learning process provides valuable lessons.
Techniques for Efficiently and Safely Removing Trad Gear
The second’s main goal is to remove all gear safely, efficiently, and without damage, generally by reversing the placement process. Clean from a stable stance to conserve energy and get better leverage. Initially, keep the quickdraw/sling attached to the rope while working on removal to avoid dropping gear; unclip and rack once free.
Nuts are removed by lifting or wiggling them upwards or outwards from constrictions, often using a nut tool to gently tap from below, hook, or apply leverage. Avoid yanking the wire. Cams are removed by pulling the trigger to retract lobes, then gently wiggling or pulling out; don’t push them further in. Learning how to clean climbing cams specifically can save a lot of trouble.
Hexes placed passively are removed like nuts. If cammed, they often need rotation or lifting to disengage. Tricams in passive mode are like nuts; in active mode, disengage camming by lifting or manipulating the fulcrum with a nut tool, not by pulling the sling. Cleaning provides invaluable feedback on placement quality. There are resources available for cleaning a trad route effectively.
Dealing with Stuck Gear: Tips and Tricks
Patience and creative problem-solving are key for stuck gear. For stuck cams, assess why it’s stuck (walked, over-cammed, uneven lobes?). Use a nut tool to reach/pull the trigger, manipulate individual lobes, or hook the trigger bar (close to stem) and gently work it. Gentle but persistent wiggling, rotating, and moving up/down/sideways can free it. Mountain Project forums offer community tips for removing stuck cams.
For stuck nuts, a nut tool is essential for tapping (short, vigorous taps on bottom/side with palm/carabiner), levering with the hook, or torquing larger nuts by inserting the tip into a channel. Sometimes pushing the wire from behind or an upward whip with an attached sling can free a nut. Reddit’s r/climbing community also has advice on removing stuck nuts.
Don’t give up too easily; try different angles and techniques. The array of community-shared techniques shows its prevalence. Retrieving expensive gear and adhering to Leave No Trace by not abandoning gear unnecessarily are prime motivations. Leaving gear is a last resort. The community often shares lessons learned from such efforts.
Organizing Collected Gear for Smooth Transitions
As the second climber cleans, they accumulate various gear pieces. Efficiently organizing this gear on their harness or a gear sling is important for smooth transitions at the belay, especially on multi-pitch routes.
Try to rack cleaned gear systematically, similar to how the leader had it (e.g., cams by size, nuts grouped, slings bundled). This makes the handover to the next leader much quicker and smoother, minimizing time spent re-racking at the stance. Good organization is a valuable skill.
Most followers rack onto their harness loops, but some might use a separate gear sling for large amounts of gear. A little attention to organization by the second significantly improves the team’s overall climbing day efficiency and momentum on longer climbs. While specific links for re-racking by the second are scarce, the principles of efficient gear racking for multi-pitch discussed earlier largely apply.
Your Journey in Trad Climbing: Learning and Progression
Becoming proficient in trad climbing is a journey that demands dedication, patience, and a commitment to continuous learning, often best guided by experienced individuals. This section emphasizes the critical role of mentorship and professional instruction, outlines how to practice placements effectively, and discusses the importance of gradual progression to build experience safely. This learning path has distinct challenges.
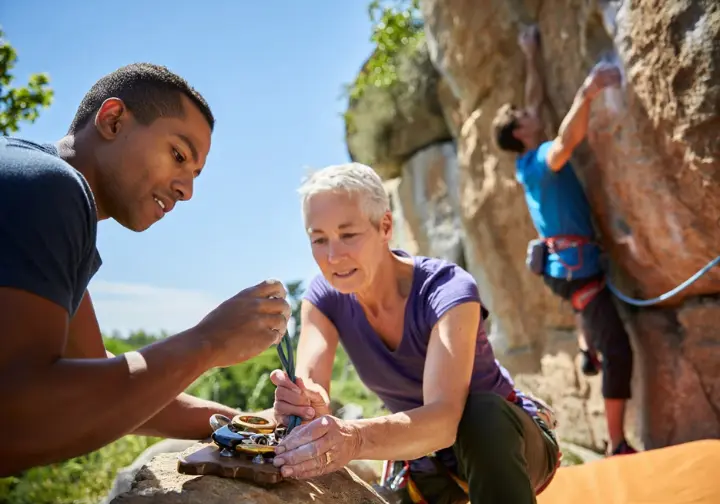
The Importance of Mentorship and Professional Instruction
Learning trad climbing from experienced individuals is considered essential due to its complexities and inherent risks; learning solely from books, manuals, or youtube is discouraged. Climbing with a trusted, knowledgeable mentor provides invaluable hands-on learning, demonstrations, error correction, shared insights, and guidance on first trad leads.
Professional instruction from certified guides (e.g., AMGA, BMC recognized) offers structured learning and adherence to safety standards. Courses like the AMGA Single Pitch Instructor course or introductory trad fundamentals cover essential skills systematically. Organizations like the American Alpine Institute also offer relevant courses; the AMGA certification for mountain guides is a widely recognized standard. These guides possess the capabilities to teach effectively. In-person lessons are invaluable.
Nuances of assessing rock quality, feeling a “bomber” placement, and making sound judgments under pressure are best developed through direct experience guided by expert feedback. This experiential learning is irreplaceable for developing competence and confidence safely, and for understanding the subtle art of this original style of climbing.
Practicing Placements: Ground School and Easy Routes
Deliberate practice is key to developing intuitive competence in placing trad gear, starting in low-stakes environments. “Ground School” involves spending considerable time placing gear at ground level before attempting to lead. This includes familiarizing oneself with each piece, finding various crack types at a cliff base, and experimenting with placing nuts, cams, hexes, and tricams. Previous practice here builds a solid foundation.
Focus on achieving optimal placements: good rock contact, correct cam retraction, secure nut seating. Practice removing gear to understand what makes it easy or difficult to clean. Carefully weighting placements (e.g., bounce-testing while tethered safely) with caution and backup helps get a feel for security. Build practice anchors on the ground to understand equalization and redundancy. Community discussions on practicing trad gear placements safely can offer additional perspectives on these practice skills.
Progress by seconding experienced trad leaders on various routes, paying attention to their placements and anchor setups, and focusing on cleaning efficiently. Practice mock leading (leading on top-rope backup) on easy routes to focus on the placement process without fear of a leader fall. This top roping technique is very useful. First leads should be on very easy, well-protectable routes, well below physical ability, to build confidence and skills in a low-stress environment, as detailed in any good guide to your first trad lead.
Gradual Progression: Building Experience Safely
Experience in trad climbing is about cumulative and contextual knowledge from navigating various rock types, placements, and challenging situations, not just routes climbed or grades achieved. Proficiency builds slowly, and identifying weaknesses to work on is part of the learning process. Avoid rushing to harder grades, as each level introduces new complexities in sustained difficulty, protection challenges, or route-finding. Some classic trad routes, like those found at The Gunks, demand this slow build-up of experience.
Build a broad skillset by climbing extensively at easier grades (e.g., VDiffs and Severes in UK system) on different rock types and route styles (slabs, cracks, corners) to develop well-rounded skills. Each climb, even easy ones, offers unique learning. A traditional climbing fundamentals course can provide a solid foundation for this style of climbing.
Consolidate skills at each level before moving up; confidently and safely leading routes at a certain trad grade in various conditions is more important than quickly ticking a harder route. Listen to your intuition and be patient with the learning process, as trad climbing is a long-term endeavor. A slow, methodical approach allows gradual accumulation of contextual wisdom and judgment, hallmarks of experienced, safe trad climbers. Cotswold Outdoor offers the BMC complete guide to climbing, which touches upon progression and provides some main tips.
Respecting the Rock: Trad Climbing Ethics and Leave No Trace
Trad climbing carries a strong ethical framework centered on respect for the rock and the environment, primarily through “Leave No Trace” (LNT) principles. This involves championing “clean climbing” by removing all protection and minimizing any permanent alteration to the rock. This section will cover core LNT principles, minimizing direct impact, and the importance of understanding and adhering to local climbing ethics and access issues. The ethical landscape of trad is as important as the technical skills.
Leave No Trace: The Cornerstone of Trad Ethics
The ‘Leave No Trace’ (LNT) philosophy is paramount in trad climbing, which inherently aligns with LNT by placing and removing all protection, often considered the “cleanest” climbing style. This “clean climbing” ethic was championed by pioneers like Royal Robbins and Yvon Chouinard, whose works were influencing advocacy for removable protection over damaging practices like extensive piton use. The history of the clean climbing movement history is detailed on Wikipedia’s Traditional Climbing page. These are the ethical foundations of the discipline.
Core LNT principles applicable include packing out all trash (food wrappers, tape, human waste using WAG bags). Stay on durable surfaces by using established trails for approaches and staying on rock or durable ground at climb bases to prevent erosion and vegetation damage. Adhering to these ethics is crucial.
Minimize campfire impacts by using established fire rings or preferably a camp stove. Respect wildlife by observing from a distance, avoiding disturbance to nesting birds or other animals, and being aware of seasonal closures for wildlife protection. Leave what you find, resisting urges to collect natural objects or alter the environment. This ethical foundation is a specific philosophical stance of environmental stewardship. Many guidebook authors also emphasize these points. The Inspire Rock trad community often discusses these ethics.
Minimizing Impact on Rock and Environment
Trad climbers strive to minimize direct impact by not chipping, drilling, or gluing to create or improve holds; the challenge is climbing rock as it is. Protect vegetation by avoiding damage to plants, moss, or lichen on rock faces or at climb bases, choosing lines that minimize impact, and not clearing vegetation without authorization. These ethical practices are part of the LNT commitment.
Manage ropes carefully, especially at cliff edges or over vegetation, to prevent erosion or damage from rope drag. Use chalk responsibly; excessive application leaves unsightly marks and alters rock over time. Use chalk sparingly, brush off tick marks after climbing if local ethics dictate, and consider using chalk that matches the rock color. Inspirerock’s article on trad ethics provides guidance on responsible chalk use in climbing.
The ideal is to remove all protection. Gear is sometimes left in emergencies if retrieval poses significant safety risk, or if bailing necessitates leaving rappel anchors. Despite best efforts, gear can become irretrievably stuck. On remote alpine routes, fixed slings/carabiners may be left at rappel stations for safety, but old tat should be cleaned by responsible climbers. Leaving gear is not taken lightly.
Understanding Local Climbing Ethics and Access
Climbing ethics are not monolithic and can vary significantly by region or crag. What’s acceptable in one area may be inappropriate or damaging in another. It’s every climber’s responsibility to research and adhere to local ethics, access agreements, and crag-specific guidelines. Understanding the ethical landscape is part of being a responsible trad climber.
Before visiting a new area, consult local guidebooks, climbing organization websites (like the BMC regional access database), or local climbers for specific rules or sensitivities. Be aware of land ownership, access restrictions, and agreements; respect private property and follow designated approach paths. Mountain Training also offers mountain training resources and downloads.
Some areas have restrictions on gear (e.g., wire brushes, specific pro in soft rock). Many crags have seasonal closures for nesting birds (e.g., peregrine falcons) or other wildlife, which must be strictly respected. Local ethics on chalk use, tick mark removal, and bolting policies (unauthorized bolting is a major violation) vary. These reflect local community values, environmental sensitivities, and access negotiations.
Conclusion: Embracing Your Trad Climbing Journey
Traditional climbing offers a uniquely rewarding path, one that demands intellect, composure, and a profound respect for the environment, extending far beyond mere physical prowess. It’s a journey of continuous learning, where each carefully considered gear placement and every mindful ascent builds not only technical skill but also deepens self-reliance and heightens your sense of adventure. The purpose is often the journey itself.
Throughout this introduction, we’ve touched upon the core principles of trad climbing, the essential gear that forms your lifeline, the intricate art of placing protection securely, the fundamentals of building bomber trad anchors, and the critical importance of risk management. We’ve also explored the processes of leading and following, and underscored the indispensable role of mentorship and adherence to climbing ethics. This guide should help you grasp trad climbing basics.
The path to proficiency in trad climbing is indeed steep, requiring patience, dedication, and a willingness to constantly learn. However, the rewards—the freedom to explore wild rock, the deep intellectual satisfaction of solving nature’s puzzles, the profound connection with the environment, and the immense sense of personal accomplishment—are truly commensurate with the effort invested. This distinct pursuit inspires many.
Your learning doesn’t stop here. Continue to educate yourself through further study, and most crucially, through hands-on experience under the watchful eye of expert guidance, whether from trusted mentors or certified professionals from organizations like AMGA, BMC, or AAI. Supplement this with reputable literature, diligent practice, and consider joining a local climbing club to connect with experienced climbers. Many useful resources, including YouTube channels and online guides, can supplement in-person lessons and proper training.
Above all, prioritize safety in every decision, embrace the learning process with humility and enthusiasm, and enjoy the rich trad adventure that is traditional climbing—an art form that cultivates resilience, meticulousness, and a profound appreciation for the vertical world. Remember that mastering this skill takes time and effort.
Frequently Asked Questions about Introduction to Trad Climbing: The Art of Placing Your Own Protection
What are the absolute minimum pieces of gear I need to start practicing trad climbing placements (not leading yet)? >
How do I know if the rock is “good enough” for a trad placement? >
What is the most common mistake beginners make when building their first trad anchors? >
Is trad climbing much more dangerous than sport climbing? >
We are a participant in the Amazon Services LLC Associates Program, an affiliate advertising program designed to provide a means for sites to earn advertising fees by advertising and linking to Amazon.com. As an Amazon Associate I earn from qualifying purchases. We also participate in other affiliate programs. The information provided on this website is provided for entertainment purposes only. We make no representations or warranties of any kind, expressed or implied, about the completeness, accuracy, adequacy, legality, usefulness, reliability, suitability, or availability of the information, or about anything else. Any reliance you place on the information is therefore strictly at your own risk. Additional terms are found in the terms of service.


