

In this article
- Foundations of Belaying: Core Principles and System Components
- Essential Belay Gear: Tools of the Trade for a Safe Belay in Climbing
- Core Belay Safety Protocols: Non-Negotiable Rules for Every Climb
- Mastering Techniques: How to Belay in Climbing for Different Scenarios
- Advanced Belaying Considerations & Specialized Skills
- Common Belaying Mistakes and How to Avoid Them
- Learning to Belay and The Path to Perfection
- Conclusion: Embracing the Responsibility of a Skilled Belayer
- Frequently Asked Questions about Belaying in Climbing
This article introduces the fundamental concept of belaying, its paramount importance for climber safety, and outlines what you will learn about this essential skill. We’ll explore the core principles and components of the belay system, the essential climbing gear you’ll need, and the non-negotiable safety protocols for every climb. Discover how to master belay techniques for different scenarios, consider advanced skills, avoid common mistakes, and understand the path to becoming a truly proficient belayer. Let’s delve into the art and science of a solid belay.
Foundations of Belaying: Core Principles and System Components

This section delves into the fundamental principles governing belaying and identifies the critical components that make up the belay system. A clear understanding here is crucial before learning techniques used to create friction within a climbing protection system for your belay in climbing system.
What is Belaying? The Definition and Its Purpose
Belaying is the process of managing a climbing rope to secure a climber, primarily by creating friction in the system to catch falls. This involves skillfully applying or releasing rope tension as the climber moves up the rock or wall. The primary purpose of belaying is to prevent a climber from falling a significant distance from a height, which minimizes the risk of injury. It’s a dynamic partnership and a continuous dialogue between the climber and the belayer.
Beyond just fall protection, belaying also involves tasks such as taking in slack while the climber ascends and lowering the climber in a controlled manner once they’ve completed their route or if they need to descend. The entire belay system relies on the correct interaction of specialized climbing equipment and the belayer’s learned skill, making it a holistic safety mechanism. For those new to climbing, grasping what belaying entails is a first step, alongside appreciating its fundamental purpose of belaying. Understanding different climbing styles like top-rope climbing is also helpful. Historically, methods like the hip belay or body belay were used before modern belay devices became prevalent.
The Belay System: Key Entities and Their Interaction
The belay system comprises several interconnected entities: the Belayer, the Climber, the Climbing Rope, Harnesses for both individuals, a Belay Device, a Locking Carabiner, and potentially an Anchor. The belayer’s focused skill and unwavering attention are absolutely paramount to the system’s success. The climbing rope acts as the dynamic lifeline, specifically designed to absorb the energy generated during a fall. Harnesses, with their straps and buckles, distribute these forces across the body and provide secure attachment points for the rope and belay device.
The belay-device itself introduces friction into the rope system, which is meticulously controlled by the belayer. A locking carabiner is used to securely connect the belay device to the belayer’s harness belay loop. Anchors come into play to secure the belayer or the entire system, especially in multi-pitch climbing or when setting up a top-belay at a belay station. Effective belaying emerges from the correct orchestration and vigilant application of these components. It’s worth noting that climbing-system failure often stems from breakdowns in their interaction or, more commonly, human error, rather than isolated equipment malfunction highlighting common belaying mistakes and injury causes. Familiarity with essential rock climbing equipment and proper harness use are foundational.
The Physics of Falling: Understanding Fall Factors and Forces
Understanding fall factors is crucial for appreciating the forces involved in a climber’s fall and the importance of a dynamic belay system. The fall factor is a numerical value calculated by dividing the distance fallen by the length of active rope available to absorb the energy of that fall. A higher fall factor, for instance, a Factor 2 fall—where the climber falls twice the length of rope out from the belayer, typically occurring when falling before the first piece of climbing protection is clipped—generates significantly more force on the climber, belayer, and all the climbing equipment in the system. Generally, fall factors of 1 or more should be avoided to prevent a big fall.
Dynamic climbing ropes are ingeniously designed to stretch and absorb a significant portion of this energy, thereby reducing the peak impact force experienced. To put it in perspective, one kilonewton (kN) of force is roughly equivalent to holding 100 kilograms (or about 220 pounds) of static weight. A “soft catch,” also known as a dynamic belay, executed by the belayer can further reduce impact forces on both the climber and the protection points, lessening the upward force on the belayer. This illustrates how a belayer’s technique directly interacts with the underlying physics of the entire system, critical knowledge for understanding fall dynamics in lead climbing. For a deeper dive, resources on the physics of climbing falls are available. Using appropriate dynamic climbing ropes is key, as rope stretch is a vital component.
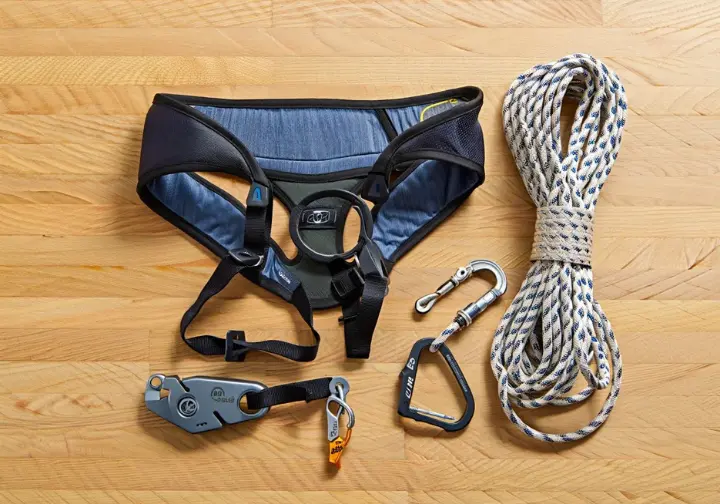
Essential Belay Gear: Tools of the Trade for a Safe Belay in Climbing
This section details the critical pieces of climbing equipment required for belaying, covering their selection, proper use, and role within the belay system. Choosing and correctly using the right climbing gear is fundamental to safety when equipping yourself for a safe belay in climbing.
Climbing Ropes, Harnesses, and Locking Carabiners
Dynamic climbing ropes are absolutely essential for belaying, and they must be selected for compatibility with your chosen belay device and the specific type of climbing you’ll be doing (e.g., gym climbing, rock climbing on a mountain). Their inherent ability to stretch absorbs the kinetic energy generated during a fall, cushioning the impact. Harnesses must fit properly; for both the climber and the belayer, all harness buckles (often slider buckles or a main buckle with specific buckle design) should be correctly fastened and, if designed to be, doubled back. It’s vital to distinguish between the structural tie-in points of the harness and the non-structural gear loops. Some newer harnesses offer advanced features for comfort and safety.
Locking carabiners are crucial components, used for securely attaching the belay device to the harness belay loop. These carabiners must always be locked during use. Different types, such as an HMS carabiner for a Munter hitch, should be chosen based on the application. Furthermore, helmets are vital for both climber and belayer, especially when climbing outdoors or on a rock face, to protect against rockfall and impact. Ensuring proper harness inspection and retirement is a key aspect of gear maintenance. An overview of top rope belay setup will also show these components in action. When choosing locking carabiners, consider their specific role in the system. Don’t forget appropriate rock shoes for the climber.
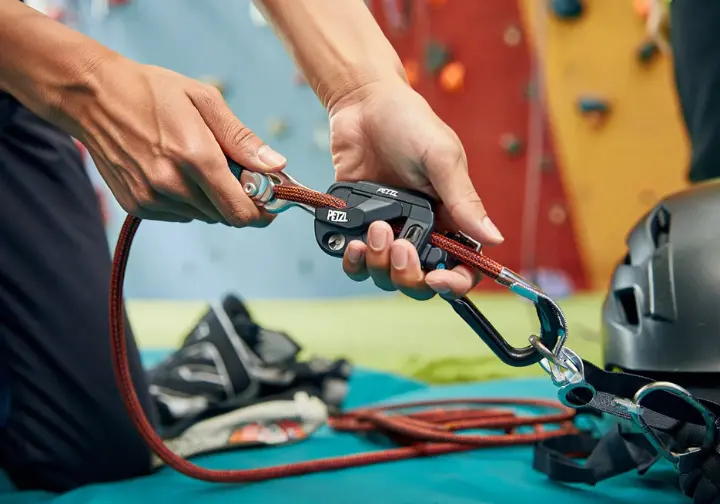
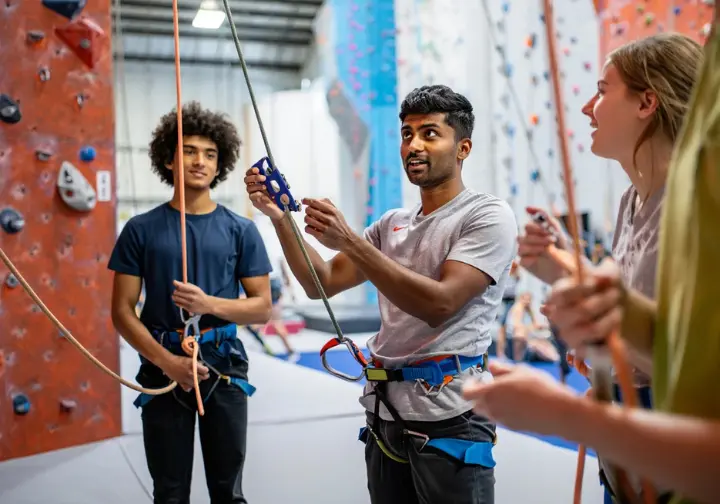
Belay Devices: Types, Mechanisms, Pros & Cons
Belay devices are engineered to create friction, allowing the belayer to control the rope effectively. The major types include tubular devices, such as the classic ATC (a traditional belay device for many climbers), and assisted braking belay devices (ABDs), like the widely recognized GriGri. Other options include the Munter hitch, which is a knot rather than a mechanical belay-device, and historically, figure-eight devices. Tubular devices are valued for their simplicity, versatility, and light weight, functioning by bending the rope through slots. They require proficient climbing technique from the belayer as they offer no assisted braking capabilities.
Assisted Braking Devices, or ABDs, incorporate an internal cam or specific geometry designed to help arrest a fall. Active ABDs, such as the GriGri, have a distinct camming mechanism (sometimes visible through the belay-device cable housing), while passive ABDs utilize the device’s shape and its interaction with the carabiner to assist breaking. It’s critical to understand that ABDs are not “hands-free” devices; diligent brake hand use is always mandatory. The Munter hitch, used with an HMS carabiner, serves as a useful backup or when a mechanical device is lost, but it can cause twisting in ropes. Figure-eight devices, while historically used for belaying, are now predominantly used for rappelling due to offering lower friction for belaying and their tendency to twist ropes. Understanding how to toprope belay involves choosing and using one of these main belay device types. For a detailed look, an overview of Petzl belay devices can be informative. When considering these options, you’ll be selecting belay equipment suited to your needs and the specific climbing area.
Choosing the Right Belay Device
Selecting an appropriate belay method and its corresponding belay device hinges on several factors, including the type of climbing you plan to do—be it in a gym, sport climbing, trad climbing, multi-pitch routes on a mountain, or even ice and alpine ascents. Climber experience, rope diameter/type (single, half, or double ropes), and desired features like assisted braking or a guide mode also play significant roles. New climbers might start with simpler tubular devices under close supervision, allowing them to master fundamental belay techniques. In contrast, experienced climbers often choose their own belay device tailored to specific disciplines; for example, many sport climbers prefer ABDs for their braking assistance feature, especially if they are lightweight climbers belaying a heavier partner.
Rope compatibility is absolutely critical; many belay devices are meticulously designed for specific rope diameter ranges. Using a device with an incompatible rope can severely compromise safety and braking effectiveness. Always consider the pros and cons: tubular devices are light and versatile but require more skill from the belayer. ABDs offer enhanced braking capabilities but can be heavier, more expensive, and require specific climbing techniques to avoid misuse, such as overriding the camming mechanism. Ultimately, no single device is universally optimal for all situations. For further advice on choosing a belay device, many resources are available. You can also explore different types of belay devices for climbing. Remember the importance of helmets in climbing as part of your overall climbing safety system.
Core Belay Safety Protocols: Non-Negotiable Rules for Every Climb

This section emphasizes the absolute, universal safety rules that every belayer must internalize and practice on every single climb. These protocols are the very bedrock of safe belaying practices.
The Unbreakable Rule: Brake Hand Always on the Rope
This is the single most critical aspect of belaying. The brake hand (the hand gripping the brake rope strand exiting the belay device that does not go to the climber) must maintain a firm and uninterrupted grip on the rope at all times. Letting go of the brake strand, even for a mere moment, can lead to the rope slipping uncontrollably through the device. This scenario could potentially result in the climber decking (hitting the ground) with catastrophic consequences from a significant height.
It’s a common misconception that assisted braking belay devices are hands-free; this is dangerously false. The brake hand rule applies equally and rigorously to them. Complacency with this fundamental rule is a leading cause of serious climbing accidents. Proper belay technique, like the PBUS method, is designed to allow smooth rope management while always keeping the brake hand securely on the rope. Understanding common climbing errors often highlights violations of this rule. Familiarity with standard climbing communication complements this physical skill.
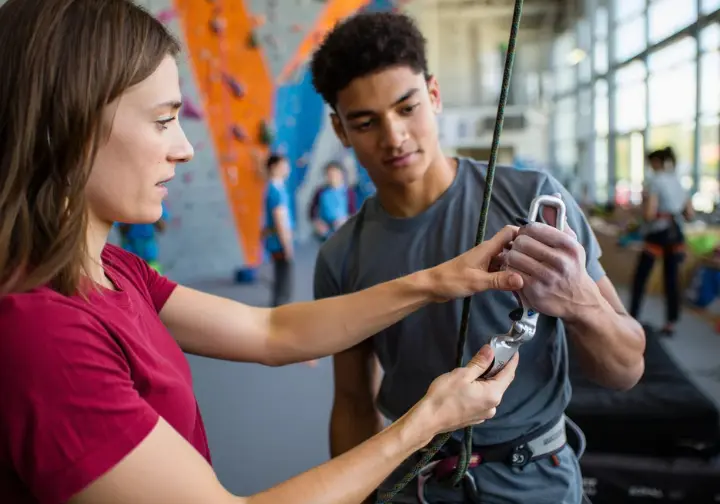
Partner Checks: The Pre-Climb Lifesaver
Before every single climb, without exception, both the climber and the belayer must conduct a thorough, systematic partner check. This is an indispensable ritual to catch potentially life-threatening errors that can easily be overlooked before the person climbing leaves the ground. These checks should meticulously include: the climber’s tie-in knot (e.g., a correctly dressed Figure 8 Follow Through where the climber ties in), harness buckles (on both climber and belayer), the belay device setup (correctly threaded, carabiner locked and properly oriented on the harness belay loop), and ensuring the system is closed with a stopper knot in the rope end.
Both partners are responsible for checking each other’s setup. This redundancy helps prevent oversight. Failing to perform adequate partner checks is a common factor in climbing accidents, often stemming from complacency or haste. The importance of closing the belay system cannot be overstated. For those learning how to belay rock climbing basics, this is a cornerstone of climbing safety. Adherence to climbing rules and ethics includes diligent partner checks.
Clear Communication: Standard Belay Commands
Standardized verbal climbing commands are absolutely essential for coordinating actions and ensuring safety between the climber and belayer. Miscommunication is a significant risk factor. Commands like “On Belay?”, “Belay On,” “Climbing,” “Climb On,” “Slack,” “Up Rope,” “Take,” “Watch Me,” “Falling,” “Ready to Lower,” “Lowering,” “Off Belay,” and “Belay Off” all have specific meanings and expected responses. Sometimes a climber yell is needed.
It’s crucial that both partners understand and use these commands correctly and consistently. In noisy environments or when out of sight, commands should be shouted clearly, and using names can help if other climbers are nearby. Before starting, confirm commands with your climbing partner, especially if belaying friends you haven’t climbed with before. Pre-arranging signals can be a backup if verbal communication is difficult. Some climber jargon may also be used, but standard commands are clearest. A clear understanding of standard U.S. belay commands is fundamental.
Belayer Stance and Positioning
A stable, athletic belay stance with good footing is important for the belayer to effectively manage forces during a catch and avoid being pulled off balance or experiencing a sudden pull inwards. This involves keeping knees slightly bent and being prepared to absorb impact. The belayer should position themselves at an appropriate distance from the wall – close enough to react and manage the rope, but not directly underneath the climber where they could be hit by falling objects, rock, or the climber themself.
Awareness of surroundings is key to avoid hazards like tripping or being pulled into rock outcrop features or other obstacles. The belayer should anticipate the direction of pull in a fall. An improper stance can lead to the belayer being pulled off balance, slammed into the wall, or being unable to effectively manage the fall forces, potentially worsening the outcome for the climber. The belayer positioning importance is often covered in comprehensive belay technique guides. Having solid footing helps maintain this position.
Mastering Techniques: How to Belay in Climbing for Different Scenarios
This core section provides step-by-step guidance on essential belaying techniques for both top-rope and lead climbing, forming the practical “how-to” for readers. Here we focus on learning essential how to belay in climbing techniques for various climbs.
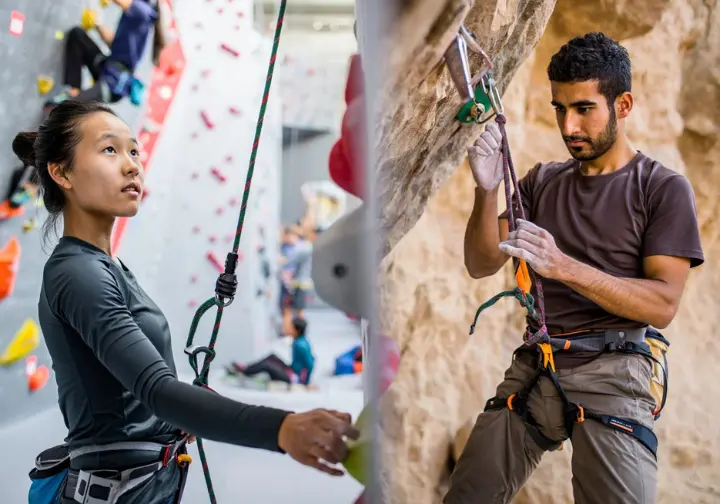
Top-Rope Belaying Technique (e.g., PBUS Method)
Top-rope belaying involves managing a rope that is already anchored above the top-rope climber at a top-rope anchor. The setup requires correctly loading the belay device, attaching it to the harness, and ensuring initial proper rope tension before the climber begins their rope climb. The PBUS (Pull, Brake, Under, Slide) method is a widely taught technique for managing slack with a tubular device while always keeping a hand on the brake strand. This is a common climbing technique for top-rope climbing.
Breaking down PBUS: “Pull” involves pulling rope slack through the device with the guide hand; “Brake” brings the brake hand down into the locked position; “Under” has the guide hand come under to grip the brake rope strand temporarily; and “Slide” allows the brake hand to slide up towards the device for another cycle. It’s crucial to take in slack smoothly, maintaining appropriate tension without “short-roping” the climber (making the rope tight and pulling them uncomfortably). Consistent practice is key to mastering these steps. Catching a top-rope fall is generally straightforward as there’s minimal slack; the belayer braces and the system arrests the fall. Lowering requires smooth, controlled release of the rope through the device, maintaining brake hand control and communicating with the climber. You can find detailed PBUS belay method steps in various instructional resources. Similarly, information on how to belay using an ATC is widely available. An introduction to top rope climbing provides foundational context for this style of belay.
Lead Belaying Technique: Managing Slack and Catching Falls
Lead belaying is more dynamic and complex than top-roping, involving higher potential fall distances and increased forces. The belayer must pay out rope slack as the lead climber ascends and clips climbing protection. Smoothly and quickly providing slack for clipping is crucial, using device-specific belay techniques (e.g., an ATC differs from a GriGri). Too little rope slack can pull the lead climber off, while too much excess rope increases fall distance, potentially leading to a long fall or hitting a ledge.
Catching a lead fall often requires a “soft catch” or dynamic belay, where the belayer uses slight movement (e.g., a small jump or step) and controlled rope feed to absorb energy, reducing impact on the climber and gear, especially when the last piece of protection is far below. This is especially important when the climber is not near the ground or a ledge. A “hard catch” (more static) may be necessary if the climber is near the ground to prevent them from hitting it. Lowering a lead climber is similar to top-rope but may involve the climber cleaning gear on descent. Learning about giving a soft catch in lead climbing is a key progression. For device specifics, how to lead belay with a GriGri is a useful resource.
Lowering a Climber Safely and Smoothly
Controlled lowering is a critical belaying skill, ensuring the climber descends safely and comfortably. The belayer must maintain absolute control with their brake hand throughout the lowering process. The technique involves smoothly allowing the rope to feed through the belay device at a consistent, manageable pace. Abrupt stops or starts should be avoided.
Communication is key: the climber asks “Ready to lower,” and the belayer should confirm “Lowering” before the climber weights the rope. The belayer should also watch the climber (if the climber sees them or not) during descent. A major hazard is lowering a climber off the end of the rope. Always ensure a stopper knot is tied in the end of the rope, and be aware of the rope’s length relative to the climb/lower, preventing the climber from being lowered off the bottom of the extra rope. Guidance on controlling descent speed when lowering is often part of general belay instruction.
Advanced Belaying Considerations & Specialized Skills
This section explores more nuanced belaying scenarios and advanced climbing techniques that experienced climbers may encounter. These include managing weight differences and multi-pitch belaying, including hanging belays at different belay stations.
Belaying a Heavier or Lighter Climber
Significant weight differences between a climber and belayer require specific strategies. If the climber is much heavier, the belayer can be launched upwards excessively during a fall, potentially losing control or causing a hard catch. Specialized devices like the Edelrid OHM can be used to add friction when belaying a heavier leader, reducing force on the belayer. These are typically attached to the first bolt. Some small belayers might also use a floor anchor at the local gym or outdoors.
Without such devices, techniques include using ground anchors for the belayer (belayer anchor), careful body positioning, and potentially adding friction with specific carabiner setups (with proper training). The German Alpine Club (DAV) advises measures if a lead climber is over 10kg heavier. If the belayer is much heavier than the climber, they must focus on giving a very soft, dynamic catch to prevent launching a light climber upwards too aggressively. Resources on managing lead weight discrepancies and the Edelrid OHM for weight differences offer valuable insights.
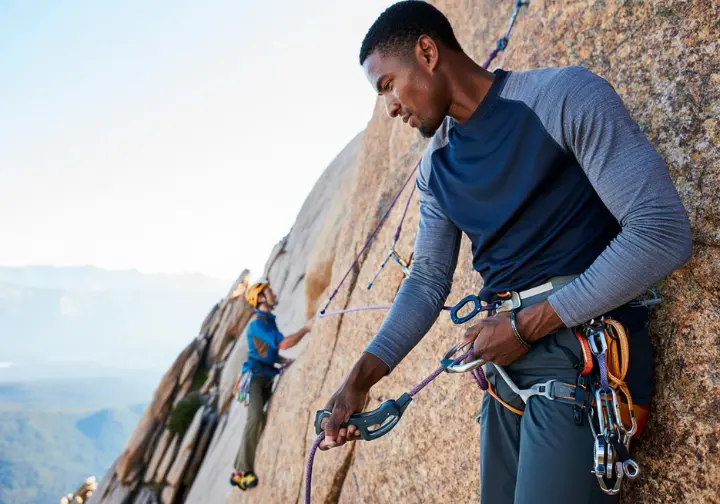
Belaying from Above (Guide Mode / Multi-Pitch)
In multi-pitch climbing (a multi-pitch climb), the lead climber reaches an anchor and then belays the second climber up from above, often from a hanging belay stance. This often involves using a belay device in “guide mode.” Many modern tubular belay devices (e.g., ATC-Guide, Petzl Reverso) have a specific guide mode, an auto-blocking function when belaying one or two seconding climbers directly from the anchor. This mode helps hold the rope if the second falls. Some mountaineers rely heavily on these for alpine climbs.
Setting up guide mode correctly is crucial and device-specific. It typically involves attaching the device directly to the anchor’s master point. Lowering a climber when the device is in auto-blocking guide mode can be difficult and requires specific technical climbing techniques, such as the “LSD method” for an ATC Guide, to release the tension safely. Understanding how to perform belaying a second climber from above is essential for multipitch climbs, as is knowing how to handle lowering with ATC Guide in guide mode. Using personal anchor systems for multi-pitch climbing is also a key skill in these scenarios. Self-belaying is a separate advanced topic not covered here.
Belaying with Half or Twin Ropes
Half (double ropes) and twin ropes are two-rope systems often used in traditional climbing, alpine climbing, and ice climbing for reasons like reduced rope drag on wandering routes, redundancy, and full-length rappels. Belaying with two ropes simultaneously requires specific belay techniques and a compatible belay device (most modern tubular devices handle two ropes). The belayer must manage both strands effectively, paying out or taking in rope slack on each as needed.
Clipping strategies differ: half ropes are typically clipped into alternating pieces of climbing protection to reduce drag and impact force on any single piece. Twin ropes are always clipped together through the same pieces of protection, functioning as a single rope. UIAA testing standards for half ropes use a lighter mass (55kg) per strand compared to single ropes (80kg). Understanding the nuances of leading and belaying with half ropes is vital. Checking for Black Diamond ATC Guide rope compatibility is also important.
Common Belaying Mistakes and How to Avoid Them
This section highlights frequent errors in belaying, explaining their potential consequences and providing clear, actionable strategies for prevention. Recognizing and avoiding these is key to perfecting your belay for climbing. These issues often revolve around lapses in attention, incorrect climbing gear use, or poor rope handling.
Inattention and Communication Breakdowns
Inattention is a primary cause of belaying accidents. The belayer must maintain unwavering focus on the climber and the rope system. Common distractions include conversations, looking away from the climber for extended periods, or becoming complacent on seemingly easy terrain of a vertical rock face. Even a momentary lapse can have severe consequences if the climber falls unexpectedly.
Communication breakdowns, such as mishearing climbing commands, can lead to dangerous actions. This is especially prevalent in noisy environments. Prevention involves minimizing distractions, confirming commands, using standardized language, and maintaining a vigilant mindset. Many resources detail how preventing common belay errors starts with focus, while others explain the dangers of belaying inattention.
Incorrect Device Setup or Handling
Incorrectly loading the belay device or mismanaging it can lead to device malfunction, insufficient friction, and potentially a dropped climber. Each belay device has specific manufacturer instructions for threading the rope (the climber strand vs. brake strand) and attaching it to the harness; these must be meticulously followed. Double-check rope orientation.
A common error with some assisted braking belay devices, like the GriGri, is incorrectly holding the device in a way that overrides its camming mechanism (e.g., holding the cam down). Prevention includes diligent partner checks, thorough understanding of one’s specific device, and practicing correct handling techniques until they are second nature. Following the Petzl recommended GriGri technique is crucial. Comparing figure 8 vs ATC for belaying shows how device choice impacts handling. Understanding essential belay gear and techniques is a good starting point.
Poor Rope Management (Slack Issues)
Managing rope slack/tension effectively is crucial, especially in lead belaying. Too much slack rope in the system when a leader falls significantly increases fall distance and the risk of hitting the ground or a ledge. This is a serious hazard. This extra distance can make a possible fall much more dangerous.
Conversely, too little rope (a tight rope) can pull the leader off balance or make it difficult to clip. This is “short-roping.” The belayer must pay close attention to the leader’s pace and needs, feeding rope slack smoothly for clips and taking it in promptly. Anticipating movements can help. Communication like “Slack!” or “Up Rope!” from the climber helps. For more on managing rope slack in lead belaying, specific guides are available, and Petzl offers advice on the technique for taking up slack. A rope bight should not become excess rope.
Learning to Belay and The Path to Perfection
This section guides readers on how to learn belaying correctly from the start. It also emphasizes the importance of continuous practice and vigilance to maintain and perfect this life-saving skill. This may include passing a belay test at your local gym.
Formal Instruction: The Importance of Qualified Guidance
Learning to belay correctly from a qualified source is paramount for climbing safety. Self-teaching or learning from inexperienced friends can lead to ingrained bad habits. Reputable climbing gyms offer introductory belay classes taught by certified instructors. These courses cover fundamental belay techniques, climbing equipment use, and safety protocols in a controlled environment like a gym wall. Many facilities, including those offering high ropes courses, will require demonstrated proficiency or instruction.
Organizations like the American Mountain Guides Association (AMGA) certify climbing instructors to a high standard. Seeking instruction from AMGA-certified guides or equivalent professionals is highly recommended, especially for advanced skills or outdoor climbing. Formal instruction provides a solid foundation, ensuring learners understand both “how” and “why” behind safe belaying practices, including additional climbing fundamentals. Information about AMGA climbing instructor programs and typical climbing gym courses for beginners can point you in the right direction. This is a core component of learning how to rock climb safely.
Practice, Complacency, and Continuous Improvement
Proficiency in belaying comes from repeated, deliberate practice in a safe environment. Muscle memory for critical actions like brake hand discipline and smooth rope feeding is built through practice. Complacency is a significant risk, even for experienced climbers. Familiarity can lead to shortcuts or lapses in attention. It’s crucial to treat every climb with the same diligence, whether it’s single pitch climbing or a more complex route. Becoming a capable belayer takes time.
Some research indicates that intermediate climbers may sometimes have higher accident rates, potentially due to overconfidence. Continuous improvement involves staying updated on best practices, perhaps taking refresher courses, being open to feedback, and always prioritizing safety. For those looking at expert advice on learning lead climbing, practice is a common theme. Reviewing climbing accident data analysis can reinforce the need for vigilance. This dedication is part of enhancing rock climbing skills and safety overall. This helps build a strong belay team.
Transitioning Skills: Gym to Outdoors, Single to Multi-Pitch
Belaying skills learned in a controlled gym environment must be carefully adapted for outdoor climbing. Outdoor crags present more variables, such as uneven ground, natural anchors, and potential rockfall. The transition from single pitch climbing to multi-pitch belaying introduces new complexities. This includes belaying directly from an anchor (often in guide mode), managing belay stations efficiently, longer exposure, and potentially handling more complex rope systems on a mountain or large wall. Some advanced scenarios might even involve techniques like an australian belay in specific rescue or rigging contexts, where the australian belay allows for certain mechanical advantages, though this is a specialized skill.
Climbers should seek further instruction before venturing into more complex outdoor or multi-pitch environments. Gradually increasing the complexity of climbs under experienced guidance is advisable. Understanding anchor assessment, rope management over multiple pitches, and efficient transitions are crucial for multi-pitch safety. Learning about building fast belays in multi-pitch climbing and reviewing the UIAA advisory on belaying techniques can be very beneficial. Transitioning often means considering essential climbing gear for mountains and specialized technical climbing skills for serious mountaineering.
Conclusion: Embracing the Responsibility of a Skilled Belayer
Perfecting your belay is an ongoing commitment to climbing safety, skill, and partnership in climbing. It demands meticulous climbing technique, unwavering vigilance, and clear communication. The human element – attention, correct procedure, and dynamic rope management – is more critical to safety than equipment features alone. These are not just tips; they are essential practices.
Actionable steps include seeking qualified instruction, mastering fundamentals before progressing, thoroughly understanding your climbing gear, making partner checks non-negotiable, practicing deliberately, and cultivating a “Thinking Belayer” mindset. By embracing these principles, climbers enhance their skills, foster trust, and contribute to a safer, more enjoyable experience for everyone undertaking an adventure on the rock. This dedication is a testament to a climber’s commitment to their craft and their partners’ well-being.
Frequently Asked Questions about Belaying in Climbing
What is the absolute most important rule when belaying? >
How can I give a “soft catch” when lead belaying? >
Is an Assisted Braking Device (ABD) safer than a tubular device? >
What are the essential components of a pre-climb partner check? >
We are a participant in the Amazon Services LLC Associates Program, an affiliate advertising program designed to provide a means for sites to earn advertising fees by advertising and linking to Amazon.com. As an Amazon Associate I earn from qualifying purchases. We also participate in other affiliate programs. The information provided on this website is provided for entertainment purposes only. We make no representations or warranties of any kind, expressed or implied, about the completeness, accuracy, adequacy, legality, usefulness, reliability, suitability, or availability of the information, or about anything else. Any reliance you place on the information is therefore strictly at your own risk. Additional terms are found in the terms of service.


