

In this article
- Understanding Ice Climbing: The Frozen Frontier
- Essential Ice Climbing Gear for Beginners
- Foundational Ice Climbing Techniques: Your First Moves
- Staying Safe: Critical Ice Climbing Safety for Beginners
- Your Path to Ice Climbing: How to Get Started
- Respecting the Ice: Environmental Considerations and Etiquette
- Key Takeaways for Your Ice Climbing Kickstart
- Frequently Asked Questions about Getting Started in Ice Climbing
Embark on a journey into the exhilarating world of ice climbing. This guide outlines what the sport, a form of climbing on frozen features, entails for beginners and covers what you need for getting started in ice climbing: essential gear and basic techniques. We’ll explore the allure of ascending frozen formations, or ice flows, and the foundational knowledge required for your first swings. Ice climbing is a discipline within mountain climbing, involving ascending ice formations like frozen waterfalls or artificial walls. This “Kickstart” guide explains its scope by providing a foundational understanding for newcomers doing ice climbing for beginners, including essential ice climbing gear, basic climbing techniques, and safety. Highlighting the importance of professional instruction and a safety-first mindset is paramount for any new ice climber. This guide sets the expectation that it will demystify ice-climbing and offer a clear path to getting started responsibly, whether on easy-to-get-to ice or more challenging ice routes.
Understanding Ice Climbing: The Frozen Frontier


This section defines ice climbing, explores its different forms relevant to beginner climbers, and provides a basic overview of ice conditions you might encounter. It aims to give you a clear picture of what the sport involves and the environments where ice climbing occurs.
What is Ice Climbing? Defining the Discipline
Ice climbing is the practice of ascending frozen water formations, such as frozen waterfalls, icefalls, and alpine couloirs, using specialized climbing equipment. It is a distinct branch of mountaineering that can also be practiced on artificial ice walls designed for training and recreation, sometimes found in a climbing gym. The allure of ice climbing often comes from the unique challenge of moving over a dynamic and ephemeral medium, the beauty of icy environments, and the problem-solving required to ascend an ice route.
This guide focuses on providing the foundational knowledge for beginners to safely try ice climbing, typically starting with top-roping under professional supervision from a guide or professional ice climber. It sets the stage for understanding the gear and techniques necessary for your first experience with ice climbs. If you are new to vertical pursuits, this can serve as a basic introduction to climbing disciplines, helping to differentiate ice climbing from rock climbing. For an official definition of ice climbing, authoritative sources offer clear explanations. Furthermore, you can find ice climbing activity guidance from organizations that oversee outdoor activities.
Types of Ice for Beginners: Waterfall and Alpine Ice
Waterfall ice (WI) is formed from frozen waterfalls and is the most common type of ice beginners will encounter, especially in dedicated ice parks or on introductory courses offering ice-climbing opportunities. Water ic can vary greatly in consistency and angle, offering a range of challenges. Alpine ice (AI), a key component of alpine climbing, is typically found in mountain environments and is often part of a larger mountaineering objective. It’s usually older, more consolidated ice formed from compacted snow and can be encountered on couloirs or glacial features on a glacier. Alpine ice climbing on such features presents different challenges than waterfall ice climbing.
While beginners might not target AI or alpine ice climbs specifically, understanding its existence provides context for some climbing gear choices and the broader sport. Ice parks provide controlled environments with man-made ice formations, ideal for learning and practicing basic techniques safely. These man-made ice climbing venues like Ouray Ice Park often have climbing routes suitable for various skill levels and are excellent for your first ice swings. To understand more, REI explains basic ice climbing types, and MEC offers insight into understanding ice conditions for beginners, crucial for any ice climber.
Ice Conditions: What Beginners Might Feel
“Plastic” or “hero ice” is often considered ideal, especially for beginners, as it deforms around ice tool and crampon placements rather than fracturing, providing secure “sticks” and a satisfying “thunk” sound. This type of solid ice is more forgiving and confidence-inspiring. Brittle ice, common in very cold temperatures, tends to shatter easily upon impact, sometimes creating “dinner plates” (large flakes of ice breaking off). This can make secure placements on the ice surface more challenging and requires a more delicate touch. Hard ice can also be strenuous.
Softer or “rotten ice” may not provide secure placements, and ice tools/crampons might shear through; this is poor quality ice. Understanding these tactile differences and different ice conditions is crucial for learning how to adapt your technique, though beginners will primarily be guided towards appropriate beginner ice. For more context, you can explore resources covering different types of ice for climbing and the tactile feel of different ice as discussed by ice climbers. Learning to understand ice quality is a skill developed over time.
Essential Ice Climbing Gear for Beginners
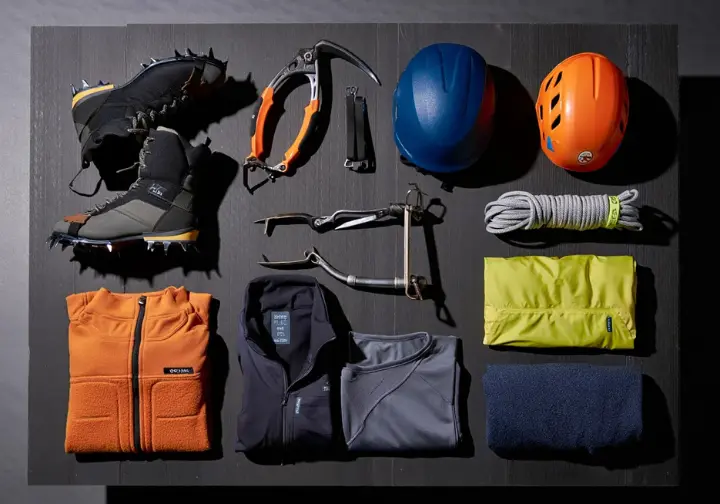
This section provides a detailed breakdown of all the essential ice climbing gear novices need for ice climbing. It covers technical gear, the clothing system, and other safety equipment, with a focus on selection criteria pertinent to beginners and advice on renting versus buying the basic equipment you’ll need to get out on the ice.
Technical Gear: The “Sharp Bits” and Support
Mountaineering boots are fundamental and must be stiff, insulated, and crampon-compatible (automatic or semi-automatic bindings with straps are common). Proper fit is critical to avoid blisters and ensure warmth; consider renting your first pair of technical boots to find what works for you. Double boots or modern single boots with integrated gaiters offer excellent warmth for colder conditions. For ice climbing, beginners will use vertical front-point crampons (either mono or dual points, though dual is common for learning stability) made of steel. They must be compatible with your mountaineering-specific boot—the norm for this activity, fitting snugly and securely; renting is highly recommended initially. Understanding mountaineering boots and crampon compatibility is a key aspect of ice-climbing gear preparation.
Beginners will use a pair of technical ice tools, which are shorter and more curved than general mountaineering ice axes, designed for swinging into and hooking ice. Features to consider include the pick design, shaft (straight or curved), and grip; all-around ice tools like the Petzl Quark are often suggested for novices. Modern ice axes are marvels of engineering. These ice climbing tools are also typically rented for initial outings. Climbing helmets certified by UIAA or CE (EN 12492) are non-negotiable to protect against falling ice and impacts. It should fit comfortably over a beanie or hood; some climbers ensure their helmet is not just a ski helmet but one specifically rated for climbing. Hardshell or shelled foam types are common. A standard rock climbing climbing harness is often sufficient for beginners, especially when top-roping. Ensure your harness fits properly over your layers. For beginner courses, the climbing rope will be provided. It will be a dynamic climbing rope with a dry treatment, essential for preventing water absorption and freezing in cold environments. Single climbing ropes with diameters between 9.0mm and 9.8mm are common for top-roping. An essential ice climbing packing list can be very helpful. For guidance, consider articles on choosing ice axes for beginners. This list usually includes helmets, ropes, harnesses, ice tools, and boots.
Clothing System: Layering for Cold and Wet
Start with moisture-wicking base layers (long underwear) made of synthetic materials (like polypropylene or polyester) or wool. These pull sweat away from your skin to keep you dry and reduce chilling; cotton should be avoided as it retains moisture. Add insulating mid-layers over your base layers. Fleece jackets or vests, light puffy jackets (synthetic or down), or heavier insulated pieces can be used depending on the temperature and your activity level. The goal is to trap body heat efficiently with a solid layering system.
A waterproof and windproof outer shell (hardshell jacket and pants, sometimes ski jackets or ski pants if suitably waterproof and durable) is crucial for protection against wind, snow, and dripping water from melting ice. Look for breathable fabrics (like Gore-Tex or similar) to allow moisture vapor to escape, preventing internal dampness. Some climbers opt for softshell pants for better mobility if conditions are dry. When choosing an outer shell jacket for weather protection, specific features matter. You’ll need multiple pairs of gloves: thinner, more dexterous gloves for climbing and warmer, waterproof, insulated winter gloves (perhaps even ski gloves if they offer enough dexterity and warmth) for belaying, resting, or approaches. Keeping your hands warm and dry is critical for comfort and preventing cold injuries; always have a spare pair of warm gloves. Wear a warm hat or beanie that fits comfortably under your helmet, and a balaclava or neck gaiter for extra face and neck protection. Warm socks, like snowboard socks, made of wool or synthetics are essential; consider layering a thin liner sock with a thicker outer sock, ensuring they don’t constrict circulation in your ski boots-like mountaineering footwear. Gaiters can help keep snow out of your boots and protect your pants from crampon snags. For more information, see guides on layering clothing for ice climbing and how to dress for mountaineering and ice climbing.
Safety and Other Essential Equipment
A 30-40 liter backpack is usually sufficient for carrying extra layers, food, water, and some group gear. Look for one with ice tool attachments and a streamlined design. While your guide will likely manage most of the belaying initially, understanding these is key. Tube-style devices (e.g., ATC, Reverso) or passive assisted-braking devices are common; passive ABDs are often recommended for icy climbing ropes. You’ll also need several locking carabiners, with pear-shaped (HMS) ones often preferred for belaying. You can deepen your knowledge by understanding belay devices for managing the rope and their various types.
Beginners will likely not place ice screws on their first outing, as these are used for lead climbing protection and building anchors on vertical ice. However, you will see your instructors use them; learning about placing ice protection like an ice screw or an ice bollard comes later. Slings/runners (Dyneema or nylon) are also primarily for instructor use in setting up top-ropes. A personal first-aid kit with essentials for blisters and minor injuries is wise. A headlamp with fresh batteries is crucial, as days are short in winter. Bring a thermos with a hot drink and high-energy snacks to stay fueled and warm. Sunscreen, lip balm, and sunglasses/glacier goggles (or glacier glasses) are also important, even on cloudy days due to UV reflection from snow and ice. Alpine Ascents International offers guides on selecting a crampon type and choosing mountaineering boots. Your gear checklist should also include essential avalanche items if venturing into common avalanche zones.
Renting vs. Buying: Advice for Novices
For your first few ice climbing experiences, renting most of the technical gear is highly recommended and cost-effective. This rental gear typically includes mountaineering boots, crampons, ice tools, helmet, and harness. Renting allows you to try different models and understand what features you prefer before committing to a purchase of your own gear. Items you will likely need to own from the start include your clothing layers (base, mid, and potentially outer shell), multiple pairs of quality gloves, warm socks, and appropriate headwear. These are personal items related to hygiene and specific fit for comfort and warmth.
The initial cost of a guided introductory course often includes gear rental, or rental is available at an additional fee from the guide service or local gear shops. This significantly lowers the barrier to entry for trying the sport. When considering whether to rent or buy gear for specialized climbing, the decision process involves several factors. Only consider purchasing technical gear like boots, crampons, and ice tools once you’ve time climbing a few times and are sure you want to pursue the sport more seriously. When you do, seek advice from experienced climbers or reputable retailers. Northwest Alpine Guides has a useful mountaineering boot guide, and Wyoming Mountain Guides provides information on ice climbing gear rental costs.
Foundational Ice Climbing Techniques: Your First Moves

This section introduces the core movements and principles for ascending ice. It covers fundamental ice axe swing and placement (basic ice axe technique), crampon techniques, and basic body positioning to help you move efficiently and securely on various slopes of ice.
Core Principles: Balance and Efficient Movement
Maintaining balance is paramount in ice climbing. This often involves keeping your weight centered over your feet and using your ice tools for stability as much as for upward progress. Good balance minimizes strain on your arms and allows for more precise movements. The concept of “three points of contact” is a useful guideline, especially for beginners: aim to have two feet and one ice tool, or two ice tools and one foot, securely placed before moving the fourth point. This provides a stable base for each movement.
Efficient movement aims to conserve energy, which is crucial in the cold and physically demanding frozen environment of ice climbing. This involves using your stronger leg muscles for upward thrusts, keeping your arms relatively straight when hanging on ice tools (to engage your skeleton rather than just muscles), and making deliberate, thoughtful ice tool placements rather than frantic, exhausting swings. Focus on keeping your hips either close to the ice for stability on lower angles or slightly out to facilitate smooth swings and visibility on steeper slopes or steep ice, as appropriate and as taught by your instructor. Weight should predominantly be on your feet, not your arms. Knowing that training for ice climbing involves building endurance underscores the need for energy conservation. Adventures.is offers a guide to basic ice climbing techniques for beginners. REI also has climbing helmet selection advice which is part of your essential ice climbing gear.
Ice Axe/Tool Usage: Swing and Placement
A proper ice axe swing, a core basic ice axe technique, involves a relaxed grip, utilizing your shoulder and elbow, and a flick of the wrist at the end to drive the pick into the ice. Aim for depressions or existing holes (if good-quality ice) to minimize ice shattering and achieve a secure placement – listen for a solid “thunk”. Avoid over-swinging or hitting the ice excessively hard, which can damage the ice surface or waste energy. When placing your ice tool, look for ice features that might offer a more secure hold, like concavities or slightly softer, more plastic ice. A good placement should feel solid and able to support your weight; test it gently before committing.
To remove an ice tool, lift the handle slightly upwards and outwards, following the path of the pick’s entry, rather than wiggling it side-to-side, which can damage the pick or the placement. A small chip around the pick might be necessary if it’s really stuck. Common beginner mistakes include over-gripping the ice tools (leading to rapid forearm fatigue), hitting the ice too hard or too tentatively, poor aim (striking flat ice or bulges that shatter), and letting elbows flare out, which reduces leverage and stability. Your instructor, potentially a certified ice guide, will help you refine this technique. Using technical ice tools for secure placements is a key skill. While specific video links for “how to swing an ice axe” were placeholders, seeking visual instruction from reputable sources for this ice climbing—the technique is beneficial. GearX.com provides ice climbing harness information if you are looking into specific ice-climbing specific features like an ice clipper loop.
Crampon Usage: Effective Footwork (Front-Pointing)
Front-pointing (also known as the German technique) is the primary crampon technique for climbing vertical ice. It involves kicking your toes straight into the ice, ensuring your front points and secondary points engage securely. Aim for a solid, level platform for your feet. A critical aspect of front-pointing is to “drop your heels” once the points are engaged. This drives the secondary points further into the ice for stability, engages your calf muscles correctly, and helps prevent your feet from popping off the ice. Avoid keeping your heels too high.
Foot placement should be precise. Look where you want to kick, clear away any loose snow or surface ice with a gentle tap if needed, and then make a firm, confident kick. Aim for existing steps if they are solid, but learn to create your own ice steps. Common mistakes include not kicking straight into the ice (leading to glancing blows), heels too high (causing points to shear out), over-kicking (wasting energy and potentially shattering ice), kicking your pants or the other leg, and not fully engaging the front points. Good footwork is the foundation of efficient ice climbing. While about rock climbing shoes, it emphasizes the importance of precise footwork in climbing, a transferable concept. REI explains how to use crampons effectively, and also offers climbing harness basics.
Body Position and Movement: The “A-Frame” Stance
The “A-Frame” or “Triangle” stance is a fundamental body position for stability and efficient movement on ice. It involves having your feet roughly shoulder-width apart or slightly wider, with your ice tools placed above you, forming a stable triangular or A-shaped base with your body. This position allows you to keep your weight on your feet and maintain balance. A common movement sequence is “squat, stand, swing”. From a stable A-frame, you might slightly squat, then stand up by pushing with your legs, creating momentum and reach to swing one ice tool higher. Once that ice tool is securely placed, you move your feet up, then repeat with the other tool.
Sequential movement, where you move one limb at a time while maintaining three points of contact, is key for security and conserving energy. Avoid making multiple moves simultaneously until you are very experienced climber. Common mistakes in body position and movement include relying too much on arms (bending elbows excessively, leading to pump), keeping hips too far from the ice (which can barn-door you off), making jerky or rushed movements instead of smooth, deliberate ones, and not taking opportunities to rest or shake out arms when possible, especially when the climb is sustained. Information on “Will Gadd on good footwork” from trusted sources can be valuable. HowNot2.com also has ice climbing rope information.
Staying Safe: Critical Ice Climbing Safety for Beginners

This section underscores the essential safety considerations for novice ice climbers. It covers understanding objective hazards, preventing cold weather injuries, awareness of self-inflicted risks, and the absolute necessity of professional instruction when tackling ice routes.
Objective Hazards: Falling Ice and More
Falling ice or ice fall is a significant objective hazard in ice climbing. It can be dislodged by your own movements, by climbers above you, or by natural causes like warming temperatures. Always wear your climbing helmet, even at the base of a climb, and try not to climb directly underneath other parties if possible. The importance of wearing a helmet for falling debris cannot be overstated. Avalanche knowledge is crucial if your chosen beginner ice routes are in or near avalanche terrain. While detailed avalanche science is beyond a kickstart, know how to check local avalanche advisories and understand that your guides will be managing this risk; this is basic avalanche knowledge. Carrying avalanche safety gear (beacon, shovel, probe) is essential in such challenging terrain, but beginners will rely on their instructor’s expertise concerning avalanche danger and other avalanche hazards.
Rockfall can also be a hazard, especially on mixed climbs (routes with both ice and rock) or as ice melts and dislodges loose rock. Again, your helmet is your primary protection, and awareness of your surroundings in any climbing area is key. For an ice climbing packing list for safety gear, refer to expert sources. Accessing official avalanche safety information from bodies like Avalanche Canada is also recommended when venturing into relevant terrain. Some climbers may also consider conditions on features like an alpine face where dangerous snow conditions can exist.
Personal Safety: Cold Injuries and Tool Awareness
Preventing cold weather injuries like frostbite and hypothermia is paramount. This involves wearing appropriate layers, keeping dry, eating and drinking regularly, recognizing early symptoms (e.g., numbness, shivering), and communicating any concerns to your instructor immediately, especially when cold—and everyone feels it. Pay special attention to fingers, toes, nose, and ears. “Screaming barfies” refer to the intense, painful throbbing sensation when cold hands rewarm and blood flow returns; while not an injury itself, it’s extremely uncomfortable. Managing hand warmth through proper glove systems and techniques like swinging arms can help minimize this.
Self-inflicted injuries from sharp ice tools and crampons are common for beginners. Be mindful of where your ice tools and crampons are in relation to your body, especially your legs and climbing ropes, to avoid tool strikes or crampon punctures. Secure your ice tools properly when not in use. Always maintain clear communication with your climbing partner and instructor/guide. This includes discussing the plan, understanding commands, and speaking up if you are unsure, uncomfortable, or notice a potential hazard, like hollow-sounding ice or questionable ice. Ensuring proper harness fit and safety is also a component of personal safety equipment. Snow+Rock offers a harness buying guide considerations page for more details. User discussions can sometimes highlight common ice climbing mistakes and injuries, offering peer insights from other ice climbers.
The Critical Role of Professional Instruction
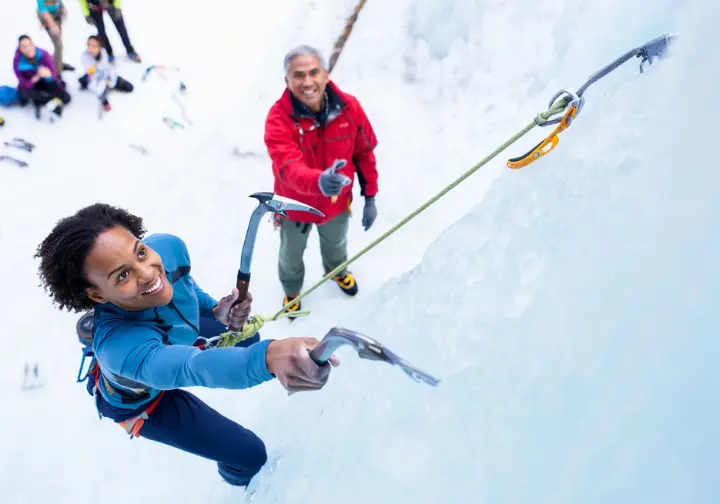
Learning ice climbing from certified ice guides or reputable introductory courses is non-negotiable for beginners. Ice climbing has inherent risks that require expert knowledge to manage, especially concerning gear usage, technique, hazard assessment, and understanding ice conditions—that can change rapidly. Professional instructors will teach you correct techniques from the start, helping you build a solid foundation and avoid developing bad habits that can be hard to break later. They create a controlled learning environment, typically starting with top-roping, where the rope is already anchored above you on basic ice.
Guides are trained to assess and manage hazards in a dynamic environment, making decisions that keep you safe while you focus on learning. They will also teach you about safety systems, such as how top-rope anchors are built and why they are secure. Attempting to learn ice climbing from inexperienced friends or online videos alone can be dangerous and lead to accidents. Invest in quality instruction; organizations like the AMGA (American Mountain Guides Association) or ACMG (Association of Canadian Mountain Guides) certify guides to high standards. Understanding the role of certified instructors in climbing highlights their importance for any climber. MEC emphasizes the value of professional ice climbing courses. You can learn about finding certified mountain guides through organizations like AMGA.
Your Path to Ice Climbing: How to Get Started
This section outlines the practical steps for beginners to start their ice climbing journey. It covers finding introductory courses, the benefits of hiring certified guides, and the utility of controlled environments like ice parks for learning and practice, especially for your first time ice climbing.
Taking an Introductory Course: What to Expect
Introductory ice climbing courses are designed for individuals with little or no prior experience. Look for courses taught by certified guides (e.g., AMGA or ACMG in North America) or accredited climbing schools. A typical beginner course curriculum will cover an overview of essential ice climbing gear (basic equipment like boots, crampons, ice tools, helmet, harness), basic knot tying relevant to being a climber (e.g., figure-eight follow-through), how to belay a climber (though you’ll likely be top-roped initially), fundamental ice axe swing and crampon placement techniques, and basic movement on low-angle ice or low-to-moderate-angle ice.
Most introductory courses focus on top-roping, where the rope is already secured at the top of the climb, minimizing risk and allowing you to focus on movement and technique. Expect to spend a significant portion of the day outdoors, practicing on actual ice. Be prepared for a physically and mentally engaging day. Managing the cold, learning new movements, and trusting your gear are all part of the experience. Listen carefully to your instructors, ask questions, and focus on learning rather than “performing” perfectly on your first day. While about sport climbing, insights on transitioning to outdoor climbing environments can be useful. Golden Mountain Guides outlines what to expect in an intro ice climbing course. GearX.com offers beginner ice climbing tips.
Hiring a Certified Guide: Personalized Learning
Hiring a certified guide offers a highly personalized learning experience tailored to your individual skill level, pace, and goals. This one-on-one or small-group attention can accelerate your learning and build confidence quickly. Certified guides possess extensive training in technical skills, instruction, and safety management in mountain environments. They can choose appropriate terrain for your abilities, from lower-angle ice to more technical ice routes as you progress, and provide immediate feedback to correct and refine your technique.
Guides can also introduce you to local climbing areas, share knowledge about ice conditions and ice route selection, and help you progress beyond the basics if you wish to continue with the sport. Look for guides certified by internationally recognized bodies like the IFMGA, or national organizations such as AMGA (American Mountain Guides Association) or ACMG (Association of Canadian Mountain Guides) to ensure a high standard of professionalism and expertise. When selecting reputable guide services for mountain activities, certification is a key factor. The AMGA provides AMGA Alpine Guide program details. Girth Hitch Guiding discusses the benefits of hiring a climbing guide.
Ice Parks and Controlled Environments: Practice Makes Perfect
Ice parks, such as the Ouray Ice Park in Colorado or various smaller man-made venues (sometimes called an indoor ice facility, though most are outdoors), offer exceptionally accessible and controlled environments for learning and practicing ice climbing. These parks often feature a high concentration of ice routes, including consistent ice routes of varying difficulty, specifically “farmed” (created by spraying water down a gorge or on structures) for climbing. The predictable nature of ice in these parks (though still variable) and easier access make them ideal for focusing on technique without the added complexities of backcountry ice travel or hazard assessment that natural ice routes might involve. Many guide services use ice parks for introductory courses. Some locations might even offer a free ice tool demo day during an ice festival.
Practicing in such locations, especially through top-roping under experienced supervision, allows beginners to get many “miles” on the ice, refining their swings, footwork, and movement patterns efficiently. Some regions also have ice climbing festivals which can be great opportunities for clinics, gear demos, and connecting with the climbing community in a supportive atmosphere where ice awaits. Learning about ice climbing in Ouray, Colorado, a premier ice park offers a specific example of how good climbing on awesome ice can be fostered. Mountain-Guiding.com provides details about the Ouray Ice Park. OutdoorGearLab offers advice on choosing climbing ropes for ice.
Respecting the Ice: Environmental Considerations and Etiquette
This section emphasizes responsible practices in ice climbing environments. It covers the Leave No Trace principles as they apply to ice climbing and specific crag etiquette to ensure the sustainability of climbing areas and positive interactions with other ice climbers.
Leave No Trace (LNT) for Ice Climbers
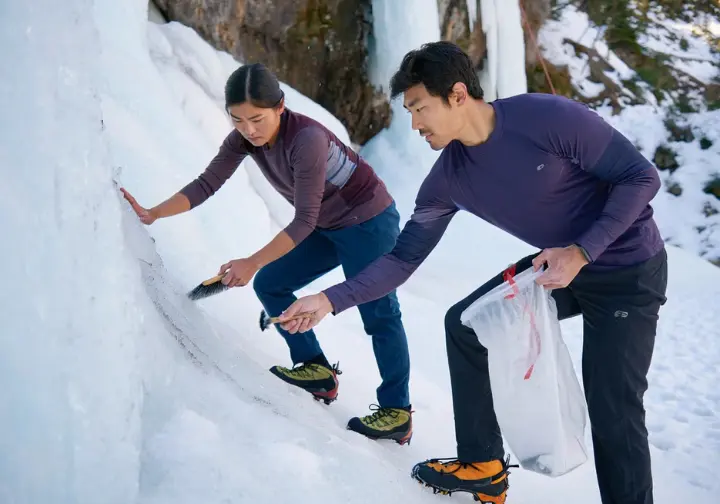
Plan Ahead and Prepare: This involves knowing the climbing area, regulations, weather forecast, and ice conditions before you go. Ensure you have the right gear and skills for your objective, and consider carpooling to minimize parking congestion. Travel and Camp on Durable Surfaces: Stick to established trails during approaches to minimize impact on vegetation, especially in fragile alpine environments. At the base of ice climbs, try to stay on snow, ice, or rock surfaces rather than trampling vegetation. Dispose of Waste Properly: Pack out everything you pack in, including all trash, food scraps, and human waste (use WAG bags or other appropriate methods for cold environments if toilets aren’t available). Even small bits of litter like tape or cord can accumulate.
Leave What You Find (and Minimize Alterations): Avoid unnecessarily damaging the ice or rock. While climbing naturally alters ice, try not to excessively “chop” or “mine” for holds when ice isn‘t ideal. Minimize the use of fixed gear; if you build V-threads for rappelling, use natural-colored cord and consider removing it if it’s easily accessible and safe to do so (local ethics vary). Be Considerate of Other Visitors: Keep noise levels down to respect the natural sounds and other climbers. Avoid climbing directly below other parties where icefall is a risk. Be patient and communicate if ice routes are busy, and be open to sharing routes if appropriate. Understanding Leave No Trace principles in climbing is fundamental. The Leave No Trace Center for Outdoor Ethics provides specific ice climbing etiquette guidelines and outlines the seven Leave No Trace principles.
Specific Ice Crag Etiquette
“Be Nice to the Ice”: Avoid climbing on thin, poorly formed, or delicate ice features that can be easily destroyed, especially early in the season or during warm spells when ice forms might be weak or it’s unstable ice. Such damage can ruin accessible climbs for others or prevent them from forming properly later. Managing Crowds and Routes: Popular ice climbing areas can get crowded. Have backup plans if your intended ice route is busy. If top-roping, be efficient and don’t monopolize a route for an excessive amount of time if others are waiting. Communicate with other parties to coordinate.
Noise and Communication: Maintain awareness of your noise levels. Clear communication between climber and belayer is essential for safety, but avoid excessive shouting that disturbs others or the natural ambiance. Dry Tooling and Mixed Climbing: Understand local ethics regarding dry tooling (using ice tools and crampons on rock). Some areas restrict or ban dry tooling to preserve rock quality or the character of pure ice climbs. If mixed climbing, be extra cautious about dislodging loose rock onto ice below or other climbers. Parking and Access: Respect all parking regulations and private property. Carpool whenever possible to reduce congestion at often-limited trailhead parking. Be mindful of access sensitivities; some areas rely on climber good behavior to remain open. Adherence to local ethics and park regulations in climbing areas is always important. Wyoming Mountain Guides discusses Leave No Trace in climbing practices. REI also covers climbing ethics and LNT.
Key Takeaways for Your Ice Climbing Kickstart
This conclusion recaps the essential points for anyone looking to start ice climbing, reinforcing the importance of safety, proper gear, foundational climbing techniques, and the path to learning how to climb ice.
Ice climbing is an accessible and rewarding sport when approached with respect for its inherent risks; prioritize professional instruction from certified guides to learn foundational skills and safety protocols correctly from day one. Essential ice climbing gear, including appropriate mountaineering boots, crampons, ice tools, helmet, harness, and a proper layering system for warmth and dryness, is crucial for safety and comfort. Renting technical gear is a smart way for beginners to start. Many seasoned climbers still recall their initial gear choices.
Mastering basic techniques like the ice axe swing, front-pointing with crampons (keeping heels down!), and maintaining a balanced “A-Frame” stance are the building blocks for efficient and secure movement on ice. Focus on using your feet and legs. Always be aware of objective hazards like falling ice and subjective hazards like cold exposure and ice tool strikes. Adhere to Leave No Trace principles and local crag etiquette to protect climbing environments and ensure a positive experience for everyone. Your first ice climbing experience should be about learning, managing the cold, being patient with yourself, and enjoying the unique frozen environment under the guidance of an instructor. This kickstart guide aims to prepare you for that exciting first step onto a frozen cascade or huge ice walls.
Frequently Asked Questions about Getting Started in Ice Climbing
How physically fit do I need to be to try ice climbing for the first time? >
Can I use my rock climbing harness and helmet for ice climbing as a beginner? >
What are the most common mistakes beginners make in ice climbing? >
How much does it typically cost to try ice climbing for the first time? >
We are a participant in the Amazon Services LLC Associates Program, an affiliate advertising program designed to provide a means for sites to earn advertising fees by advertising and linking to Amazon.com. As an Amazon Associate I earn from qualifying purchases. We also participate in other affiliate programs. The information provided on this website is provided for entertainment purposes only. We make no representations or warranties of any kind, expressed or implied, about the completeness, accuracy, adequacy, legality, usefulness, reliability, suitability, or availability of the information, or about anything else. Any reliance you place on the information is therefore strictly at your own risk. Additional terms are found in the terms of service.


