

In this article
- The Technique Deep Dive: Understanding Dynos, Heel Hooks, and Toe Hooks
- Strategic Application: When and Why to Use Advanced Moves
- Skill Development & Training: Building Your Advanced Toolkit
- Safety & Injury Management: Climbing Smarter and Longer
- Gear Considerations: The Right Shoes for the Job
- Conclusion: Integrating Advanced Movements for Bouldering Mastery
- Frequently Asked Questions about Advanced Bouldering Movements
For climbers aiming to advance, specific movements like dynos, heel hooks, and toe hooks often represent the next significant hurdle. These advanced bouldering techniques, while sometimes appearing complex, are learnable skills that open up a new world of bouldering possibilities. This guide is dedicated to demystifying these advanced maneuvers, offering a thorough exploration. Our commitment is to support dedicated climbers in their skill development journey. Dive in to gain a deeper understanding of advanced bouldering movements: dynos, heel hooks, and toe hooks explained and unlock your potential on the wall.
Mastering dynos, heel hooks, and toe hooks is indeed pivotal for climbers looking to progress to higher bouldering grades and successfully navigate complex boulder problems. These techniques provide solutions that static or more basic movements might not offer. We recognize that these advanced climbing techniques can often seem intimidating. Therefore, this article focuses on providing clear, in-depth explanations to build your confidence and understanding. To ensure a full picture, we will detail the fundamental mechanics of each move, explore their strategic application on the wall, discuss effective training methods, and cover important safety protocols. This structured approach will break down each technique comprehensively. Ultimately, this aligns with our mission to be a thorough resource, cultivating deeper understanding and skill development for climbers at all levels.
The Technique Deep Dive: Understanding Dynos, Heel Hooks, and Toe Hooks

Now, let’s explore the ‘what’ and ‘how’ of these three foundational bouldering movements. We will look into the basic mechanics, exact body positioning, the muscle groups you’ll engage, and some common variations you might encounter or employ for each climbing technique.
Dynos: Mastering Explosive Dynamic Movement
A dyno is a dynamic move where the climber leaps, becoming entirely airborne for a moment. This separates it from less committed dynamic moves such as ‘slaps’ or ‘jumps’. This technique is often key to understanding boulder problems that feature large gaps between holds on a boulder or climbing wall. As an external resource on rock climbing terminology definitions notes, a dyno can be described as a lunge or leap to the next hold. Learning how to dyno effectively involves understanding these phases.
Successful dynos involve three distinct phases. The Setup includes selecting holds, sinking the body for momentum, and focusing on the target. Next is the Launch, a coordinated, explosive drive from legs and arms, timed for the ‘deadpoint’—the apex of upward motion. Finally, the Latch phase involves securing the target hold, absorbing impact, and controlling any resulting swing. Remember to release your hands from the starting holds as late as you can manage.
Power for dynos comes from a combined effort of leg drive and arm pull. Hip movements frequently add significant force to generate momentum. Pinpoint coordination and timing are fundamental to hitting the deadpoint accurately, which allows for the best possible latch on the target hold.
Dynos come in several forms. Single-hand dynos demand very precise contact with the target. Double-hand dynos can be more forgiving on less positive holds and help manage swings. Paddle dynos are more subtle, often involving sideways or swatting dynamic reaches to make contact. For a deeper look at these movements, consider resources on bouldering dynamic movement explained.
Heel Hooks: Leveraging Power and Precision
A heel hook involves a climber using their heel on a hold. This heel hooking engages strong leg muscles like hamstrings and glutes to pull the body upwards, keep balance, reduce arm strain, or initiate movement. This technique, a form of essential climbing footwork, is highly valuable for saving energy and managing difficult body positions on the wall. Understanding how heel hooks work is key.
The main muscles at work in a heel hook are the hamstrings, particularly the biceps femoris, and the gluteal muscles. Your core also plays a part, providing stability and helping transmit force. Understanding how to go about activating leg muscles for climbing is part of mastering this heel hook climbing technique. If you feel your hip muscles working, it’s a good indicator of solid engagement for a secure heel hook.
Good body positioning and posture are very important for heel hooks. Keeping your hips close to the wall is often beneficial. The position of your knee and your non-hooking foot also matters a lot for stability and power. A key detail: pointing the toes of the hooking foot downwards greatly increases how secure the heel hook feels. The design of your footwear also contributes to secure hooking with climbing shoes.
Place your heel precisely, often using the outside edge of the shoe. Actively pull with your leg muscles to create tension; don’t just rest the heel passively. Some climbers achieve a better hook by first turning their foot outwards slightly before tucking the heel onto the hold. You can learn more about climbing heel hook benefits from various resources, including those discussing basic heel hooks.
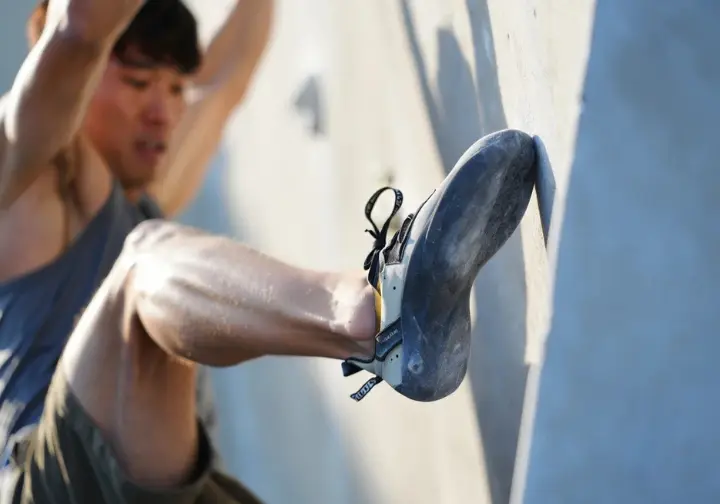
Toe Hooks: The Art of Tension and Stability
A toe hook uses the upper part of your toes, or the top of your climbing shoe, against a hold or surface. This toe hook technique improves balance, offers another point to pull from, and is especially useful for keeping your body near the wall, an aspect well-covered when discussing toe hooking on overhangs. This prevents swinging, particularly on steep overhangs and roofs, common features in a climbing gym or outdoors.
The mechanics behind a toe hook involve substantial work from your shin muscles, mainly the tibialis anterior. This muscle helps dorsiflex your ankle (pull your foot upwards) and keep pressure on the hold. Your core muscles are also engaged to sustain overall body tension during the move.
For best results with this hooking technique, position your ‘alpha leg‘—the one doing the toe hook—so there’s roughly a 90-degree angle between the top of your foot and your lower leg. Your other leg, the ‘beta leg,’ helps with balance and pushing. It is very important to keep the toe-hooking leg stiff and unyielding throughout the move.
Apply your toe hook with intent. Keep steady tension by actively pulling with your shin muscle, and then release the hook smoothly and with control. Common variations include the double toe hook, using both feet, the heel-toe cam for opposing pressure, and ‘clamping’ which is often applied on roof sections, demonstrating creative ways of using different climbing holds effectively. Many resources delve into expert toe hooking techniques for those looking to refine these skills.
Strategic Application: When and Why to Use Advanced Moves

Understanding the mechanics is one part; knowing when and why to employ these advanced moves is another. This section examines their contextual use on varied climbing terrain, different hold types, and diverse boulder problem styles. We will also touch upon comparative choices, like deciding between a dynamic leap and a static reach when facing a boulder.
Identifying Opportunities: Dynos, Heels, and Toes on the Wall
A dyno often becomes the go-to or only choice when holds are too distant for a static reach. It can also be an efficient way to bypass several exhausting static moves. Target holds for dynos are typically larger features like jugs or big slopers, and they commonly appear in boulder problems with dynamic crux sequences or significant gaps between holds. These are common on many boulders.
Heel hooks are incredibly versatile. They are frequently used on overhangs, roofs, traverses, and for mantels to ease arm load, enhance stability, increase reach, or act as an anchor. With good climbing technique, you can apply heel hooks to a wide array of holds, including slopers, crimps, edges, volumes, and arêtes; a better understanding of using climbing holds types can help here, especially on steep boulders.
Toe hooks are most often seen on overhangs and roofs, where they help stop body swing and lessen arm fatigue. They are also handy on arêtes to prevent the body from swinging outwards (barn-dooring), on slopers to create an upward pull on otherwise poor holds, and for keeping tension during lateral movements. Undercuts, flakes, spikes, and volumes can all be suitable places for a toe hook.
Learning to ‘read’ boulder problems effectively is key to spotting chances to use these advanced bouldering techniques, which are well detailed in guides about rock climbing advanced techniques. This skill, similar to reading sport routes for strategic moves, expands your problem-solving toolkit, or ‘beta’. It also involves knowing when a dyno or hooking technique is truly needed, versus when focusing on fundamental climbing technique might be more productive for that specific boulder problem.
Active Engagement and Broader Movement Concepts
For both heel and toe hooks, the idea of ‘active engagement’ over ‘passive reliance’ is very important. Simply placing your foot isn’t enough; you need to actively create and hold body tension using the correct muscles for the hook to be secure and effective. This ongoing active control makes a significant difference to your climbing.
There are broader movement ideas that apply to all three techniques. One such idea is grasping the ‘direction of pull’ on any hold to get the most grip from it—essentially, understanding how to use climbing holds effectively. Resources on climbing training movement concepts often expand on this. This concept applies to every hold you use while performing these advanced maneuvers, not just the target hold.
Creating ‘momentum from the hips’ is another key concept. While obviously important for dynos, hip-generated momentum can also help initiate hooks efficiently or make transitions between holds smoother. Learning to control this movement enhances your strategic options on the wall.
When you become proficient in these techniques, your climbing efficiency and energy conservation can improve substantially. A well-executed dyno might bypass several hard moves, while good hooks reduce arm strain from arm muscles. This ability to save energy is a primary advantage of mastering these skills. Overall, understanding active engagement and these wider movement principles is a large part of improving bouldering through technique refinement.
Skill Development & Training: Building Your Advanced Toolkit

To effectively add these advanced moves to your climbing, focused skill development and training are needed. This section outlines what you’ll need beforehand, specific exercises and drills, general conditioning, and useful tips for mastering dynos, heel hooks, and toe hooks.
Essential Prerequisites for Advanced Moves
Solid core strength is a must for these techniques. It allows you to maintain body tension, transfer power effectively, and control your movements, particularly on steep terrain. For those looking to improve this area, focusing on developing core strength for bouldering is a great start, as this foundational strength is repeatedly highlighted as a precursor for all advanced bouldering movements.
Good flexibility and mobility are also very important, especially in your hips, hamstrings, and ankles, underscoring the importance of mobility for climbers. These qualities enable you to achieve the best body positions for hooks and execute the explosive actions needed for dynos. Adequate range of motion contributes to both the effectiveness of the move and helps in preventing injuries to joints like knees and ankles. Even some yoga can aid overall flexibility.
You’ll also need well-developed coordination and body awareness, sometimes called kinesthetic sense or proprioception. These skills allow for exact control over your body’s position and movement as you move through complex, three-dimensional sequences. This awareness is fundamental for timing and carrying out complex moves successfully.
Before tackling these advanced skills, ensure you have a firm grasp of basic climbing movement, including competent footwork, balance, and weight transfer. This includes essential climbing footwork. Additionally, having enough finger and grip strength is a requirement to support these more demanding techniques. These prerequisites are part of overall advanced bouldering skills development.
Targeted Training for Dynos
Campus board training is often recommended for building upper body power and the contact strength needed to successfully latch dyno targets. For those interested in using campus boards for dyno training, they are effective because they specifically train explosive power, a key component of dynamic movement. This is a specific workout for dynos.
Practice by starting with small jumps. Gradually make these dynamic movements longer and more challenging to build coordination and confidence over time. This step-by-step approach is important for learning new skills safely and effectively on the climbing wall.
Plyometric exercises like jump squats or box jumps should be part of your training. Information on plyometrics for climbing power can offer more ideas. These workouts help build the explosive leg power that you’ll rely on for launching effectively into dynos.
For successful dynos, climbers need to work on several physical attributes. These include overall power development, finely tuned coordination, and robust core strength. Effective training advanced climbing techniques will often cover these areas.
Targeted Training for Heel Hooks
To build the necessary posterior chain strength for heel hooks, incorporate exercises like hamstring curls, single and double leg glute bridges, single-leg deadlifts, and Romanian Deadlifts (RDLs). These directly work the hamstrings and glutes, which are key leg muscles for heel hooking.
Flexibility and mobility work are also very important. Specifically, the Pigeon Pose can improve hip mobility, while targeted stretches for hip flexors and hamstrings are beneficial. Having enough mobility is important for effective positioning and preventing injuries when heel hooking; limited flexibility can be a real hindrance. For more on this, seeking out information on heel hook hamstring injury information can be enlightening. A good flexor stretch increases range of motion.
A good practice strategy involves deliberately using heel hooks on easier climbs or on holds where they aren’t strictly required. This helps build muscle memory and refines your heel hook technique. This is a common tip in guides on advanced climbing footwork techniques. Practicing basic heel hooks this way helps.
During practice, concentrate on feeling the power come from your leg and hip muscles, rather than relying mostly on arm strength. This active engagement from the lower body is a large part of mastering the heel hook, and complements overall strength exercises for powerful heel hooks. Some home heel specific exercises can also target these areas. A thorough heel engagement is the goal.
Targeted Training for Toe Hooks
Specific shin strengthening exercises can be very helpful. One drill involves hanging from a bar by your toes (with hand support if needed) for short periods, like 3-4 sets of 6-10 seconds. This directly targets the tibialis anterior, the main shin muscle used in toe hooking.
A useful practice method is to actively search for and attempt toe hooks on a bouldering wall, particularly on roof sections. Try to find and hold as many as you can to build practical skill. This type of climbing specific muscle training helps develop the necessary strength and refine your toe hook technique.
Once you lock into a toe hook position, get a feel for the body tension required. Then, experiment with different hand movements and various positions for your other foot to understand its application in different scenarios. This helps in combining advanced climbing techniques effectively and adapting to different wall angles.
Make an effort to look for toe hook possibilities that might not be in your direct line of sight, such as around the side of boulders or on less obvious features, to maximize your opportunities for using this move. Some home exercises for toe hook strength can also be integrated into your routine.
Safety & Injury Management: Climbing Smarter and Longer
Advanced bouldering movements come with inherent risks. This section covers common injuries, prevention strategies, proper warm-up routines, and basic rehabilitation awareness associated with these techniques. Addressing the physical demands and potential issues proactively is part of climbing smarter.
General Safety for Advanced Bouldering Moves
Always ensure adequate crash pad coverage and correct placement. This is especially true when practicing dynamic moves like dynos or committing to hooks where falls are likely. Pay attention to the landing zone and your surroundings as well, whether in a gym or outdoors.
A thorough warm-up routine before attempting these demanding techniques is non-negotiable. It prepares your muscles and joints, thereby lowering injury risk. This should include some general cardio and dynamic, climbing-specific stretches (like active stretches) to align with bouldering training safety guidelines. The importance of warm-up routines for injury prevention cannot be overstated for a successful climbing session.
Learn techniques for controlling swings after dynos or if a hook unexpectedly releases. This helps prevent collisions with the wall or awkward landings, minimizing impact and potential injury. These controlled movements are key.
Consider having a spotter when learning or pushing your limits with these moves, especially for dynos. A spotter can help manage falls and protect your head and neck. While not always the primary safety system in bouldering, for high-consequence moves, it adds a valuable layer of protection. You can find extensive climbing injury research for further reading.
Preventing Heel Hook Injuries: Hamstrings and Knees
One of the main risks with heel hooking is a hamstring strain or tear, particularly of the biceps femoris muscle. The forceful contraction involved in a powerful heel hook can lead to this type of injury to the leg.
Knee injuries are also a concern. These can include strains or tears of the Posterior Cruciate Ligament (PCL) due to the rotational forces and backward pull on the tibia during aggressive heel hooking. It has been noted that knee injuries in climbing have reportedly seen an increase, which is a topic covered by resources discussing knee injuries from heel hooks. Protecting your joints is paramount.
Prevention strategies include thorough warm-ups, consistent strengthening of hamstrings, glutes, and core muscles, and developing proper heel hook technique to avoid placing undue stress on your joints. If possible, try to avoid falling while the heel hook is still engaged. Understanding climbing biomechanics research can also provide insights.
Ensuring you have good hip and hamstring mobility and flexibility is another key preventive step. Tightness in these areas can make these structures more prone to injury during forceful engagement. This highlights the importance of understanding climbing injury prevention. Incorporating key stretches like a hip flexor stretch increases safety.
Toe Hook Safety and Considerations
While perhaps less emphasized for acute injuries compared to heel hooks in some discussions, proper toe hook technique is still important to avoid strains or awkward falls when toe hooking. Incorrect engagement or unexpected slips can lead to minor issues. When judging boulder problem quality, route setters often consider the safety of such moves.
Strengthening your shin muscles, especially the tibialis anterior, is a direct preventive measure against strains. It also improves your ability to maintain secure toe hooks, making the hook more reliable.
Ensuring a good climbing shoe fit and having appropriate, sticky rubber on the toe box can also prevent slips that might lead to awkward falls or strains of the foot, ankle, or leg. This relates to climbing shoe fit for toe hook safety.
Be mindful of overuse, particularly when you first start incorporating many toe hooks into your climbing, as the shin muscles might not be accustomed to the load, potentially leading to soreness or minor strains. Gradual progress is always a sensible approach. You can find many climbing training resources online to guide this progression.
Gear Considerations: The Right Shoes for the Job
The features of your climbing shoes can significantly aid in the effective and safe execution of dynos, heel hooks, and toe hooks. This section examines those specific shoe characteristics.
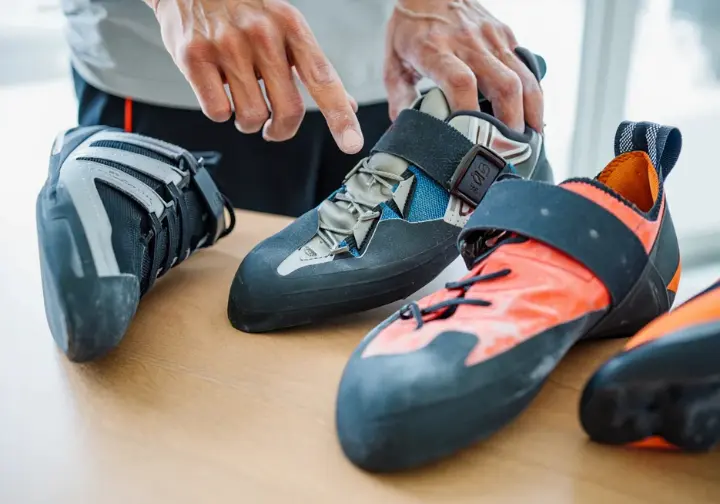
Climbing Shoe Features for Advanced Techniques
For secure heel hooks, climbing shoes with well-designed heel cups that have sticky rubber covering a significant portion are very beneficial. The actual shape and sensitivity of the heel also contribute to performance. Having the right heels on your shoes makes a difference.
Extensive rubber coverage on the top of the toe box, often called a “toe patch,” greatly enhances the effectiveness and grip of toe hooks. This patch allows for better friction and pulling power when engaging a toe hook with your toes.
Aggressively downturned shoes can be advantageous for certain techniques like “clamping” on steep terrain, as they help maintain toe pressure and keep the foot in a powerful position. However, one should balance this with comfort if wearing them for extended periods. The benefits are often discussed when looking at aggressive climbing shoe benefits.
While not specific to a single move, the overall fit, sensitivity, and type of rubber (e.g., softer for smearing, harder for an edge) influence the precision and confidence needed for all advanced maneuvers. A good understanding of how climbing shoes should fit for advanced moves is part of choosing climbing shoes for performance.
Conclusion: Integrating Advanced Movements for Bouldering Mastery
This guide has explored dynos, heel hooks, and toe hooks, from their mechanics to their application. Mastering these advanced bouldering movements involves dedicated practice and an understanding of how they can unlock new levels of bouldering performance and help send harder boulder problems.
Dynos, heel hooks, and toe hooks are complex yet learnable skills that are very helpful for bouldering progress. They offer unique ways to solve challenging boulder problems on the wall. To truly master them requires an understanding of their biomechanics, strategic application in different situations (like on a low-angle wall or using an outside edge with your left leg), dedicated training regimens, and a consistent focus on safety and injury prevention. Even simple stretching contributes to good body posture for difficult climbs.
Technical precision, especially the concept of “active engagement” for hooks, is very important. Equally so is strategic awareness in reading routes and choosing the right move for the situation. We encourage climbers to engage in mindful, deliberate practice. Focus on the technique, the underlying physical attributes needed (like strong muscles and overall flexibility), and the “feel” of the movements to speed up learning and refinement for these hooking techniques and dynamic moves. Deep stretching and controlled movements during workouts can aid this.
Our commitment is to support climbers in their ongoing journey of learning and improvement. We hope this detailed look helps you integrate these powerful tools, allowing you to climb with greater confidence, efficiency, and success on your projects, whether in the climbing gym or on outdoor boulders, even when tackling tricky positions.
Frequently Asked Questions about Advanced Bouldering Movements
What are the biggest mistakes beginners make when learning dynos? >
My heel hooks feel weak or insecure. What am I likely doing wrong? >
How important is specific shoe rubber for toe hooks, and what should I look for? >
Are there any “golden rules” for deciding when to use an advanced move versus a static one? >
We are a participant in the Amazon Services LLC Associates Program, an affiliate advertising program designed to provide a means for sites to earn advertising fees by advertising and linking to Amazon.com. As an Amazon Associate I earn from qualifying purchases. We also participate in other affiliate programs. The information provided on this website is provided for entertainment purposes only. We make no representations or warranties of any kind, expressed or implied, about the completeness, accuracy, adequacy, legality, usefulness, reliability, suitability, or availability of the information, or about anything else. Any reliance you place on the information is therefore strictly at your own risk. Additional terms are found in the terms of service.


